
If you’re looking to use a hypervisor for analysis and reverse engineering tasks, check out HyperDbg Debugger. It’s a hypervisor-based debugger designed specifically for analyzing, fuzzing, and reversing applications. A free and comprehensive tutorial on hypervisor-based reverse engineering is available at OpenSecurityTraining2’s website (preferred) and YouTube, which demonstrates numerous practical examples on how to utilize hypervisors for reverse engineering.
Introduction
It’s the second part of a multiple series of a tutorial called “Hypervisor From Scratch”. First, please consider reading the first part (Basic Concepts & Configure Testing Environment) before reading this part, as it contains the essential knowledge you need to know in order to understand the rest of this tutorial. In this part, we’ll talk about WDK drivers and finally start enabling VT-x.
Table of Contents
- Introduction
- Table of Contents
- Overview
- IRP Major Functions
- What is an IRP?
- Configuring IRP Major Functions
- IRP Major Functions List
- Loading Driver and Checking Device
- Viewing Debugging Messages In DbgView
- Detecting Hypervisor Support
- Setting CR4 VMXE Bit
- Conclusion
- References
Overview
In this section, we will learn about Detecting Hypervisor Support for our processor, then we simply config the basic operations to Enable VMX, Entering VMX Operation, and we will learn more about Window Driver Kit (WDK).
The source code of this tutorial is available at :
[https://github.com/SinaKarvandi/Hypervisor-From-Scratch/]
IRP Major Functions
Besides our kernel-mode driver (“MyHypervisorDriver”), we’ll create a user-mode application called “MyHypervisorApp”. First of all, I should encourage you to write most of the codes (whenever it’s possible) in user-mode rather than the kernel-mode, and that’s because you might not have handled exceptions properly. Hence, it leads to BSODs, or on the other hand, running less code in kernel-mode reduces the possibility of putting some nasty kernel-mode bugs.
If you remember from the previous part, we created a Windows driver. Now we want to extend our project to support more IRP Major functions.
IRP Major Functions are located in a conventional Windows table created for every device. Once we register a device in Windows, we have to introduce a handler for these IRP Major Functions.
That’s like every device has a table of Major Functions. Whenever a user-mode application calls any of these functions, Windows finds the corresponding function (if the device driver supports that MJ Function), then passes an IRP to the kernel driver.
What is an IRP?
So, what is an IRP? IRP is a structure that represents an I/O Request Packet. This packet contains many details about its caller, parameters, state of the packet, etc. We extract the caller parameters from the IRP packet.
Now, we can handle the user-mode request in the kernel based on the details provided by IRP.
Remember, when our functions in the kernel driver receive the IRP packet, it’s the responsibility of our code to investigate the caller and check its privileges, etc.
Configuring IRP Major Functions
After registering a device (explained in the previous part), we need to introduce the Major Functions of our device.
The following code is responsible for configuring different IRP MJ Functions and introducing custom kernel-mode functions as the IRP handlers.
1
2
3
4
5
6
7
8
9
10
11
12
13
14
15
16
17
18
19
20
21
22
23
    if (NtStatus == STATUS_SUCCESS)
    {
        for (Index = 0; Index < IRP_MJ_MAXIMUM_FUNCTION; Index++)
        {
            DriverObject->MajorFunction[Index] = DrvUnsupported;
        }

        DbgPrint("[*] Setting Devices major functions.");
        DriverObject->MajorFunction[IRP_MJ_CLOSE]          = DrvClose;
        DriverObject->MajorFunction[IRP_MJ_CREATE]         = DrvCreate;
        DriverObject->MajorFunction[IRP_MJ_DEVICE_CONTROL] = DrvIoctlDispatcher;

        DriverObject->MajorFunction[IRP_MJ_READ]  = DrvRead;
        DriverObject->MajorFunction[IRP_MJ_WRITE] = DrvWrite;

        DriverObject->DriverUnload = DrvUnload;

        IoCreateSymbolicLink(&DosDeviceName, &DriverName);
    }
    else
    {
        DbgPrint("[*] There were some errors in creating device.");
    }
You can see that we used “DrvUnsupported” for all functions. This function handles all MJ Functions and tells the user that it’s not supported.
The main body of “DrvUnsupported” is like this:
1
2
3
4
5
6
7
8
9
10
11
NTSTATUS
DrvUnsupported(IN PDEVICE_OBJECT DeviceObject, IN PIRP Irp)
{
    DbgPrint("[*] This function is not supported :( !");

    Irp->IoStatus.Status      = STATUS_SUCCESS;
    Irp->IoStatus.Information = 0;
    IoCompleteRequest(Irp, IO_NO_INCREMENT);

    return STATUS_SUCCESS;
}
We also introduce other Major Functions that are essential for our device. We’ll complete the implementation of some of these MJ Functions in the future parts.
1
2
3
4
5
6
7
8
9
10
11
12
13
14
15
16
17
18
19
20
21
22
23
24
25
26
27
28
29
30
31
32
33
34
35
NTSTATUS
DrvRead(IN PDEVICE_OBJECT DeviceObject, IN PIRP Irp)
{
    DbgPrint("[*] Not implemented yet :( !");

    Irp->IoStatus.Status      = STATUS_SUCCESS;
    Irp->IoStatus.Information = 0;
    IoCompleteRequest(Irp, IO_NO_INCREMENT);

    return STATUS_SUCCESS;
}

NTSTATUS
DrvWrite(IN PDEVICE_OBJECT DeviceObject, IN PIRP Irp)
{
    DbgPrint("[*] Not implemented yet :( !");

    Irp->IoStatus.Status      = STATUS_SUCCESS;
    Irp->IoStatus.Information = 0;
    IoCompleteRequest(Irp, IO_NO_INCREMENT);

    return STATUS_SUCCESS;
}

NTSTATUS
DrvClose(IN PDEVICE_OBJECT DeviceObject, IN PIRP Irp)
{
    DbgPrint("[*] Not implemented yet :( !");

    Irp->IoStatus.Status      = STATUS_SUCCESS;
    Irp->IoStatus.Information = 0;
    IoCompleteRequest(Irp, IO_NO_INCREMENT);

    return STATUS_SUCCESS;
}
Now let’s see the IRP MJ Functions list and other types of Windows Driver Kit handlers routine.

IRP Major Functions List
We can use this list of IRP Major Functions to perform different operations in a WDK driver.
1
2
3
4
5
6
7
8
9
10
11
12
13
14
15
16
17
18
19
20
21
22
23
24
25
26
27
28
29
30
#define IRP_MJ_CREATE                   0x00
#define IRP_MJ_CREATE_NAMED_PIPE        0x01
#define IRP_MJ_CLOSE                    0x02
#define IRP_MJ_READ                     0x03
#define IRP_MJ_WRITE                    0x04
#define IRP_MJ_QUERY_INFORMATION        0x05
#define IRP_MJ_SET_INFORMATION          0x06
#define IRP_MJ_QUERY_EA                 0x07
#define IRP_MJ_SET_EA                   0x08
#define IRP_MJ_FLUSH_BUFFERS            0x09
#define IRP_MJ_QUERY_VOLUME_INFORMATION 0x0a
#define IRP_MJ_SET_VOLUME_INFORMATION   0x0b
#define IRP_MJ_DIRECTORY_CONTROL        0x0c
#define IRP_MJ_FILE_SYSTEM_CONTROL      0x0d
#define IRP_MJ_DEVICE_CONTROL           0x0e
#define IRP_MJ_INTERNAL_DEVICE_CONTROL  0x0f
#define IRP_MJ_SHUTDOWN                 0x10
#define IRP_MJ_LOCK_CONTROL             0x11
#define IRP_MJ_CLEANUP                  0x12
#define IRP_MJ_CREATE_MAILSLOT          0x13
#define IRP_MJ_QUERY_SECURITY           0x14
#define IRP_MJ_SET_SECURITY             0x15
#define IRP_MJ_POWER                    0x16
#define IRP_MJ_SYSTEM_CONTROL           0x17
#define IRP_MJ_DEVICE_CHANGE            0x18
#define IRP_MJ_QUERY_QUOTA              0x19
#define IRP_MJ_SET_QUOTA                0x1a
#define IRP_MJ_PNP                      0x1b
#define IRP_MJ_PNP_POWER                IRP_MJ_PNP // Obsolete....
#define IRP_MJ_MAXIMUM_FUNCTION         0x1b
Every major function will only trigger if we call its corresponding function from the user-mode. For instance, there is a function (in user-mode) called CreateFile (And all its variants like CreateFileA and CreateFileW for ASCII and Unicode), so every time we call CreateFile, the function that registered as IRP_MJ_CREATE will be called, if we call ReadFile then IRP_MJ_READ, or WriteFile then IRP_MJ_WRITE will be triggered.
You can see that Windows treats its devices like files, and everything we need to pass from user-mode to kernel-mode is available in an argument with the IRP * type and available as a buffer to the kernel IRP MJ Function handlers. Windows is responsible for copying the user-mode buffer to the kernel mode stack.
Don’t worry; we use it frequently in the rest of the project, but we only support IRP_MJ_CREATE in this part and left others unimplemented for future parts.
There are other terms called “IRP Minor Functions”. We left these functionalities as they’re not used in this series.
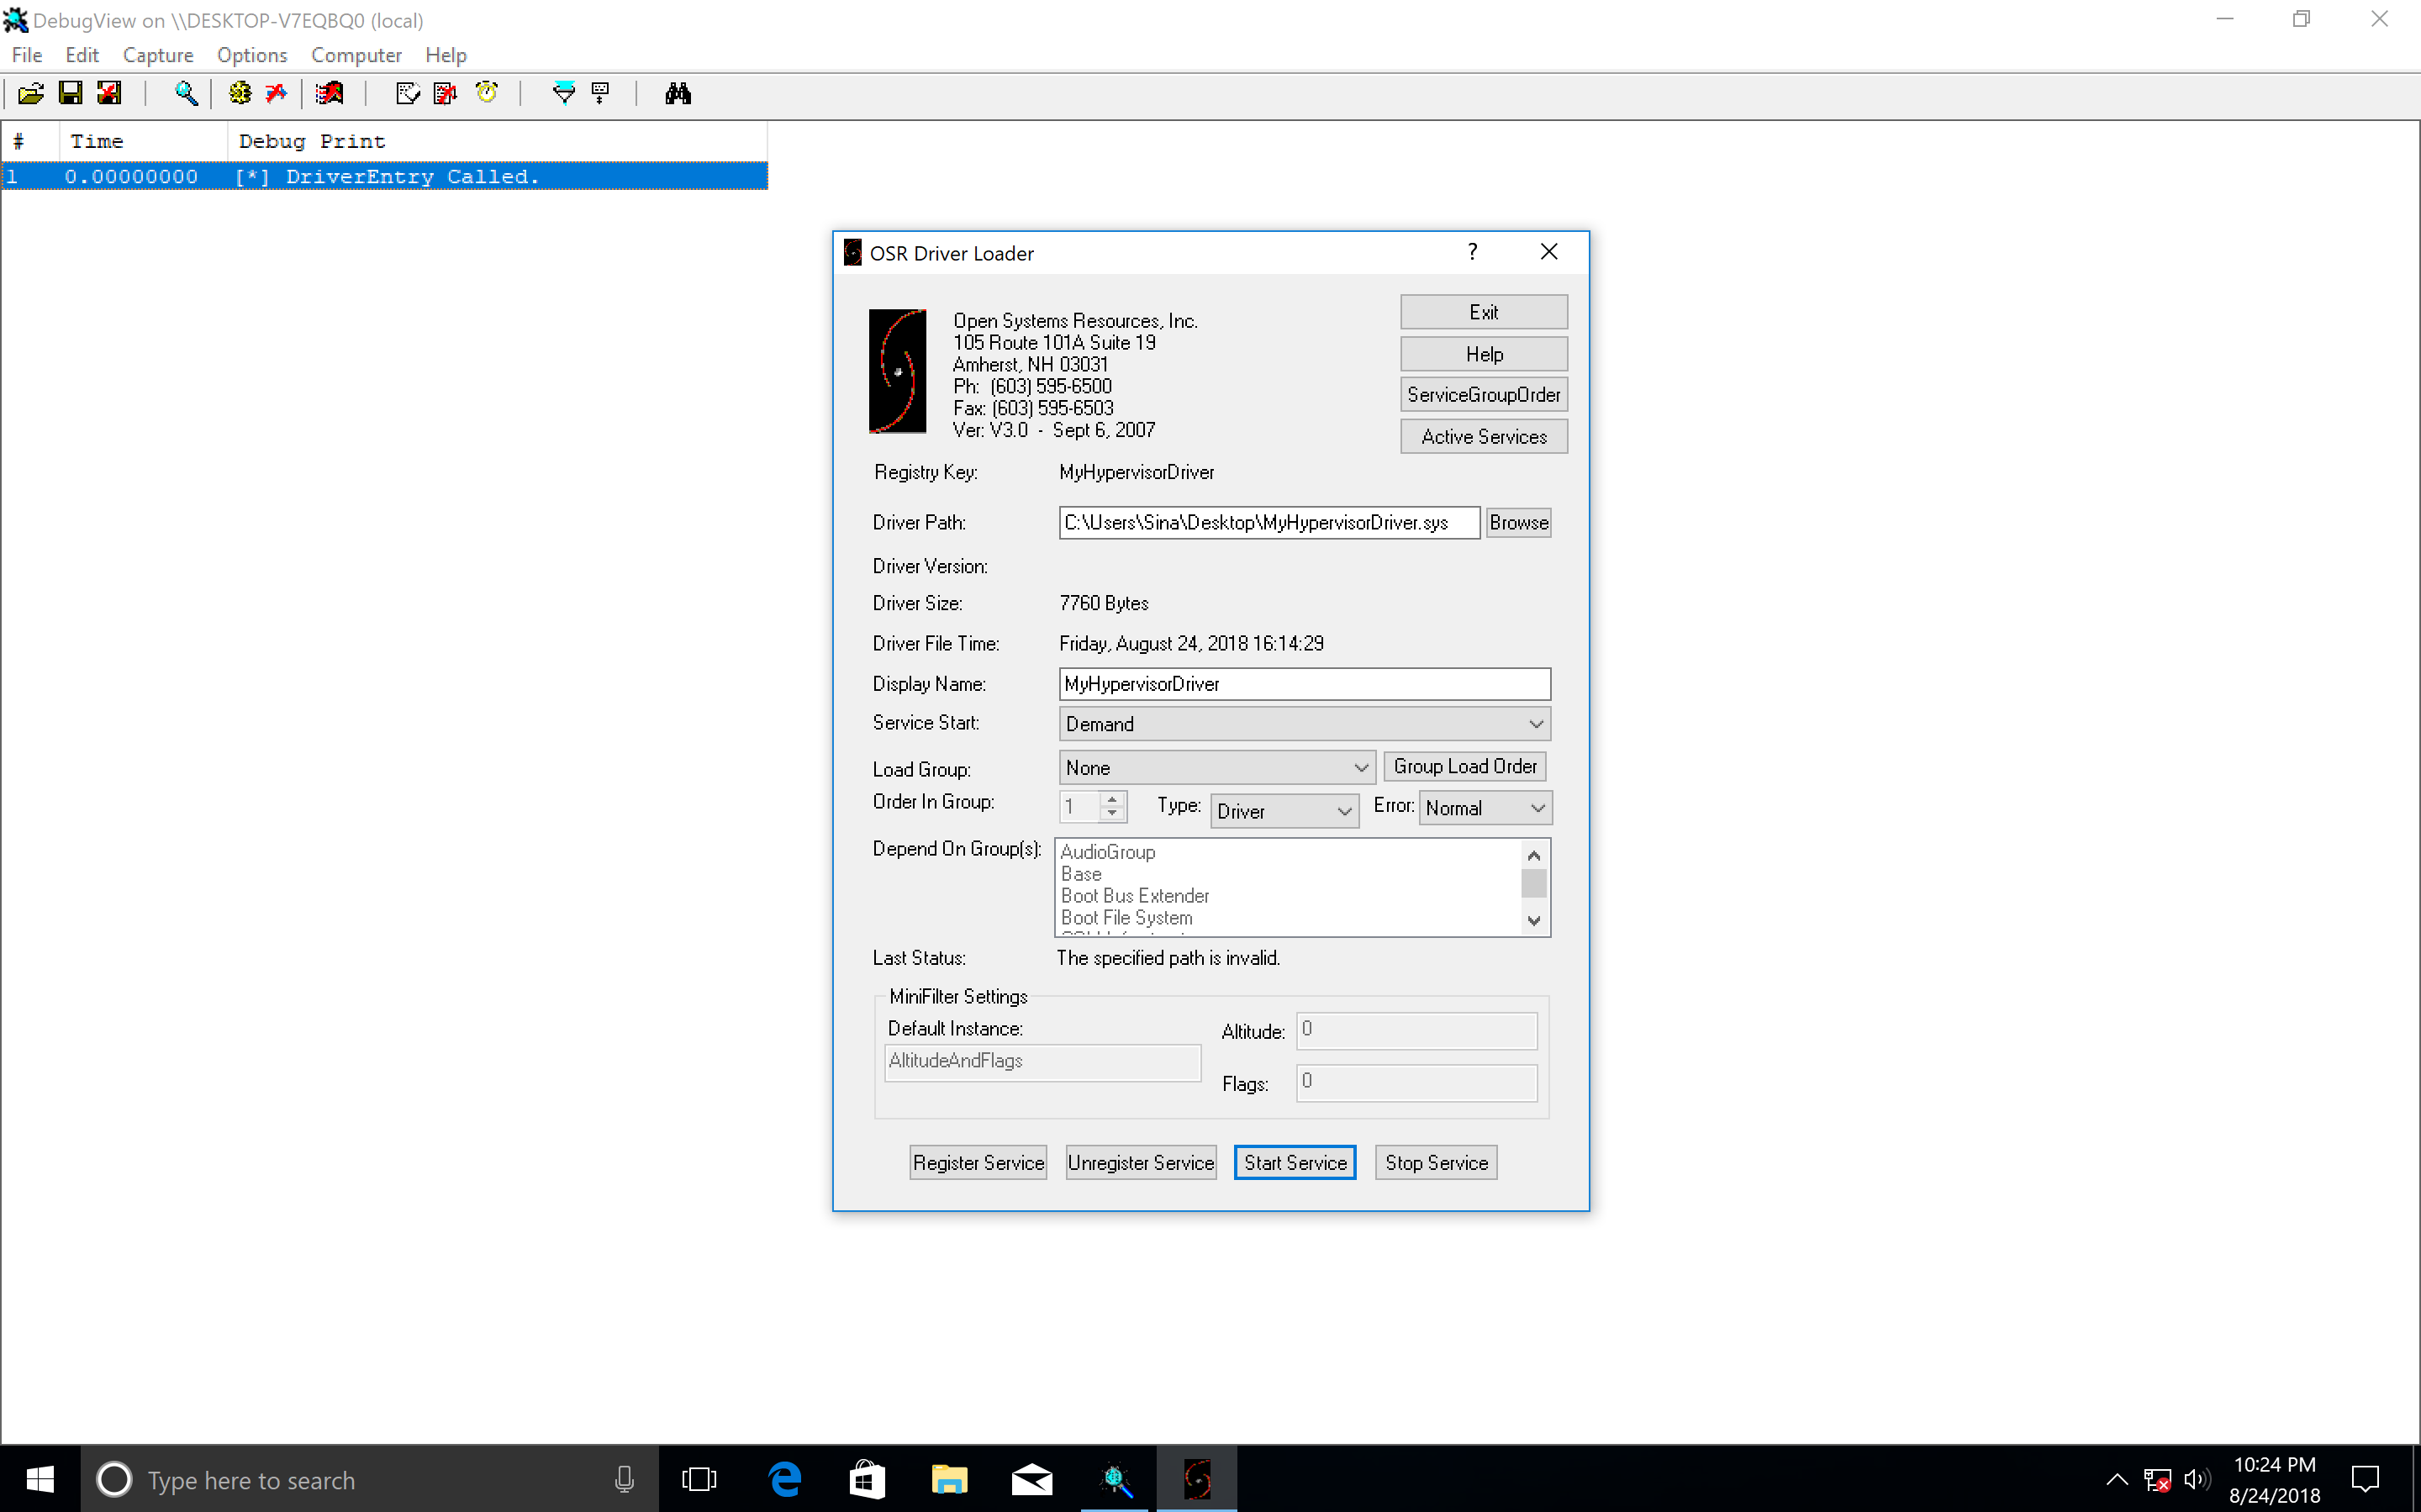
Loading Driver and Checking Device
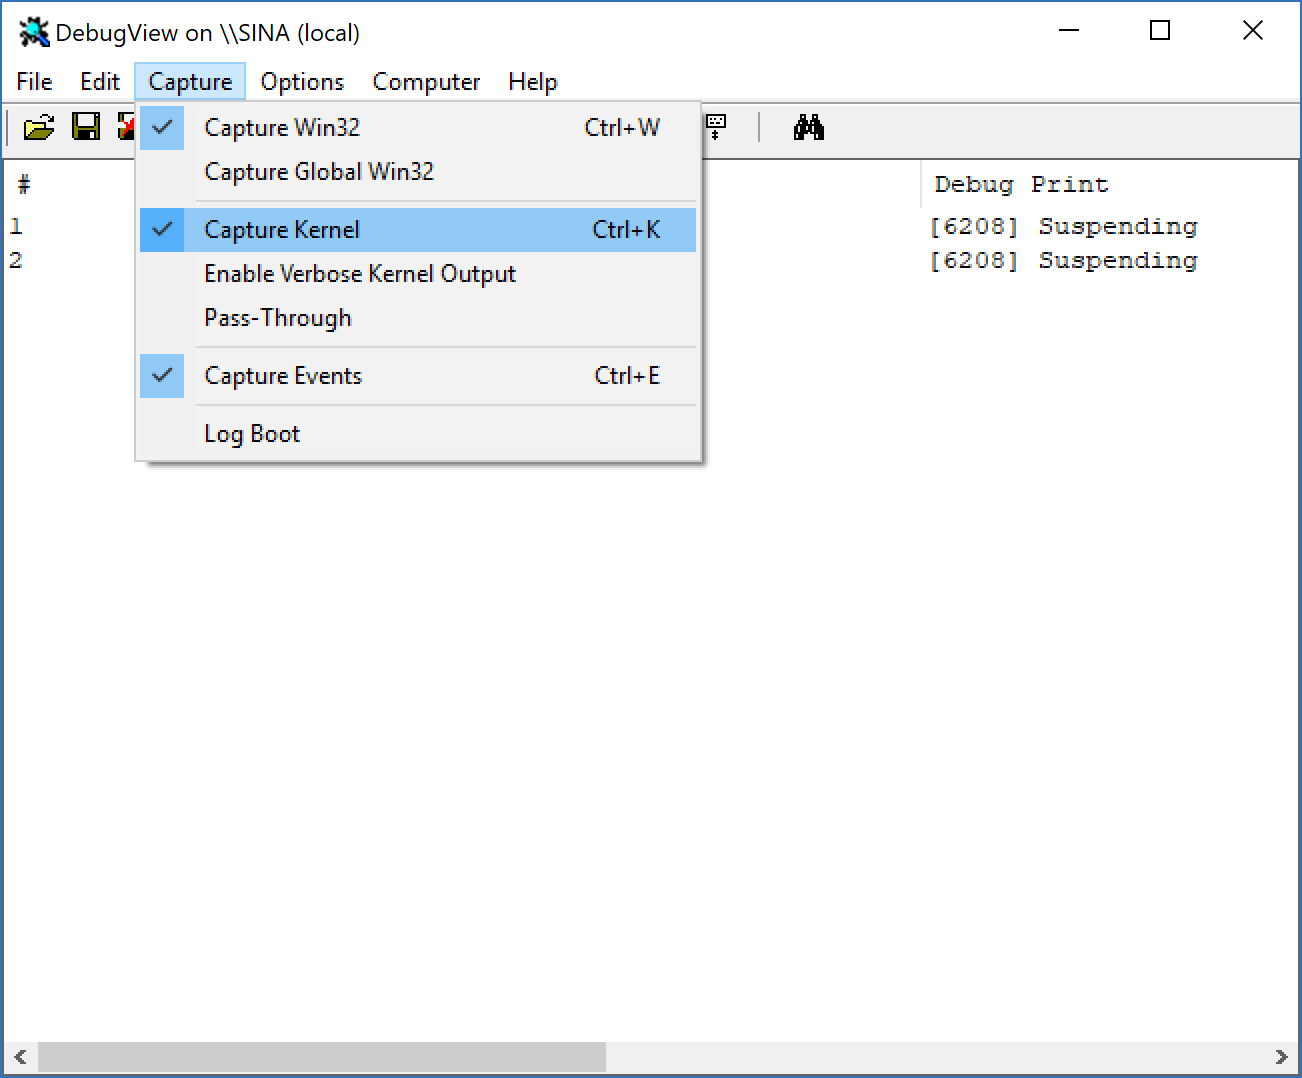
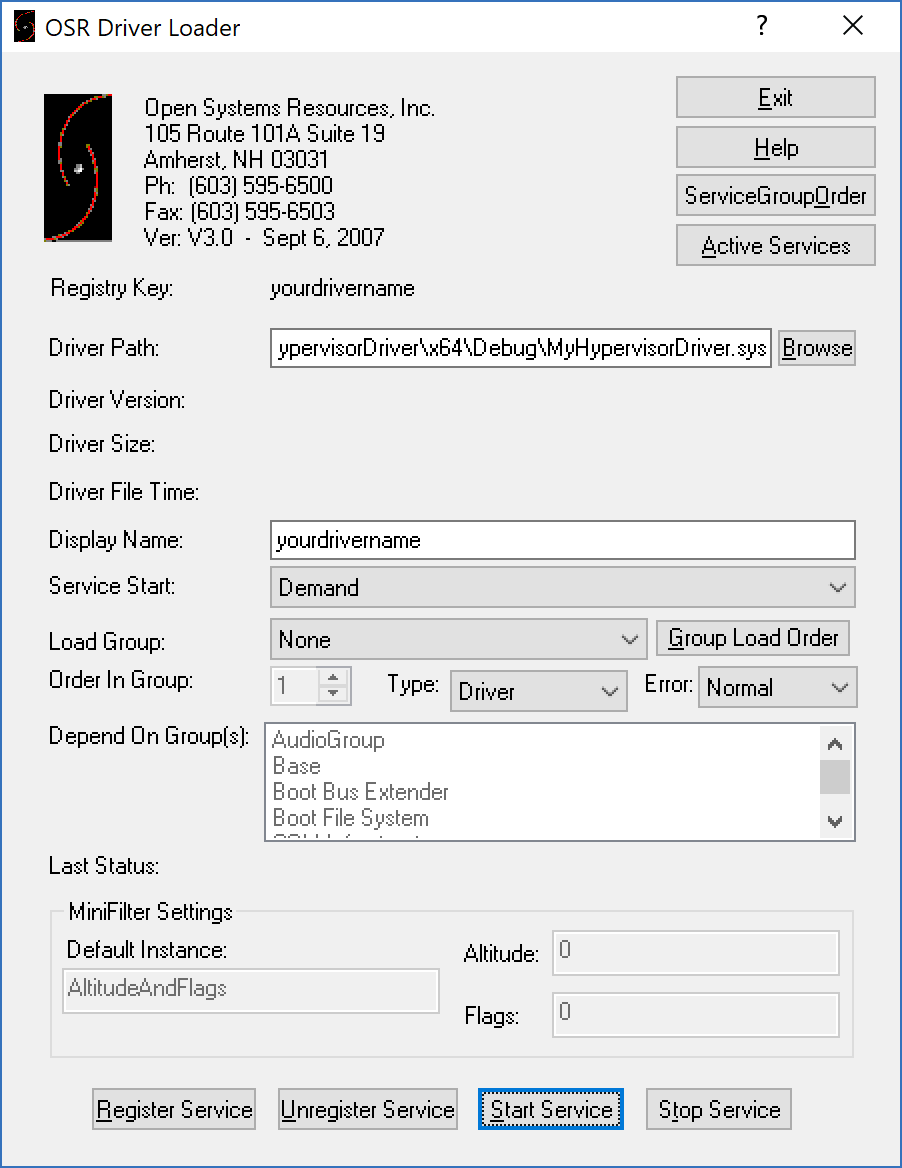
In order to load our driver (MyHypervisorDriver), first, download OSR Driver Loader, then run Sysinternals DbgView as administrator. Ensure that your DbgView captures the kernel (you can check by going to Capture -> Capture Kernel).
After that open the OSR Driver Loader (go to OsrLoader -> kit-> WNET -> AMD64 -> FRE) and open OSRLOADER.exe. Now, if you build your driver, find the .sys file (in MyHypervisorDriver\x64\Debug\ should be a file named: “MyHypervisorDriver.sys”), in OSR Driver Loader, click to browse and select (MyHypervisorDriver.sys) and then click to “Register Service” after that, you see a message box that shows your driver registered successfully, you should click on “Start Service”.
Please note that you should have WDK installed for your Visual Studio in order to be able to build your project.
Now come back to the DbgView, you should see that your driver loaded successfully, and a message “[*] DriverEntry Called.” should appear.
If there is no problem, then you’re good to go. Otherwise, you can check the next step if you have a problem with DbgView.
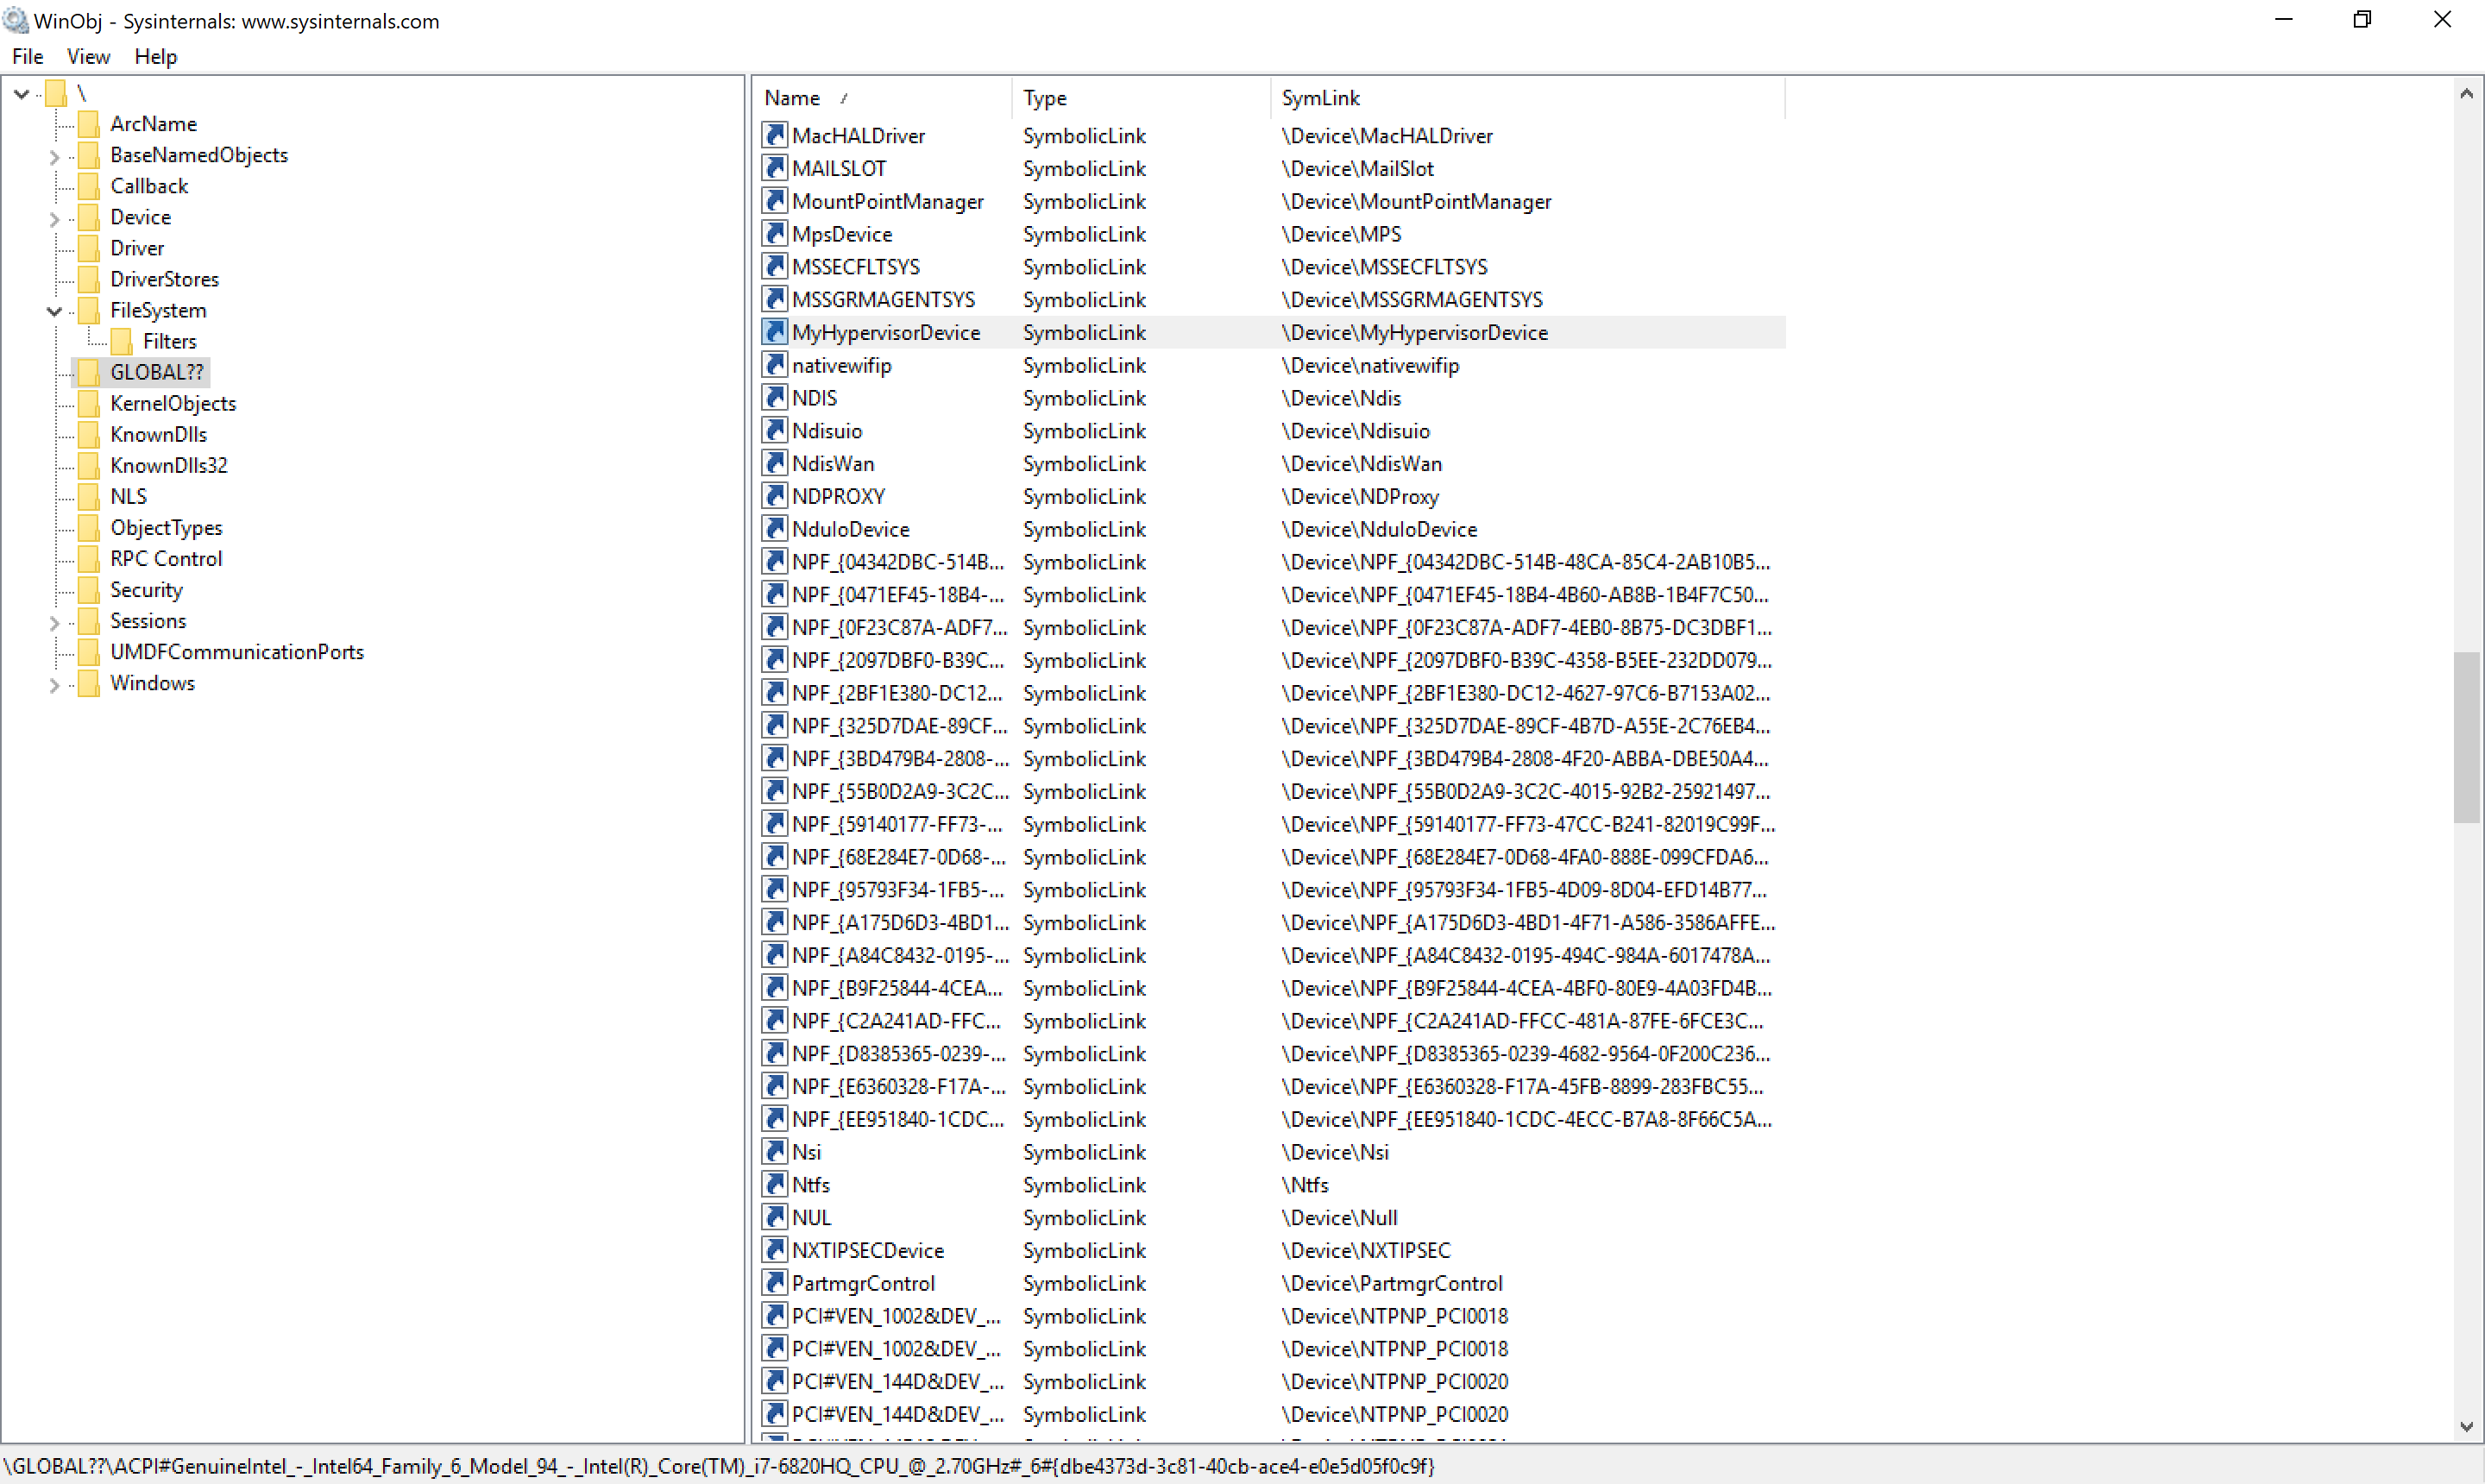
Keep in mind that now we have registered our driver, so we can use SysInternals WinObj to see whether “MyHypervisorDevice” is available or not.
Viewing Debugging Messages In DbgView
Unfortunately, for some unknown reason, I’m unable to view the result of DbgPrint(). If you can see the result, then you can skip this step but if you have a problem, perform the following steps:
As I mentioned in part 1:
Save the following content as dbgview.reg.
1
2
3
4
Windows Registry Editor Version 5.00

[HKEY_LOCAL_MACHINE\SYSTEM\CurrentControlSet\Control\Session Manager\Debug Print Filter]
"DEFAULT"=dword:0000000f
Double-click on dbgview.reg. Reboot the machine, and it’s good to go.
This method should solve the problem, but if the problem still persists, we have another option. For this purpose, we can use WinDbg to find a Windows Kernel global variable called nt!Kd\_DEFAULT\_Mask. This variable is responsible for showing the results in DbgView. It has a mask that I’m not aware of, so I just put a 0xffffffff into it to simply make it show everything!
To do this, you need a Windows Kernel Debugging using WinDbg. In WinDbg, you can run the following command:
1
kd> eb nt!kd_Default_Mask ff ff ff ff
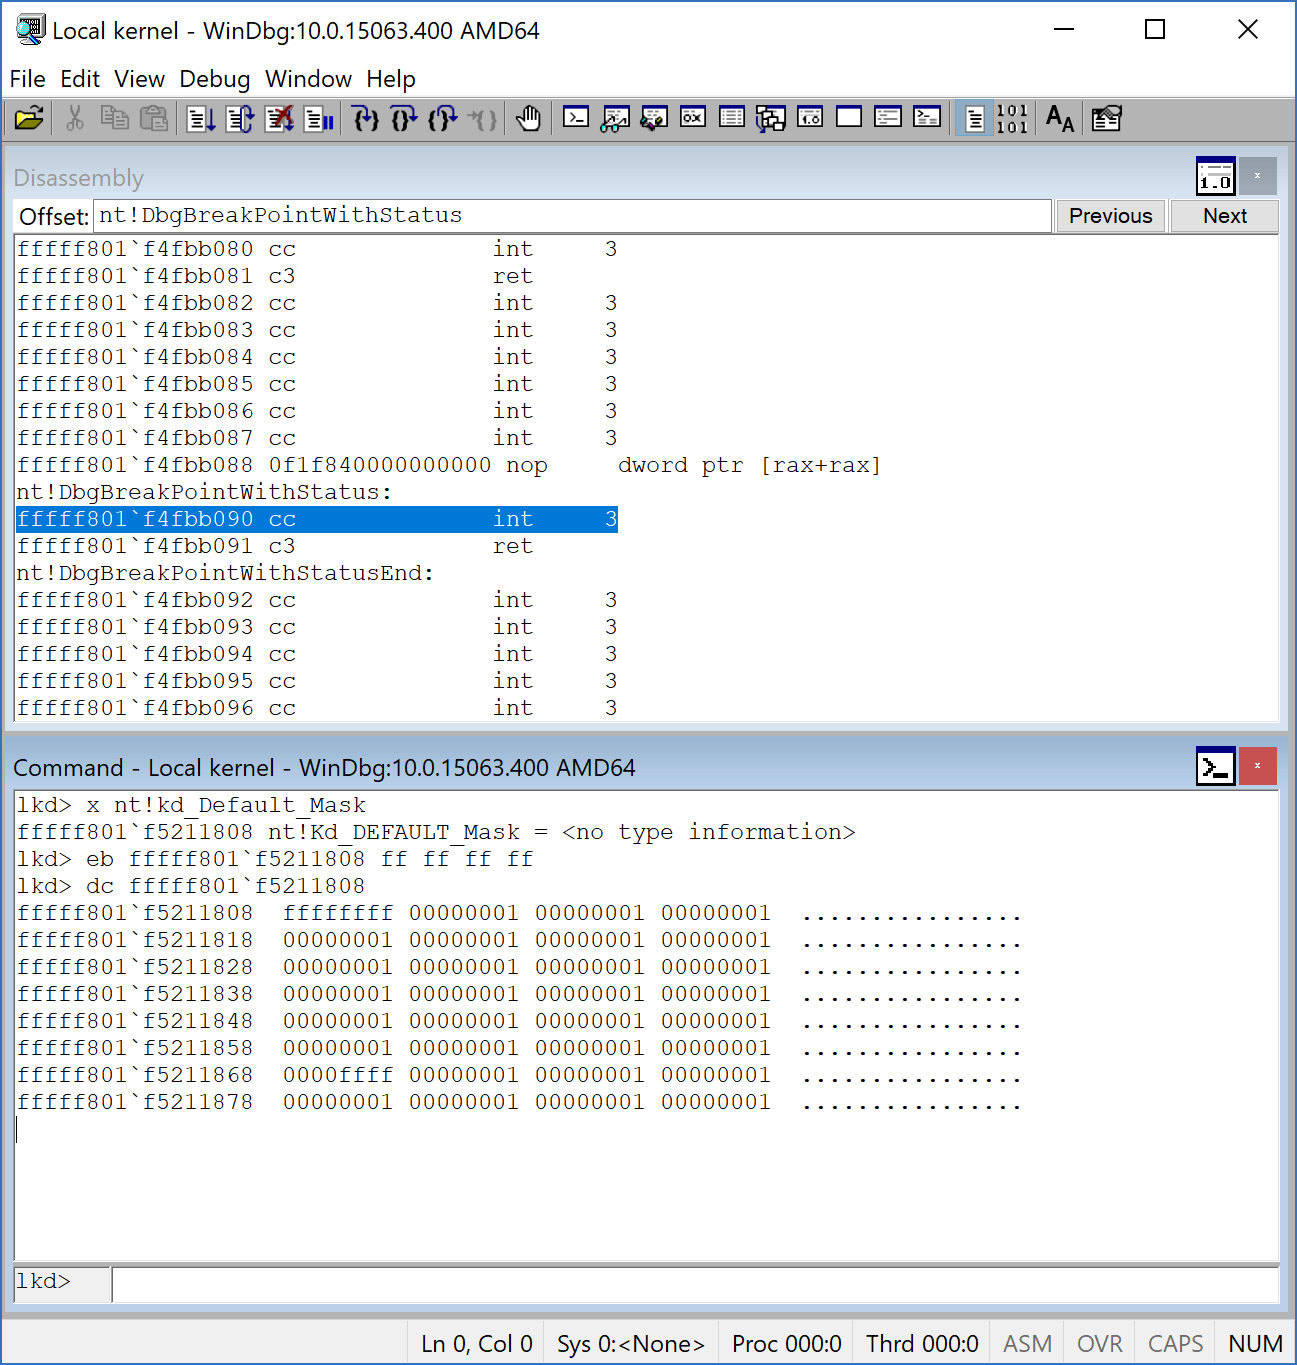
After that, we should see the results and everything we’ll be ready for the next step.
Remember, this is an essential step for the rest of the topic because if we can’t see any kernel messages, sure, we can’t debug it too.
Detecting Hypervisor Support
Discovering support for VMX is the first thing we should consider before enabling VT-x. This is covered in Intel Software Developer’s Manual volume 3C section 23.6 DISCOVERING SUPPORT FOR VMX.
You could know the presence of VMX using CPUID if CPUID.1:ECX.VMX[bit 5] = 1, then VMX operation is supported.
First, we need to know whether or not we’re running on an Intel-based processor. We can understand this using the CPUID instruction and finding the vendor string “GenuineIntel”.
The following function returns the vendor string by using the CPUID instruction.
1
2
3
4
5
6
7
8
9
10
11
12
13
14
15
16
17
18
19
20
21
22
23
24
25
26
27
28
29
30
31
32
33
34
35
36
37
38
std::string
GetCpuID()
{
    // Initialize used variables
    char   SysType[13]; // Array consisting of 13 single bytes/characters
    string CpuID;       // The string that will be used to add all the characters to
                        // Starting coding in assembly language
    _asm
        {
            // Execute CPUID with EAX = 0 to get the CPU producer
		XOR EAX, EAX
		CPUID
                    // MOV EBX to EAX and get the characters one by one by using shift out right bitwise operation.
		MOV EAX, EBX
		MOV SysType[0], AL
		MOV SysType[1], AH
		SHR EAX, 16
		MOV SysType[2], AL
		MOV SysType[3], AH
                // Get the second part the same way but these values are stored in EDX
		MOV EAX, EDX
		MOV SysType[4], AL
		MOV SysType[5], AH
		SHR EAX, 16
		MOV SysType[6], AL
		MOV SysType[7], AH
                // Get the third part
		MOV EAX, ECX
		MOV SysType[8], AL
		MOV SysType[9], AH
		SHR EAX, 16
		MOV SysType[10], AL
		MOV SysType[11], AH
		MOV SysType[12], 00
        }
    CpuID.assign(SysType, 12);
    return CpuID;
}
The last step is checking for the presence of VMX. We can check it using the following code :
1
2
3
4
5
6
7
8
9
10
11
12
13
14
15
16
17
18
19
20
bool
DetectVmxSupport()
{
    bool VMX = false;
    __asm {
		XOR    EAX, EAX
		INC    EAX
		CPUID
		BT     ECX, 0x5
		JC     VMXSupport
		VMXNotSupport :
		JMP     NopInstr
		VMXSupport :
		MOV    VMX, 0x1
		NopInstr :
		NOP
    }

    return VMX;
}
As you can see, it checks CPUID with EAX=1, and if the 5th (6th) bit is one, then the VMX Operation is supported. We can also perform the same thing in Kernel Driver.
All in all, our main code to detect the support for VMX should be something like this:
1
2
3
4
5
6
7
8
9
10
11
12
13
14
15
16
17
18
19
20
21
22
23
24
25
26
27
28
29
30
31
32
33
34
35
36
37
38
39
40
41
42
43
44
45
int
main()
{
    std::string CpuId;

    PrintAppearance();

    CpuId = GetCpuID();

    printf("[*] The CPU Vendor is : %s \n", CpuID.c_str());

    if (CpuId == "GenuineIntel")
    {
        printf("[*] The Processor virtualization technology is VT-x. \n");
    }
    else
    {
        printf("[*] This program is not designed to run in a non-VT-x environment !\n");
        return 1;
    }

    if (DetectVmxSupport())
    {
        printf("[*] VMX Operation is supported by your processor .\n");
    }
    else
    {
        printf("[*] VMX Operation is not supported by your processor .\n");
        return 1;
    }

    HANDLE hWnd = CreateFile(L"\\\\.\\MyHypervisorDevice",
                             GENERIC_READ | GENERIC_WRITE,
                             FILE_SHARE_READ |
                                 FILE_SHARE_WRITE,
                             NULL, /// lpSecurityAttirbutes
                             OPEN_EXISTING,
                             FILE_ATTRIBUTE_NORMAL |
                                 FILE_FLAG_OVERLAPPED,
                             NULL); /// lpTemplateFile

    _getch();

    return 0;
}
The final result:
Enabling VMX Operation
If the processor supports the VMX Operation, it’s time to enable it. As I told you above, IRP_MJ_CREATE is the first function that should be used to start the operation.
Before entering the VMX operation, we should enable VMX by setting CR4.VMXE[bit 13] = 1. VMX operation is then entered by executing the VMXON instruction. VMXON causes an invalid-opcode exception (#UD) if executed with CR4.VMXE = 0. Once in VMX operation, it is not possible to clear CR4.VMXE.
After that, we can leave the VMX operation by executing the VMXOFF instruction and, this time, CR4.VMXE can be cleared.
VMXON is also controlled by the IA32_FEATURE_CONTROL MSR (MSR address 3AH). This MSR is cleared to zero when a logical processor is reset.
Let’s look at the first bit of this MSR:
- Bit 0 is the lock bit. If this bit is clear, VMXON causes a general-protection (#GP) exception. If the lock bit is set, WRMSR to this MSR causes a general-protection exception; the MSR cannot be modified until a power-up reset.
What does it mean? It means that we can disable the VMX feature without the ability to be enabled again. Only after a system reset, we can enable the VMX.
System BIOS can use this bit to provide a setup option for BIOS to disable support for VMX. To enable VMX support in a platform, BIOS must set bit 1, bit 2, or both, as well as the lock bit.
Setting CR4 VMXE Bit
Do you remember the previous part where I told you how to create an inline assembly in Windows Driver Kit (x64)?
Now we should create some function to perform this operation in assembly.
Just in Header File (in my case Source.h) declare your function:
1
extern void inline AsmEnableVmxOperation(void);
Then in the assembly file (in my case, “SourceAsm.asm”), add this function (Which sets the 13th (14th) bit of CR4).
1
2
3
4
5
6
7
8
9
10
11
12
13
14
AsmEnableVmxOperation PROC PUBLIC

	PUSH RAX			    ; Save the state

	XOR RAX, RAX			; Clear the RAX
	MOV RAX, CR4

	OR RAX,02000h	    	; Set the 14th bit
	MOV CR4, RAX

	POP RAX			     	; Restore the state
	RET

AsmEnableVmxOperation ENDP
Also, declare your function in the above of SourceAsm.asm.
1
PUBLIC AsmEnableVmxOperation
This assembly function should be called in DrvCreate:
1
2
3
4
5
6
7
8
9
10
11
12
13
14
15
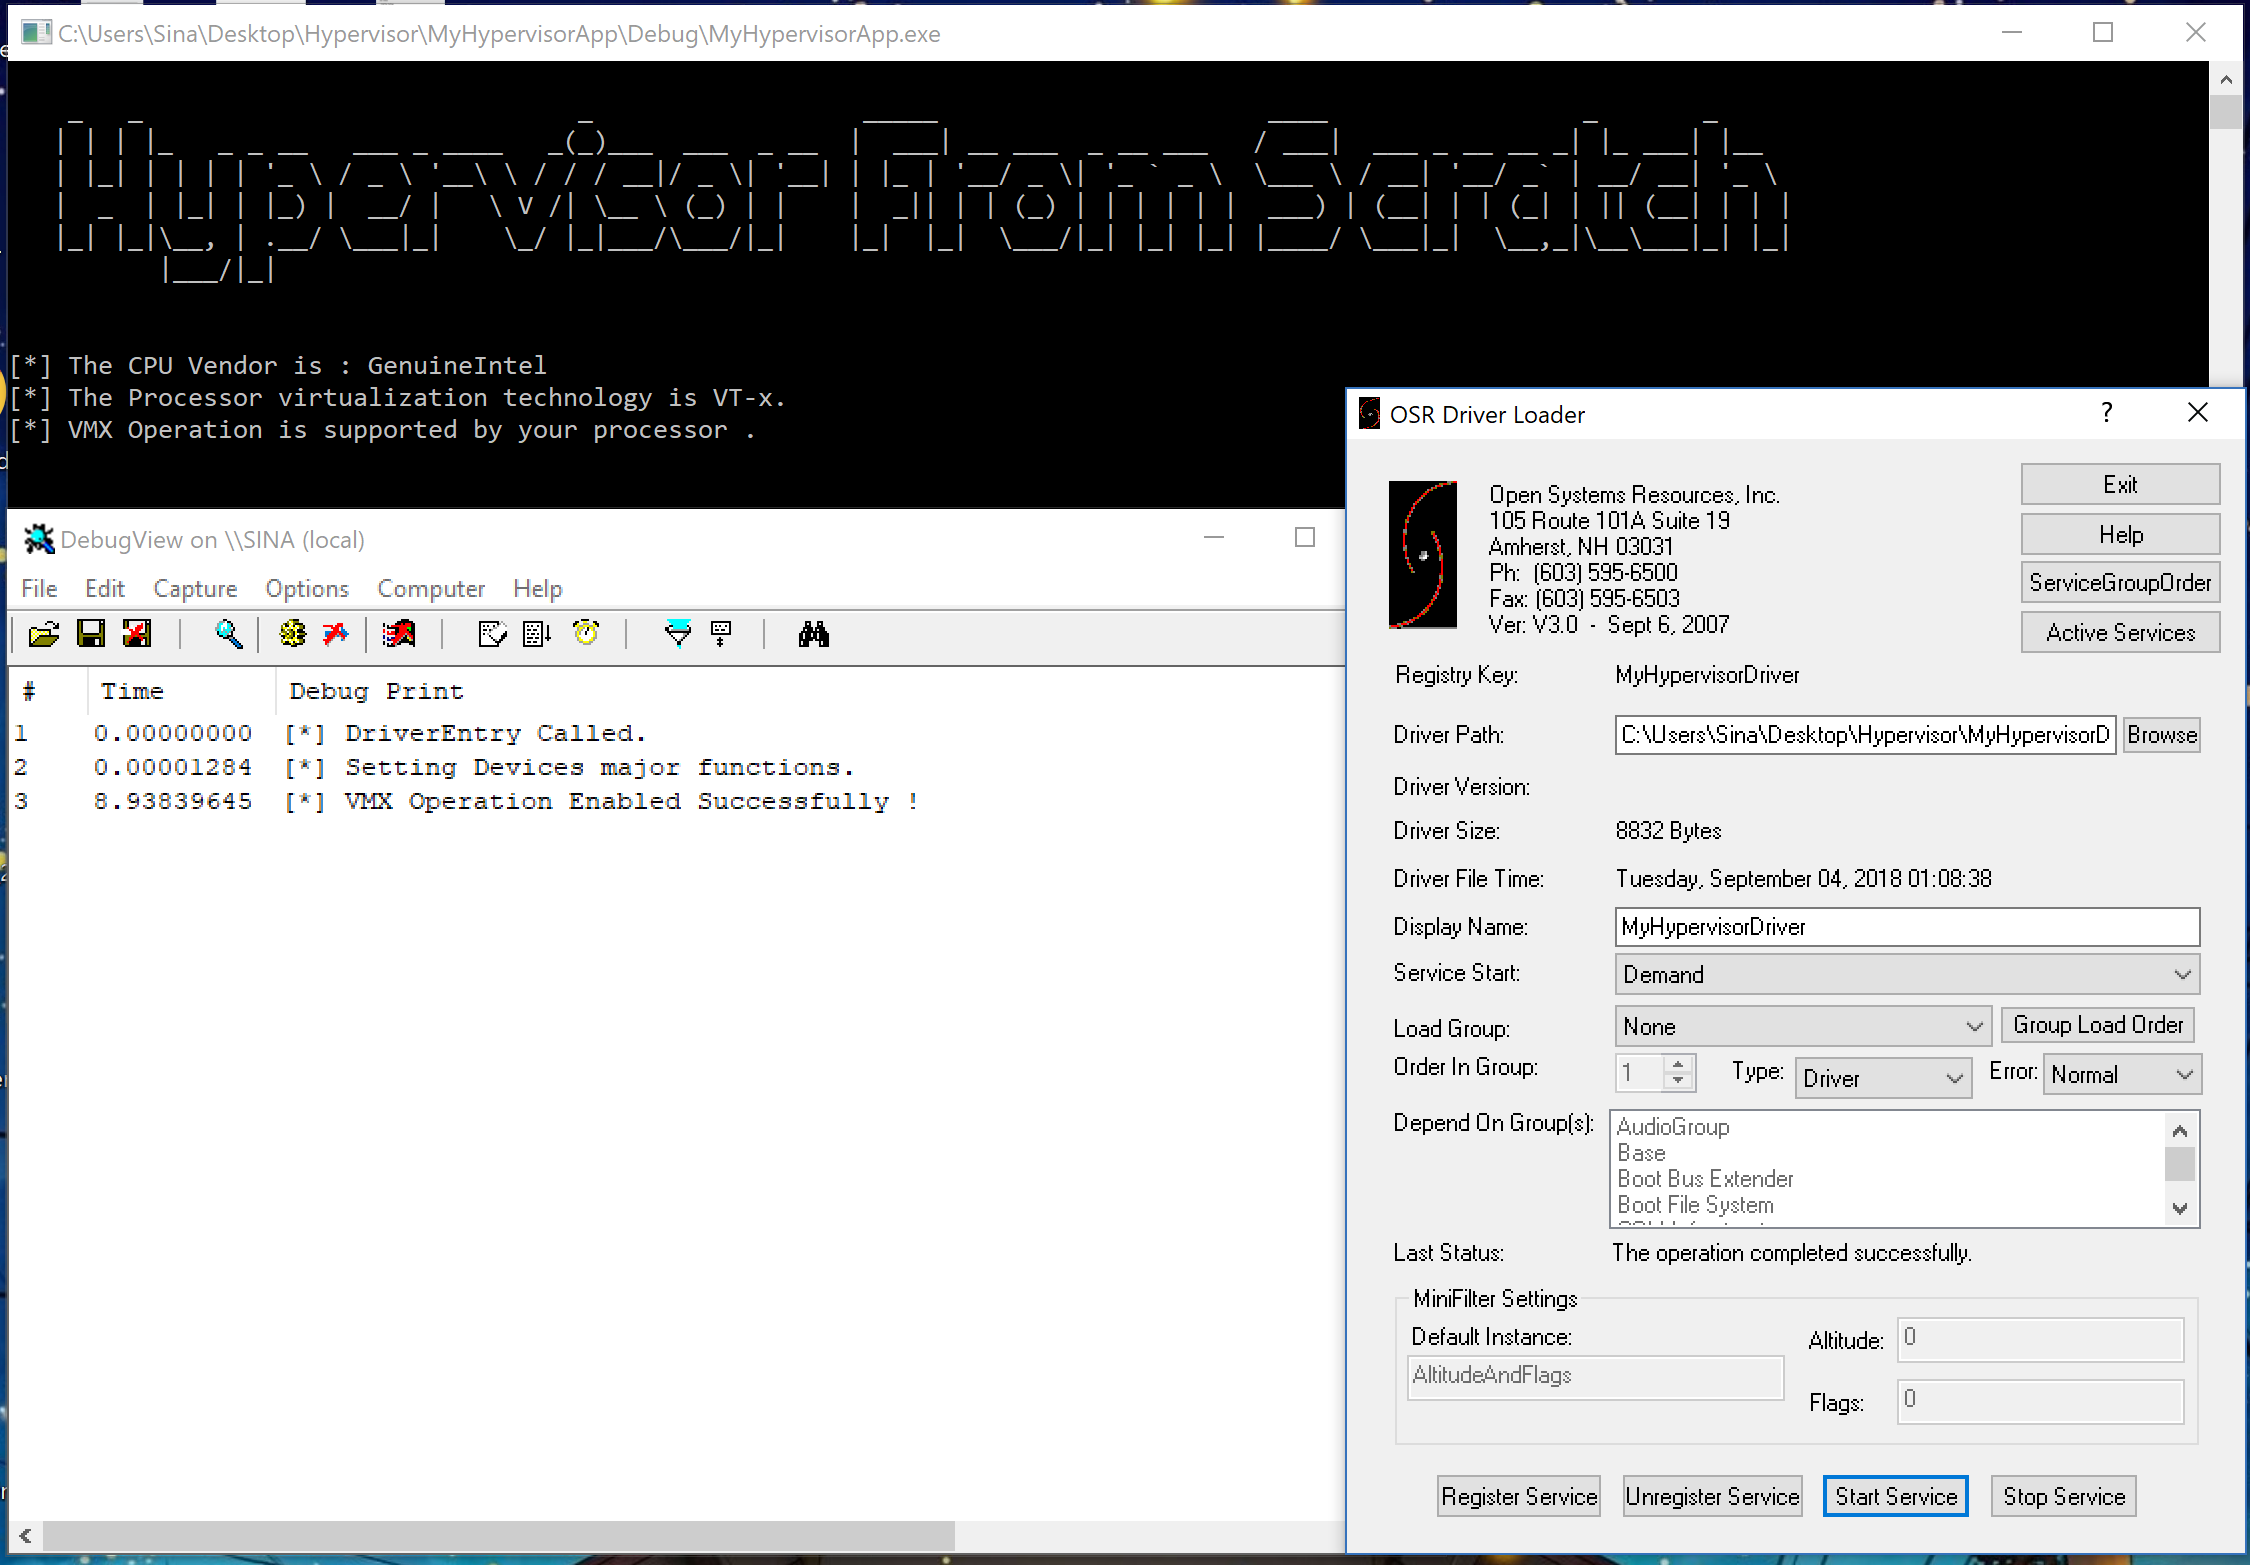
NTSTATUS
DrvCreate(IN PDEVICE_OBJECT DeviceObject, IN PIRP Irp)
{
//
// Enabling VMX Operation
//
AsmEnableVmxOperation();
DbgPrint("[*] VMX Operation Enabled Successfully !");
Irp->IoStatus.Status = STATUS_SUCCESS;
Irp->IoStatus.Information = 0;
IoCompleteRequest(Irp, IO_NO_INCREMENT);
return STATUS_SUCCESS;
}
At last, we should call the following function from the user-mode:
1
2
3
4
5
6
7
8
9
    HANDLE hWnd = CreateFile(L"\\\\.\\MyHypervisorDevice",
                             GENERIC_READ | GENERIC_WRITE,
                             FILE_SHARE_READ |
                                 FILE_SHARE_WRITE,
                             NULL, /// lpSecurityAttirbutes
                             OPEN_EXISTING,
                             FILE_ATTRIBUTE_NORMAL |
                                 FILE_FLAG_OVERLAPPED,
                             NULL); /// lpTemplateFile
If you see the following result, you successfully completed the second part.
Important Note: Please consider that your .asm file should have a different name from your main driver file (.c file). For example, if your driver file is “Source.c”, then using the name “Source.asm” causes weird linking errors in Visual Studio. You should change the name of your .asm file to something like “SourceAsm.asm” to avoid these linker errors.
Conclusion
In this part, we learned about the basic stuff we need to know to create a Windows Driver Kit program, and then we entered our virtual environment to build a cornerstone for the rest of the parts.
In the third part, we’re getting deeper with Intel VT-x and making our driver even more advanced.
Note: Remember that hypervisors change over time because new features are added to the operating systems or new technologies are used. For example, updates to Meltdown & Spectre have made a lot of changes to the hypervisors. So, if you want to use Hypervisor From Scratch in your projects, research, or whatever, you should use the HyperDbg drivers. HyperDbg is actively maintained, stable, and reliable, ensuring you avoid the errors and instability problems that can arise from using older parts of the tutorial series.
The third part is also available [here].(https://rayanfam.com/topics/hypervisor-from-scratch-part-3/).

References
[1] Intel® 64 and IA-32 architectures software developer’s manual combined volumes 3 (https://software.intel.com/en-us/articles/intel-sdm)
[2] IRP_MJ_DEVICE_CONTROL (https://docs.microsoft.com/en-us/windows-hardware/drivers/kernel/irp-mj-device-control)
[3] Windows Driver Kit Samples (https://github.com/Microsoft/Windows-driver-samples/blob/master/general/ioctl/wdm/sys/sioctl.c)
[4] Setting Up Local Kernel Debugging of a Single Computer Manually (https://docs.microsoft.com/en-us/windows-hardware/drivers/debugger/setting-up-local-kernel-debugging-of-a-single-computer-manually)
[5] Obtain processor manufacturer using CPUID (https://www.daniweb.com/programming/software-development/threads/112968/obtain-processor-manufacturer-using-cpuid)
[6] Plug and Play Minor IRPs (https://docs.microsoft.com/en-us/windows-hardware/drivers/kernel/plug-and-play-minor-irps)
[7] _FAST_IO_DISPATCH structure (https://docs.microsoft.com/en-us/windows-hardware/drivers/ddi/content/wdm/ns-wdm-_fast_io_dispatch)
[8] Filtering IRPs and Fast I/O (https://docs.microsoft.com/en-us/windows-hardware/drivers/ifs/filtering-irps-and-fast-i-o)
[9] Windows File System Filter Driver Development (https://www.apriorit.com/dev-blog/167-file-system-filter-driver)
Comments powered by Disqus.