
If you’re looking to use a hypervisor for analysis and reverse engineering tasks, check out HyperDbg Debugger. It’s a hypervisor-based debugger designed specifically for analyzing, fuzzing, and reversing applications. A free and comprehensive tutorial on hypervisor-based reverse engineering is available at OpenSecurityTraining2’s website (preferred) and YouTube, which demonstrates numerous practical examples on how to utilize hypervisors for reverse engineering.
Introduction
Hi guys,
Welcome to the 8th part of the Hypervisor From Scratch. If you reach here, then you probably finished reading the 7th part, and personally, I believe the 7th part was the most challenging part to understand so hats off, you did a great job.
The 8th part would be an exciting part as we’ll see lots of real-world and practical examples of solving reverse-engineering related problems with hypervisors. For example, we’ll see how hidden hooks work in the presence of hypervisor or how to create a syscall hook, and we’re eventually able to transfer messages from vmx root to OS (vmx non-root) and then into user-mode thus it gives us a valuable bunch of information about how the system works.
Besides some OS-related concepts, we’ll also see some CPU related topics like VPIDs and some general information about how patches for Meltdown and Spectre works.
Event injection, Exception Bitmap, and also adding support to virtualize a hyper-v machine are other titles that will be discussed.
Before starting, I should give special thanks to my friend Petr Benes for his contributions to Hypervisor From Scratch, of course, Hypervisor From Scratch could never have existed without his help and to Liran Alon for great helps on fixing VPID problem, and to Gerhart for his in-depth knowledge about Hyper-V internals that makes Hypervisor From Scratch available for Hyper-V.
Overview
This part is divided into eight main sections :
- How to inject interrupts (Event) into the guest and Exception Bitmap
- Implementing hidden hooks using EPT
- Syscall hook
- Invalidating EPT caches using VPID
- Demonstrating a custom VMX Root-mode compatible message tracing mechanism and adding WPP Tracing to our Hypervisor
- We’ll add support to Hyper-V
- Fixing some previous design caveats
- Discussion (In this section we discuss the different question and approaches about various topics in this part)
The full source code of this tutorial is available on GitHub :
[https://github.com/SinaKarvandi/Hypervisor-From-Scratch]
Table of Contents
- Introduction
- Overview
- Table of Contents
Event Injection
- Vectored Events
- Interrupts
- Exceptions
- Exception Classifications
- Event Injection Fields
- Vectored Event Injection
- Exception Error Codes
- Vectored Events
- Exception Bitmap
- Monitor Trap Flag (MTF)
Hidden Hooks (Simulating Hardware Debug Registers Without Any Limitation)
- Hidden Hooks Scenarios for Read/Write and Execute
Implementing Hidden Hooks
Removing Hooks From Pages
- An Important Note When Modifying EPT Entries
- System-Call Hook
- Finding Kernel Base
- Finding SSDT and Shadow SSDT Tables
- Get Routine Address by Syscall Number
- Virtual Processor ID (VPID) & TLB
- INVVPID - Invalidate Translations Based on VPID
- Individual-address invalidation
- Single-context invalidation
- All-contexts invalidation
- Single-context invalidation, retaining global translations
- Important Notes For Using VPIDs
- INVVPID vs. INVPCID
- INVVPID - Invalidate Translations Based on VPID
- Designing A VMX Root-mode Compatible Message Tracing
- Concepts
- What’s a spinlock?
- Test-and-Set
- What do we mean by “Safe”?
- What is DPC?
- Challenges
- Designing A Spinlock
- Message Tracer Design
- Initialization Phase
- Sending Phase (Saving Buffer and adding them to pools)
- Reading Phase (Read buffers and send them to user-mode)
- Checking for new messages
- Sending messages to pools
- Receiving buffers and messages in user-mode
- IOCTL and managing user-mode requests
- User-mode notify callback
- Uninitialization Phase
- Concepts
- WPP Tracing
Supporting to Hyper-V
Enable Nested Virtualization
Hyper-V’s visible behavior in nested virtualization
Hyper-V Hypervisor Top-Level Functional Specification (TLFS)
Out of Range MSRs
Hyper-V Hypercalls (VMCALLs)
Hyper-V Interface CPUID Leaves
- Fixing Previous Design Issues
- Fixing the problem with pre-allocated buffers
- Avoid Intercepting Accesses to CR3
- Restoring IDTR, GDTR, GS Base and FS Base
- Let’s Test it!
- View WPP Tracing Messages
- How to test?
- Event Injection & Exception Bitmap Demo
- Hidden Hooks Demo
- Read/Write Hooks or Hardware Debug Registers Simulation
- Hidden Execution Hook
- Syscall Hook Demo
- Discussion
- Conclusion
- References

Event Injection
One of the essential parts of the hypervisors is the ability to inject events (events are Interrupts, Exceptions, NMIs, and SMIs) as if they’ve arrived normally, and the capability to monitor received interrupts and exceptions.
This gives us a great ability to manage the guest operating system and unique ability to build applications, For example, if you are developing anti-cheat application, you can easily disable breakpoint and trap interrupts, and it completely disables all the features of Windbg or any other debugger as you’re the first one that is being notified about the breakpoint thus you can decide to abort the breakpoint or give it to the debugger.
This is just a simple example that the attacker needs to find a way around it. You can also use event injections for reverse-engineering purposes, e.g., directly inject a breakpoint into an application that uses different anti-debugging techniques to make its code hidden.
We can also implement some important features of our hypervisor like hidden hooks based on relying on event injection.
Before going deep into the Event Injection, we need to know some basic processor concepts and terms used by Intel. Most of them derived from this post and this answer.
Intel x86 defines two overlapping categories, vectored events (interrupts vs exceptions), and exception classes (faults vs traps vs aborts).
Vectored Events
Vectored Events (interrupts and exceptions) cause the processor to jump into an interrupt handler after saving much of the processor’s state (enough such that execution can continue from that point later).
Exceptions and interrupts have an ID, called a vector, that determines which interrupt handler the processor jumps to. Interrupt handlers are described within the Interrupt Descriptor Table (IDT).
Interrupts
Interrupts occur at random times during the execution of a program, in response to signals from the hardware. System hardware uses interrupts to handle events external to the processor, such as requests to service peripheral devices. The software can also generate interrupts by executing the INT n instruction.
Exceptions
Exceptions occur when the processor detects an error condition while executing an instruction, such as division by zero. The processor identifies a variety of error conditions, including protection violations, page faults, and internal machine faults.
Exception Classifications
Exceptions classified as faults, traps, or aborts depending on the way they reported and whether the instruction that caused the exception could be restarted without loss of program or task continuity.
In summary: traps increment the instruction pointer (RIP), faults do not, and aborts ’explode’.
We’ll start with the fault classification. You’ve probably heard of things called page faults (or segmentation faults if you’re from the past).
A fault is just an exception type that can be corrected and allows the processor the ability to execute some fault handler to rectify an offending operation without terminating the entire operation. When a fault occurs, the system state is reverted to an earlier state before the faulting operation occurred, and the fault handler is called. After executing the fault handler, the processor returns to the faulting instruction to execute it again. That last sentence is important because that means it redoes an instruction execution to make sure the proper results are used in the following operations. This is different from how a trap is handled.
A trap is an exception that is delivered immediately following the execution of a trapping instruction. In our hypervisor, we trap on various instructions, meaning that after the execution of an instruction – say rdtsc or rdtscp – a trap exception is reported to the processor. Once a trap exception is reported, control is passed to a trap handler, which will perform some operation(s). Following the execution of the trap handler, the processor returns to the instruction following the trapping instruction.
An abort, however, is an exception that occurs and doesn’t always yield the location of the error. Aborts are commonly used for reporting hardware errors, or otherwise. You won’t see these very often, and if you do… Well, you’re doing something wrong. It’s important to know that all exceptions are reported on an instruction boundary – excluding aborts. An instruction boundary is quite simple: if you have the bytes 0F 31 48 C1 E2 20 which translates to the instructions,
1
2
rdtsc
shl rdx, 20h
Then the instruction boundary would be between the bytes 31 and 48. That’s because 0F 31 is the instruction opcodes for rdtsc. This way, two instructions separated by a boundary.
Event Injection Fields
Event injection is done with using interruption-information field of VMCS.
The interruption-information is written into the VM-entry fields of the VMCS during VM-entry; after all the guest context has been loaded, including MSRs and Registers, it delivers the exception through the Interrupt Descriptor Table (IDT) using the vector specified in this field.
The first field to configure event injection is VM-entry interruption-information field (32 bits) or VM_ENTRY_INTR_INFO in the VMCS, this field provides details about the event to be injected.
The following picture shows the detail of each bit.
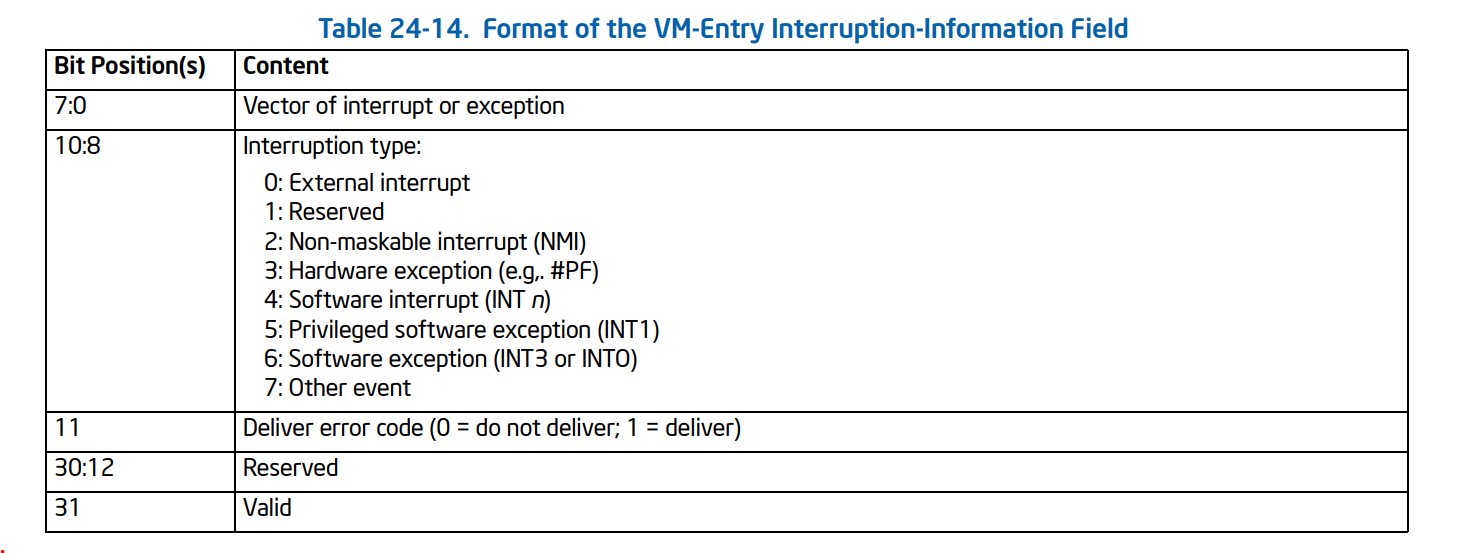
- The vector (bits 7:0) determines which entry in the IDT is used or which other event is injected or, in other words, it defines the index of Interrupt to be injected in IDT, for example, the following command (!idt) in windbg shows the IDT indexes. (note that the index is the numbers at the left).
1
2
3
4
5
6
7
8
9
10
11
12
13
14
15
16
17
18
19
20
21
22
23
24
25
26
27
28
29
30
31
32
33
34
35
36
37
lkd> !idt

Dumping IDT: fffff8012c05b000

00:	fffff80126551100 nt!KiDivideErrorFaultShadow
01:	fffff80126551180 nt!KiDebugTrapOrFaultShadow	Stack = 0xFFFFF8012C05F9D0
02:	fffff80126551200 nt!KiNmiInterruptShadow	Stack = 0xFFFFF8012C05F7D0
03:	fffff80126551280 nt!KiBreakpointTrapShadow
04:	fffff80126551300 nt!KiOverflowTrapShadow
05:	fffff80126551380 nt!KiBoundFaultShadow
06:	fffff80126551400 nt!KiInvalidOpcodeFaultShadow
07:	fffff80126551480 nt!KiNpxNotAvailableFaultShadow
08:	fffff80126551500 nt!KiDoubleFaultAbortShadow	Stack = 0xFFFFF8012C05F3D0
09:	fffff80126551580 nt!KiNpxSegmentOverrunAbortShadow
0a:	fffff80126551600 nt!KiInvalidTssFaultShadow
0b:	fffff80126551680 nt!KiSegmentNotPresentFaultShadow
0c:	fffff80126551700 nt!KiStackFaultShadow
0d:	fffff80126551780 nt!KiGeneralProtectionFaultShadow
0e:	fffff80126551800 nt!KiPageFaultShadow
10:	fffff80126551880 nt!KiFloatingErrorFaultShadow
11:	fffff80126551900 nt!KiAlignmentFaultShadow
12:	fffff80126551980 nt!KiMcheckAbortShadow	Stack = 0xFFFFF8012C05F5D0
13:	fffff80126551a80 nt!KiXmmExceptionShadow
14:	fffff80126551b00 nt!KiVirtualizationExceptionShadow
15:	fffff80126551b80 nt!KiControlProtectionFaultShadow
1f:	fffff80126551c00 nt!KiApcInterruptShadow
20:	fffff80126551c80 nt!KiSwInterruptShadow
29:	fffff80126551d00 nt!KiRaiseSecurityCheckFailureShadow
2c:	fffff80126551d80 nt!KiRaiseAssertionShadow
2d:	fffff80126551e00 nt!KiDebugServiceTrapShadow
2f:	fffff80126551f00 nt!KiDpcInterruptShadow
30:	fffff80126551f80 nt!KiHvInterruptShadow
31:	fffff80126552000 nt!KiVmbusInterrupt0Shadow
32:	fffff80126552080 nt!KiVmbusInterrupt1Shadow
33:	fffff80126552100 nt!KiVmbusInterrupt2Shadow
34:	fffff80126552180 nt!KiVmbusInterrupt3Shadow
...
The interruption type (bits 10:8) determines details of how the injection is performed.
In general, a VMM should use the type hardware exception for all exceptions other than the following:
- Breakpoint exceptions (#BP): a VMM should use the type software exception.
- Overflow exceptions (#OF): a VMM should use the use type software exception.
- Those debug exceptions (#DB) that are generated by INT1 (a VMM should use the use type privileged software exception).
For exceptions, the deliver-error-code bit (bit 11) determines whether delivery pushes an error code on
the guest stack. (we’ll talk about error-code later)
The last bit is that VM entry injects an event if and only if the valid bit (bit 31) is 1. The valid bit in this field is cleared on every VM exit means that when you want to inject an event, you set this bit to inject your interrupt and the processor will automatically clear it at the next VM-Exit.
The second field that controls the event injection is VM-entry exception error code.
VM-entry exception error code (32 bits) or VM_ENTRY_EXCEPTION_ERROR_CODE in the VMCS: This field is used if and only if the valid bit (bit 31) and the deliver error-code bit (bit 11) are both set in the VM-entry interruption-information field.
The third field that controls the event injection is VM-entry instruction length.
VM-entry instruction length (32 bits) or VM_ENTRY_INSTRUCTION_LEN in the VMCS: For injection of events whose type is a software interrupt, software exception, or privileged software exception, this field is used to determine the value of RIP that is pushed on the stack.
All in all, these things in VMCS control the Event Injection process: VM_ENTRY_INTR_INFO, VM_ENTRY_EXCEPTION_ERROR_CODE, VM_ENTRY_INSTRUCTION_LEN.
Vectored Event Injection
If the valid bit in the VM-entry interruption-information field is 1, VM entry causes an event to be delivered (or made pending) after all components of the guest state have been loaded (including MSRs) and after the VM-execution control fields have been established.
The interruption type (which is described above) can be one of the following values.
1
2
3
4
5
6
7
8
9
10
11
enum _INTERRUPT_TYPE
{
	INTERRUPT_TYPE_EXTERNAL_INTERRUPT = 0,
	INTERRUPT_TYPE_RESERVED = 1,
	INTERRUPT_TYPE_NMI = 2,
	INTERRUPT_TYPE_HARDWARE_EXCEPTION = 3,
	INTERRUPT_TYPE_SOFTWARE_INTERRUPT = 4,
	INTERRUPT_TYPE_PRIVILEGED_SOFTWARE_INTERRUPT = 5,
	INTERRUPT_TYPE_SOFTWARE_EXCEPTION = 6,
	INTERRUPT_TYPE_OTHER_EVENT = 7
};
Now it’s time to set the vector bit. The following enum is the representation of the indexes in IDT. (Look at the indexes of !idt command above).
1
2
3
4
5
6
7
8
9
10
11
12
13
14
15
16
17
18
19
20
21
22
23
24
25
26
27
28
29
30
31
32
33
34
35
36

typedef enum _EXCEPTION_VECTORS
{
	EXCEPTION_VECTOR_DIVIDE_ERROR,
	EXCEPTION_VECTOR_DEBUG_BREAKPOINT,
	EXCEPTION_VECTOR_NMI,
	EXCEPTION_VECTOR_BREAKPOINT,
	EXCEPTION_VECTOR_OVERFLOW,
	EXCEPTION_VECTOR_BOUND_RANGE_EXCEEDED,
	EXCEPTION_VECTOR_UNDEFINED_OPCODE,
	EXCEPTION_VECTOR_NO_MATH_COPROCESSOR,
	EXCEPTION_VECTOR_DOUBLE_FAULT,
	EXCEPTION_VECTOR_RESERVED0,
	EXCEPTION_VECTOR_INVALID_TASK_SEGMENT_SELECTOR,
	EXCEPTION_VECTOR_SEGMENT_NOT_PRESENT,
	EXCEPTION_VECTOR_STACK_SEGMENT_FAULT,
	EXCEPTION_VECTOR_GENERAL_PROTECTION_FAULT,
	EXCEPTION_VECTOR_PAGE_FAULT,
	EXCEPTION_VECTOR_RESERVED1,
	EXCEPTION_VECTOR_MATH_FAULT,
	EXCEPTION_VECTOR_ALIGNMENT_CHECK,
	EXCEPTION_VECTOR_MACHINE_CHECK,
	EXCEPTION_VECTOR_SIMD_FLOATING_POINT_NUMERIC_ERROR,
	EXCEPTION_VECTOR_VIRTUAL_EXCEPTION,
	EXCEPTION_VECTOR_RESERVED2,
	EXCEPTION_VECTOR_RESERVED3,
	EXCEPTION_VECTOR_RESERVED4,
	EXCEPTION_VECTOR_RESERVED5,
	EXCEPTION_VECTOR_RESERVED6,
	EXCEPTION_VECTOR_RESERVED7,
	EXCEPTION_VECTOR_RESERVED8,
	EXCEPTION_VECTOR_RESERVED9,
	EXCEPTION_VECTOR_RESERVED10,
	EXCEPTION_VECTOR_RESERVED11,
	EXCEPTION_VECTOR_RESERVED12
};
In general, the event is delivered as if it had been generated normally, and the event is delivered using the vector in that field to select a descriptor in the IDT. Since event injection occurs after loading IDTR (IDT Register) from the guest-state area, this is the guest IDT, or in other words, the event is delivered to GUEST_IDTR_BASE and GUEST_IDTR_LIMIT.
Putting the above descriptions into the implementation, we have the following function :
1
2
3
4
5
6
7
8
9
10
11
12
13
14
// Injects interruption to a guest
VOID EventInjectInterruption(INTERRUPT_TYPE InterruptionType, EXCEPTION_VECTORS Vector, BOOLEAN DeliverErrorCode, ULONG32 ErrorCode)
{
	INTERRUPT_INFO Inject = { 0 };
	Inject.Valid = TRUE;
	Inject.InterruptType = InterruptionType;
	Inject.Vector = Vector;
	Inject.DeliverCode = DeliverErrorCode;
	__vmx_vmwrite(VM_ENTRY_INTR_INFO, Inject.Flags);

	if (DeliverErrorCode) {
		__vmx_vmwrite(VM_ENTRY_EXCEPTION_ERROR_CODE, ErrorCode);
	}
}
As an example we want to inject a #BP (breakpoint) into the guest, we can use the following code :
1
2
3
4
5
6
7
8
/* Inject #BP to the guest (Event Injection) */
VOID EventInjectBreakpoint()
{
EventInjectInterruption(INTERRUPT_TYPE_SOFTWARE_EXCEPTION, EXCEPTION_VECTOR_BREAKPOINT, FALSE, 0);
UINT32 ExitInstrLength;
__vmx_vmread(VM_EXIT_INSTRUCTION_LEN, &ExitInstrLength);
__vmx_vmwrite(VM_ENTRY_INSTRUCTION_LEN, ExitInstrLength);
}
Or if we want to inject a #GP(0) or general protection fault with error code 0 then we use the following code:
1
2
3
4
5
6
7
8
/* Inject #GP to the guest (Event Injection) */
VOID EventInjectGeneralProtection()
{
	EventInjectInterruption(INTERRUPT_TYPE_HARDWARE_EXCEPTION, EXCEPTION_VECTOR_GENERAL_PROTECTION_FAULT, TRUE, 0);
	UINT32 ExitInstrLength;
	__vmx_vmread(VM_EXIT_INSTRUCTION_LEN, &ExitInstrLength);
	__vmx_vmwrite(VM_ENTRY_INSTRUCTION_LEN, ExitInstrLength);
}
You can write functions for other types of interrupts and exceptions. The only thing that you should consider is the InterruptionType, which is always hardware exception except for #DP, #BP, #OF, which is discussed above.
Exception Error Codes
You might notice that we used VM_ENTRY_EXCEPTION_ERROR_CODE in the VMCS and 11th bit of the interruption-information field, and for some exceptions, we disabled them while for some others we set them to a specific value, so what’s that error codes?
Some exceptions will push a 32-bit “error code” on to the top of the stack, which provides additional information about the error. This value must be pulled from the stack before returning control back to the currently running program. (i.e., before calling IRET for returning from interrupt).
The fact that the error code must be pulled from the stack makes event injection more complicated as we have to make sure whether the Windows tries to pull error code from the stack or not, as it turns to error if we put something onto the stack that Windows doesn’t expect to pull it later or we didn’t push anything but Windows thoughts there is something in the stack that needs to be pulled.
The following table shows some of these exceptions with the presence or absence of Error code, this table is derived from Intel SDM, Volume 1, CHAPTER 6 (Table 6-1. Exceptions and Interrupts).
| Name | Vector nr. | Type | Mnemonic | Error code? |
|---|---|---|---|---|
| Divide-by-zero Error | 0 (0x0) | Fault | #DE | No |
| Debug | 1 (0x1) | Fault/Trap | #DB | No |
| Non-maskable Interrupt | 2 (0x2) | Interrupt | - | No |
| Breakpoint | 3 (0x3) | Trap | #BP | No |
| Overflow | 4 (0x4) | Trap | #OF | No |
| Bound Range Exceeded | 5 (0x5) | Fault | #BR | No |
| Invalid Opcode | 6 (0x6) | Fault | #UD | No |
| Device Not Available | 7 (0x7) | Fault | #NM | No |
| Double Fault | 8 (0x8) | Abort | #DF | Yes (Zero) |
| Coprocessor Segment Overrun | 9 (0x9) | Fault | - | No |
| Invalid TSS | 10 (0xA) | Fault | #TS | Yes |
| Segment Not Present | 11 (0xB) | Fault | #NP | Yes |
| Stack-Segment Fault | 12 (0xC) | Fault | #SS | Yes |
| General Protection Fault | 13 (0xD) | Fault | #GP | Yes |
| Page Fault | 14 (0xE) | Fault | #PF | Yes |
| Reserved | 15 (0xF) | - | - | No |
| x87 Floating-Point Exception | 16 (0x10) | Fault | #MF | No |
| Alignment Check | 17 (0x11) | Fault | #AC | Yes |
| Machine Check | 18 (0x12) | Abort | #MC | No |
| SIMD Floating-Point Exception | 19 (0x13) | Fault | #XM/#XF | No |
| Virtualization Exception | 20 (0x14) | Fault | #VE | No |
| Reserved | 21-29 (0x15-0x1D) | - | - | No |
| Security Exception | 30 (0x1E) | - | #SX | Yes |
| Reserved | 31 (0x1F) | - | - | No |
| Triple Fault | - | - | - | No |
| FPU Error Interrupt | IRQ 13 | Interrupt | #FERR | No |
Now that we learn how to create a new events, it’s time to see how to monitor system interrupts.
Exception Bitmap
If you remember from MSR Bitmaps, we have a mask for each MSR that shows whether the read or write on that MSR should cause a vm-exit or not.
The monitoring of exceptions uses the same method, which means that a simple mask governs it. This mask is EXCEPTION_BITMAP in VMCS.
The exception bitmap is a 32-bit field that contains one bit for each exception. When an exception occurs, its vector is used to select a bit in this field. If the bit is 1, the exception causes a VM exit. If the bit is 0, the exception is delivered normally through the IDT.
Now it’s up to you to decide whether you want to inject that exception back to the guest or change the state or whatever you want to do.
For example, if you set the 3rd bit of the EXCEPTION_BITMAP, then whenever a breakpoint occurs somewhere (both user-mode and kernel-mode), a vm-exit with EXIT_REASON_EXCEPTION_NMI (exit reason == 0) occurs.
1
2
	// Set exception bitmap to hook division by zero (bit 1 of EXCEPTION_BITMAP)
	__vmx_vmwrite(EXCEPTION_BITMAP, 0x8); // breakpoint 3nd bit
Now we can change the state of the program, then resume the guest, remember resuming the guest doesn’t cause the exception to be delivered to the guest, we have to inject an event manually if we want that the guest process the event normally. For example, we can use the function “EventInjectBreakpoint,” as mentioned earlier, to inject the exception back to the guest.
The last question is how we can find the index of exception that occurred, you know we might set exception bitmap for multiple exceptions, so we have to know the exact reason why this vm-exit happened or more clearly, what exception causes this vm-exit.
The following VMCS fields report us about the event,
- VM_EXIT_INTR_INFO
- VM_EXIT_INTR_ERROR_CODE
The following table shows how we can use VM_EXIT_INTR_INFO.
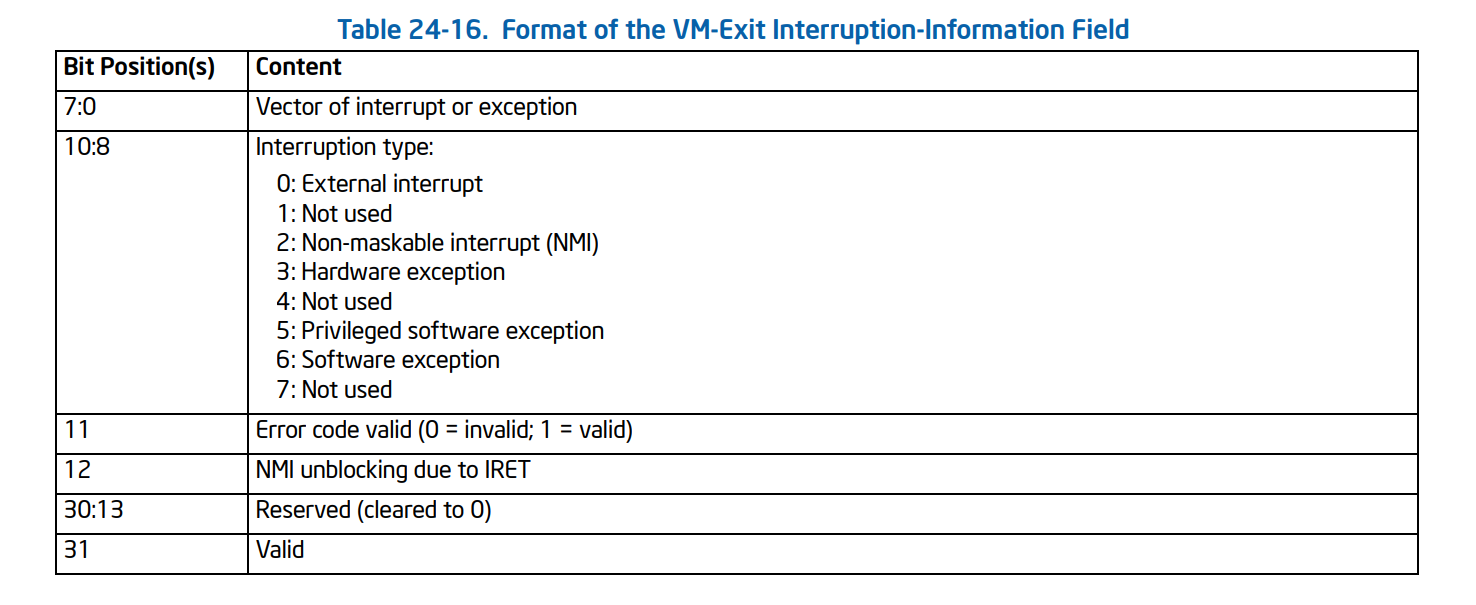
Which is the following structure:
1
2
3
4
5
6
7
8
9
10
11
typedef union _VMEXIT_INTERRUPT_INFO {
	struct {
		UINT32 Vector : 8;
		UINT32 InterruptionType : 3;
		UINT32 ErrorCodeValid : 1;
		UINT32 NmiUnblocking : 1;
		UINT32 Reserved : 18;
		UINT32 Valid : 1;
	};
	UINT32 Flags;
}VMEXIT_INTERRUPT_INFO, * PVMEXIT_INTERRUPT_INFO;
And we can read the details using vmread instruction, for example, the following command shows how we can detect if breakpoint (0xcc) occurred.
1
2
3
4
5
6
7
		// read the exit reason
		__vmx_vmread(VM_EXIT_INTR_INFO, &InterruptExit);

		if (InterruptExit.InterruptionType == INTERRUPT_TYPE_SOFTWARE_EXCEPTION && InterruptExit.Vector == EXCEPTION_VECTOR_BREAKPOINT)
		{
		// Do whatever , e.g re-inject the breakpoint
		}
If we want to re-inject an exception that comes with an error code (see the above table), then the error code can be read using VM_EXIT_INTR_ERROR_CODE in VMCS. After that, write the error code to VM_ENTRY_EXCEPTION_ERROR_CODE and enable the deliver-error-code of VM_ENTRY_INTR_INFO to make sure that re-injection is without any flaw.
Also, keep in mind that page-fault is treated differently you can read Intel SDM for more information.
But wait! Have you notice that exception bitmap are just a 32-bit field in VMCS while we have up to 256 interrupts in IDT ?!
If you’re curious about this question you can read its answer in Discussion section.
Monitor Trap Flag (MTF)
Monitor Trap Flag or MTF is a feature that works exactly like Trap Flag in r/eflags except it’s invisible to the guest.
Whenever you set this flag on CPU_BASED_VM_EXEC_CONTROL, after VMRESUME, the processor executes one instruction then a vm-exit occurs.
We have to clear this flag otherwise each instruction cause a vm-exit.
The following function is responsible for setting and unsetting MTF.
1
2
3
4
5
6
7
8
9
10
11
12
13
14
15
16
17
18
/* Set the monitor trap flag */
VOID HvSetMonitorTrapFlag(BOOLEAN Set)
{
	ULONG CpuBasedVmExecControls = 0;

	// Read the previous flag
	__vmx_vmread(CPU_BASED_VM_EXEC_CONTROL, &CpuBasedVmExecControls);

	if (Set) {
		CpuBasedVmExecControls |= CPU_BASED_MONITOR_TRAP_FLAG;
	}
	else {
		CpuBasedVmExecControls &= ~CPU_BASED_MONITOR_TRAP_FLAG;
	}

	// Set the new value
	__vmx_vmwrite(CPU_BASED_VM_EXEC_CONTROL, CpuBasedVmExecControls);
}
Setting MTF leads to a vm-exit with exit reason (EXIT_REASON_MONITOR_TRAP_FLAG), we unset the MTF in the vm-exit handler.
MTF is essential in implementing hidden hooks, more details about MtfEptHookRestorePoint later in the hidden hooks section.
Here’s the MTF vm-exit handler.
1
2
3
4
5
6
7
8
9
10
11
12
13
14
15
16
17
18
19
20
21
22
23
	case EXIT_REASON_MONITOR_TRAP_FLAG:
	{
		/* Monitor Trap Flag */
		if (GuestState[CurrentProcessorIndex].MtfEptHookRestorePoint)
		{
			// Restore the previous state
			EptHandleMonitorTrapFlag(GuestState[CurrentProcessorIndex].MtfEptHookRestorePoint);
			// Set it to NULL
			GuestState[CurrentProcessorIndex].MtfEptHookRestorePoint = NULL;
		}
		else
		{
			LogError("Why MTF occured ?!");
		}

		// Redo the instruction
		GuestState[CurrentProcessorIndex].IncrementRip = FALSE;

		// We don't need MTF anymore
		HvSetMonitorTrapFlag(FALSE);

		break;
	}
Hidden Hooks
(Simulating Hardware Debug Registers Without Any Limitation)
Have you ever used hardware debugger registers ?!
The debug registers allow researchers and programmers to selectively enable various debug conditions (read, write, execute) associated with a set of four debug addresses without any change in program instructions.
As you know, we can set up to 4 locations to these hardware registers, and it’s the worst limitation for these registers.
so what if we have a structure (let say _EPROCESS) and we want to see what function in Windows Read or Write in this structure?
It’s not possible with current debug registers but we use EPT to rescue !
Hidden Hooks Scenarios for Read/Write and Execute
We have two strategies for hidden hooks, one for Read/Write and one for Execute.
For Read/Write,
we unset read or write or both (based on how user wants) in the entry corresponding to the address.
This means before read or write a vm-exit occurs, and an EPT Violation will notify us. In the EPT Violation handler, we log the address that tries to read or write, then we find the entry in EPT table and set both read and write (means that any read or write to the page is allowed) and also set an MTF flag.
VMM resumes, and one instruction executes, or in other words, read or write is performed, then an MTF vm-exit occurs. In MTF vm-exit handler, we unset the read and write access again so any future access to that page will cause an EPT Violation.
Note that all of the above scenarios happen to one core. Each core has a separate TLB and separate Monitor Trap Flag.
For Execute,
For execution, we use a capability in Intel processors called execute-only.
Execute-only means that we can have a page with execute access enabled while read and write access is disabled.
If the user wants an execution hook, then we find the entry in EPT Table and unset read and write access and set the execute access. Then we create a copy from the original page (Page A) to somewhere else (Page B) and modify the copied page (Page B) with an absolute jump to the hook function.
Now, each time that any instruction attempted to execute our function, the absolute jump is performed, and our hook function is called. Each time any instruction tries to read or write to that location, an EPT Violation occurs as we unset read and write access to that page, so we can swap the original page (Page A) and also set the monitor trap flag to restore the hook after executing one instruction.
Wasn’t it easy ? Review it one more time if you didn’t understand.
You can also think about the different methods; for example, DdiMon creates a copy from that page and modifies the hook location by replacing one bytes (0xcc) breakpoint there. Now it intercepts each breakpoint (using Exception Bitmap) and swaps the original page. This method is much simpler to implement and more reliable, but it causes vm-exit for each hook, so it’s slower, but the first method for EPT Hooks never causes a vm-exit for execution.
Vm-exits for Read and Write hooks are unavoidable.
The execution hook for this part is derived from Gbps hv.
Let’s dig into implementation.
Implementing Hidden Hooks
For hooking functions, first, we split the page into 4KB entries, as described in the previous part. Then find the entry and read that entry. We want to save the details of a hooked page so we can use it later. For read/write hooks, we unset read or write or both, while for executing hooks, we unset read/write access and set execute access and also copy the page contents into a new page and swap the entry’s physical address with the second page’s physical address (fake page’s physical address).
Then we build a trampoline (explained later) and finally decide how to invalidate the TLB based on vmx-state (vmx-root or vmx non-root) and finally add the hook details to the HookedPagesList.
1
2
3
4
5
6
7
8
9
10
11
12
13
14
15
16
17
18
19
20
21
22
23
24
25
26
27
28
29
30
31
32
33
34
35
36
37
38
39
40
41
42
43
44
45
46
47
48
49
50
51
52
53
54
55
56
57
58
59
60
61
62
63
64
65
66
67
68
69
70
71
72
73
74
75
76
77
78
79
80
81
82
83
84
85
86
87
88
89
90
91
92
93
94
95
96
97
98
99
100
101
102
103
104
105
106
107
108
109
110
111
112
113
114
115
116
117
118
119
120
121
122
123
124
125
126
127
128
129
130
131
132
133
134
135
136
137
138
139
140
141
142
143
144
145
146
147
148
/* This function returns false in VMX Non-Root Mode if the VM is already initialized
   This function have to be called through a VMCALL in VMX Root Mode */
BOOLEAN EptPerformPageHook(PVOID TargetAddress, PVOID HookFunction, PVOID* OrigFunction, BOOLEAN UnsetRead, BOOLEAN UnsetWrite, BOOLEAN UnsetExecute) {

	EPT_PML1_ENTRY ChangedEntry;
	INVEPT_DESCRIPTOR Descriptor;
	SIZE_T PhysicalAddress;
	PVOID VirtualTarget;
	PVOID TargetBuffer;
	PEPT_PML1_ENTRY TargetPage;
	PEPT_HOOKED_PAGE_DETAIL HookedPage;
	ULONG LogicalCoreIndex;

	// Check whether we are in VMX Root Mode or Not
	LogicalCoreIndex = KeGetCurrentProcessorIndex();

	if (GuestState[LogicalCoreIndex].IsOnVmxRootMode && !GuestState[LogicalCoreIndex].HasLaunched)
	{
		return FALSE;
	}

	/* Translate the page from a physical address to virtual so we can read its memory.
	 * This function will return NULL if the physical address was not already mapped in
	 * virtual memory.
	 */
	VirtualTarget = PAGE_ALIGN(TargetAddress);

	PhysicalAddress = (SIZE_T)VirtualAddressToPhysicalAddress(VirtualTarget);

	if (!PhysicalAddress)
	{
		LogError("Target address could not be mapped to physical memory");
		return FALSE;
	}

	// Set target buffer, request buffer from pool manager , we also need to allocate new page to replace the current page ASAP
	TargetBuffer = PoolManagerRequestPool(SPLIT_2MB_PAGING_TO_4KB_PAGE, TRUE, sizeof(VMM_EPT_DYNAMIC_SPLIT));

	if (!TargetBuffer)
	{
		LogError("There is no pre-allocated buffer available");
		return FALSE;
	}

	if (!EptSplitLargePage(EptState->EptPageTable, TargetBuffer, PhysicalAddress, LogicalCoreIndex))
	{
		LogError("Could not split page for the address : 0x%llx", PhysicalAddress);
		return FALSE;
	}

	// Pointer to the page entry in the page table.
	TargetPage = EptGetPml1Entry(EptState->EptPageTable, PhysicalAddress);

	// Ensure the target is valid.
	if (!TargetPage)
	{
		LogError("Failed to get PML1 entry of the target address");
		return FALSE;
	}

	// Save the original permissions of the page
	ChangedEntry = *TargetPage;

	/* Execution is treated differently */

	if (UnsetRead)
		ChangedEntry.ReadAccess = 0;
	else
		ChangedEntry.ReadAccess = 1;

	if (UnsetWrite)
		ChangedEntry.WriteAccess = 0;
	else
		ChangedEntry.WriteAccess = 1;


	/* Save the detail of hooked page to keep track of it */
	HookedPage = PoolManagerRequestPool(TRACKING_HOOKED_PAGES, TRUE, sizeof(EPT_HOOKED_PAGE_DETAIL));

	if (!HookedPage)
	{
		LogError("There is no pre-allocated pool for saving hooked page details");
		return FALSE;
	}

	// Save the virtual address
	HookedPage->VirtualAddress = TargetAddress;

	// Save the physical address
	HookedPage->PhysicalBaseAddress = PhysicalAddress;

	// Fake page content physical address
	HookedPage->PhysicalBaseAddressOfFakePageContents = (SIZE_T)VirtualAddressToPhysicalAddress(&HookedPage->FakePageContents[0]) / PAGE_SIZE;

	// Save the entry address
	HookedPage->EntryAddress = TargetPage;

	// Save the orginal entry
	HookedPage->OriginalEntry = *TargetPage;


	// If it's Execution hook then we have to set extra fields
	if (UnsetExecute)
	{
		// Show that entry has hidden hooks for execution
		HookedPage->IsExecutionHook = TRUE;

		// In execution hook, we have to make sure to unset read, write because
		// an EPT violation should occur for these cases and we can swap the original page
		ChangedEntry.ReadAccess = 0;
		ChangedEntry.WriteAccess = 0;
		ChangedEntry.ExecuteAccess = 1;

		// Also set the current pfn to fake page
		ChangedEntry.PageFrameNumber = HookedPage->PhysicalBaseAddressOfFakePageContents;

		// Copy the content to the fake page
		RtlCopyBytes(&HookedPage->FakePageContents, VirtualTarget, PAGE_SIZE);

		// Create Hook
		if (!EptHookInstructionMemory(HookedPage, TargetAddress, HookFunction, OrigFunction))
		{
			LogError("Could not build the hook.");
			return FALSE;
		}
	}

	// Save the modified entry
	HookedPage->ChangedEntry = ChangedEntry;

	// Add it to the list
	InsertHeadList(&EptState->HookedPagesList, &(HookedPage->PageHookList));

	/***********************************************************/
	// if not launched, there is no need to modify it on a safe environment
	if (!GuestState[LogicalCoreIndex].HasLaunched)
	{
		// Apply the hook to EPT
		TargetPage->Flags = ChangedEntry.Flags;
	}
	else
	{
		// Apply the hook to EPT
		EptSetPML1AndInvalidateTLB(TargetPage, ChangedEntry, INVEPT_SINGLE_CONTEXT);
	}

	return TRUE;
}
Now we need a function that creates another page and patches the original page (Page A) with an absolute jump (trampoline) that jumps another page (Page B).
In (Page B) we will jump to the hooked function also this function copies the bytes that are patched to the (Page B) and save the original function for the caller to return back to the original page on (Page B).
This is a simple inline hook that we use LDE (LDE64x64) as the detour function.
1
2
3
4
5
6
7
8
9
10
11
12
13
14
15
16
17
18
19
20
21
22
23
24
25
26
27
28
29
30
31
32
33
34
35
36
37
38
39
40
41
42
43
44
45
46
47
48
49
50
51
52
BOOLEAN EptHookInstructionMemory(PEPT_HOOKED_PAGE_DETAIL Hook, PVOID TargetFunction, PVOID HookFunction, PVOID* OrigFunction)
{
	SIZE_T SizeOfHookedInstructions;
	SIZE_T OffsetIntoPage;

	OffsetIntoPage = ADDRMASK_EPT_PML1_OFFSET((SIZE_T)TargetFunction);
	LogInfo("OffsetIntoPage: 0x%llx", OffsetIntoPage);

	if ((OffsetIntoPage + 13) > PAGE_SIZE - 1)
	{
		LogError("Function extends past a page boundary. We just don't have the technology to solve this.....");
		return FALSE;
	}

	/* Determine the number of instructions necessary to overwrite using Length Disassembler Engine */
	for (SizeOfHookedInstructions = 0;
		SizeOfHookedInstructions < 13;
		SizeOfHookedInstructions += LDE(TargetFunction, 64))
	{
		// Get the full size of instructions necessary to copy
	}

	LogInfo("Number of bytes of instruction mem: %d", SizeOfHookedInstructions);

	/* Build a trampoline */

	/* Allocate some executable memory for the trampoline */
	Hook->Trampoline = PoolManagerRequestPool(EXEC_TRAMPOLINE, TRUE, MAX_EXEC_TRAMPOLINE_SIZE);

	if (!Hook->Trampoline)
	{
		LogError("Could not allocate trampoline function buffer.");
		return FALSE;
	}

	/* Copy the trampoline instructions in. */
	RtlCopyMemory(Hook->Trampoline, TargetFunction, SizeOfHookedInstructions);

	/* Add the absolute jump back to the original function. */
	EptHookWriteAbsoluteJump(&Hook->Trampoline[SizeOfHookedInstructions], (SIZE_T)TargetFunction + SizeOfHookedInstructions);

	LogInfo("Trampoline: 0x%llx", Hook->Trampoline);
	LogInfo("HookFunction: 0x%llx", HookFunction);

	/* Let the hook function call the original function */
	*OrigFunction = Hook->Trampoline;

	/* Write the absolute jump to our shadow page memory to jump to our hook. */
	EptHookWriteAbsoluteJump(&Hook->FakePageContents[OffsetIntoPage], (SIZE_T)HookFunction);

	return TRUE;
}
For creating a simple absolute jump we use the following function.
1
2
3
4
5
6
7
8
9
10
11
12
13
14
15
16
17
/* Write an absolute x64 jump to an arbitrary address to a buffer. */
VOID EptHookWriteAbsoluteJump(PCHAR TargetBuffer, SIZE_T TargetAddress)
{
	/* mov r15, Target */
	TargetBuffer[0] = 0x49;
	TargetBuffer[1] = 0xBB;

	/* Target */
	*((PSIZE_T)&TargetBuffer[2]) = TargetAddress;

	/* push r15 */
	TargetBuffer[10] = 0x41;
	TargetBuffer[11] = 0x53;

	/* ret */
	TargetBuffer[12] = 0xC3;
}
In the case of EPT Violations, first, we find the details of the physical address that caused this vm-exit. Then we call EptHandleHookedPage to create a log about the details then we set an MTF to restore to the hooked state after executing one instruction.
1
2
3
4
5
6
7
8
9
10
11
12
13
14
15
16
17
18
19
20
21
22
23
24
25
26
27
28
29
30
31
32
33
34
35
36
37
38
39
40
41
42
43
44
45
46
47
48
49
50
/* Check if this exit is due to a violation caused by a currently hooked page. Returns FALSE
 * if the violation was not due to a page hook.
 *
 * If the memory access attempt was RW and the page was marked executable, the page is swapped with
 * the original page.
 *
 * If the memory access attempt was execute and the page was marked not executable, the page is swapped with
 * the hooked page.
 */
BOOLEAN EptHandlePageHookExit(VMX_EXIT_QUALIFICATION_EPT_VIOLATION ViolationQualification, UINT64 GuestPhysicalAddr)
{
	BOOLEAN IsHandled = FALSE;
	PLIST_ENTRY TempList = 0;

	TempList = &EptState->HookedPagesList;
	while (&EptState->HookedPagesList != TempList->Flink)
	{
		TempList = TempList->Flink;
		PEPT_HOOKED_PAGE_DETAIL HookedEntry = CONTAINING_RECORD(TempList, EPT_HOOKED_PAGE_DETAIL, PageHookList);
		if (HookedEntry->PhysicalBaseAddress == PAGE_ALIGN(GuestPhysicalAddr))
		{
			/* We found an address that match the details */

			/*
			   Returning true means that the caller should return to the ept state to the previous state when this instruction is executed
			   by setting the Monitor Trap Flag. Return false means that nothing special for the caller to do
			*/
			if (EptHandleHookedPage(HookedEntry, ViolationQualification, GuestPhysicalAddr))
			{
				// Next we have to save the current hooked entry to restore on the next instruction's vm-exit
				GuestState[KeGetCurrentProcessorNumber()].MtfEptHookRestorePoint = HookedEntry;

				// We have to set Monitor trap flag and give it the HookedEntry to work with
				HvSetMonitorTrapFlag(TRUE);


			}

			// Indicate that we handled the ept violation
			IsHandled = TRUE;

			// Get out of the loop
			break;
		}
	}
	// Redo the instruction
	GuestState[KeGetCurrentProcessorNumber()].IncrementRip = FALSE;
	return IsHandled;

}
Each time an EPT Violation occurs, we check whether it was because Read Access or Write Access or Execute Access violation and log GUEST_RIP, then we restore the initial flags (All read, write, and exec is allowed).
1
2
3
4
5
6
7
8
9
10
11
12
13
14
15
16
17
18
19
20
21
22
23
24
25
26
27
28
29
30
31
32
33
34
35
36
37
38
39
40
41
42
BOOLEAN EptHandleHookedPage(EPT_HOOKED_PAGE_DETAIL* HookedEntryDetails, VMX_EXIT_QUALIFICATION_EPT_VIOLATION ViolationQualification, SIZE_T PhysicalAddress) {

	ULONG64 GuestRip;
	ULONG64 ExactAccessedAddress;
	ULONG64 AlignedVirtualAddress;
	ULONG64 AlignedPhysicalAddress;


	// Get alignment
	AlignedVirtualAddress = PAGE_ALIGN(HookedEntryDetails->VirtualAddress);
	AlignedPhysicalAddress = PAGE_ALIGN(PhysicalAddress);

	// Let's read the exact address that was accesses
	ExactAccessedAddress = AlignedVirtualAddress + PhysicalAddress - AlignedPhysicalAddress;

	// Reading guest's RIP
	__vmx_vmread(GUEST_RIP, &GuestRip);

	if (!ViolationQualification.EptExecutable && ViolationQualification.ExecuteAccess)
	{
		LogInfo("Guest RIP : 0x%llx tries to execute the page at : 0x%llx", GuestRip, ExactAccessedAddress);

	}
	else if (!ViolationQualification.EptWriteable && ViolationQualification.WriteAccess)
	{
		LogInfo("Guest RIP : 0x%llx tries to write on the page at :0x%llx", GuestRip, ExactAccessedAddress);
	}
	else if (!ViolationQualification.EptReadable && ViolationQualification.ReadAccess)
	{
		LogInfo("Guest RIP : 0x%llx tries to read the page at :0x%llx", GuestRip, ExactAccessedAddress);
	}
	else
	{
		// there was an unexpected ept violation
		return FALSE;
	}

	EptSetPML1AndInvalidateTLB(HookedEntryDetails->EntryAddress, HookedEntryDetails->OriginalEntry, INVEPT_SINGLE_CONTEXT);

	// Means that restore the Entry to the previous state after current instruction executed in the guest
	return TRUE;
}
That’s it! We have a working hidden hooks.
Removing Hooks From Pages
Removing hooks from pages are essential to us because of two reasons; first, sometimes we need to disable the hooks, and second, when we want to turn off hypervisor, we have to remove all the hooks. Otherwise, we might encounter strange behavior.
Removing hooks is simple as we saved details, including original entries in PageHookList; we have to find entries in this list and broadcast to all processors to update their TLBs and also remove that entry.
The following function is for this purpose.
1
2
3
4
5
6
7
8
9
10
11
12
13
14
15
16
17
18
19
20
21
22
23
24
25
26
27
28
29
30
31
32
33
34

/* Remove single hook from the hooked pages list and invalidate TLB */
BOOLEAN HvPerformPageUnHookSinglePage(UINT64 VirtualAddress) {
	PLIST_ENTRY TempList = 0;
	SIZE_T PhysicalAddress;

	PhysicalAddress = PAGE_ALIGN(VirtualAddressToPhysicalAddress(VirtualAddress));

	// Should be called from vmx non-root
	if (GuestState[KeGetCurrentProcessorNumber()].IsOnVmxRootMode)
	{
		return FALSE;
	}

	TempList = &EptState->HookedPagesList;
	while (&EptState->HookedPagesList != TempList->Flink)
	{
		TempList = TempList->Flink;
		PEPT_HOOKED_PAGE_DETAIL HookedEntry = CONTAINING_RECORD(TempList, EPT_HOOKED_PAGE_DETAIL, PageHookList);

		if (HookedEntry->PhysicalBaseAddress == PhysicalAddress)
		{
			// Remove it in all the cores
			KeGenericCallDpc(HvDpcBroadcastRemoveHookAndInvalidateSingleEntry, HookedEntry->PhysicalBaseAddress);

			// remove the entry from the list
			RemoveEntryList(HookedEntry->PageHookList.Flink);

			return TRUE;
		}
	}
	// Nothing found , probably the list is not found
	return FALSE;
}
In vmx-root, we also search for the specific hook and use EptSetPML1AndInvalidateTLB to return that entry to the initial state, which is previously saved in OriginalEntry.
1
2
3
4
5
6
7
8
9
10
11
12
13
14
15
16
17
18
19
20
21
22
23
24
25
26
/* Remove and Invalidate Hook in TLB */
// Caution : This function won't remove entries from LIST_ENTRY, just invalidate the paging, use HvPerformPageUnHookSinglePage instead
BOOLEAN EptPageUnHookSinglePage(SIZE_T PhysicalAddress) {
	PLIST_ENTRY TempList = 0;

	// Should be called from vmx-root, for calling from vmx non-root use the corresponding VMCALL
	if (!GuestState[KeGetCurrentProcessorNumber()].IsOnVmxRootMode)
	{
		return FALSE;
	}

	TempList = &EptState->HookedPagesList;
	while (&EptState->HookedPagesList != TempList->Flink)
	{
		TempList = TempList->Flink;
		PEPT_HOOKED_PAGE_DETAIL HookedEntry = CONTAINING_RECORD(TempList, EPT_HOOKED_PAGE_DETAIL, PageHookList);
		if (HookedEntry->PhysicalBaseAddress == PAGE_ALIGN(PhysicalAddress))
		{
			// Undo the hook on the EPT table
			EptSetPML1AndInvalidateTLB(HookedEntry->EntryAddress, HookedEntry->OriginalEntry, INVEPT_SINGLE_CONTEXT);
			return TRUE;
		}
	}
	// Nothing found , probably the list is not found
	return FALSE;
}
If we want to unhook all the pages, then we use another VMCALL, there is no need to iterate through the list here as all of the hooks must be removed. Just broadcast it through all the cores.
1
2
3
4
5
6
7
8
9
10
11
12
13
14
15
/* Remove all hooks from the hooked pages list and invalidate TLB */
// Should be called from Vmx Non-root
VOID HvPerformPageUnHookAllPages() {

	// Should be called from vmx non-root
	if (GuestState[KeGetCurrentProcessorNumber()].IsOnVmxRootMode)
	{
		return;
	}

	// Remove it in all the cores
	KeGenericCallDpc(HvDpcBroadcastRemoveHookAndInvalidateAllEntries, 0x0);

	// No need to remove the list as it will automatically remove by the pool uninitializer
}
In vmx-root we just iterate through the list and restore them to the initial state.
1
2
3
4
5
6
7
8
9
10
11
12
13
14
15
16
17
18
19
20
21
/* Remove and Invalidate Hook in TLB */
// Caution : This function won't remove entries from LIST_ENTRY, just invalidate the paging, use HvPerformPageUnHookAllPages instead
VOID EptPageUnHookAllPages() {
	PLIST_ENTRY TempList = 0;

	// Should be called from vmx-root, for calling from vmx non-root use the corresponding VMCALL
	if (!GuestState[KeGetCurrentProcessorNumber()].IsOnVmxRootMode)
	{
		return FALSE;
	}

	TempList = &EptState->HookedPagesList;
	while (&EptState->HookedPagesList != TempList->Flink)
	{
		TempList = TempList->Flink;
		PEPT_HOOKED_PAGE_DETAIL HookedEntry = CONTAINING_RECORD(TempList, EPT_HOOKED_PAGE_DETAIL, PageHookList);

		// Undo the hook on the EPT table
		EptSetPML1AndInvalidateTLB(HookedEntry->EntryAddress, HookedEntry->OriginalEntry, INVEPT_SINGLE_CONTEXT);
	}
}
An Important Note When Modifying EPT Entries
One interesting thing that I encountered during the test of my driver on the multi-core system was the fact that EPT entries should be modified in one instruction.
For example, if you change the access bits of an EPT entry, bit by bit, then you probably get the error (EPT Misconfiguration) that one access bits changed and before the next access bit applies another core tries to access page table and it sometimes leads to an EPT Misconfiguration and sometimes you might not get the desired behavior.
For example the following method for modifying EPT entries is wrong!
1
2
3
HookedEntryDetails->EntryAddress->ExecuteAccess = 1;
HookedEntryDetails->EntryAddress->WriteAccess = 1;
HookedEntryDetails->EntryAddress->ReadAccess = 1;
But the following code is correct. (Applying changes in one instruction instantly).
1
2
		// Apply the hook to EPT
		TargetPage->Flags = OriginalEntry.Flags;
This is why we have the following function that acquires a spinlock that makes sure that only one entry is modified once and then invalidate that core’s TLB.
1
2
3
4
5
6
7
8
9
10
11
12
13
14
15
16
17
18
19
20
21
22
/*  This function set the specific PML1 entry in a spinlock protected area then invalidate the TLB ,
	this function should be called from vmx root-mode
*/
VOID EptSetPML1AndInvalidateTLB(PEPT_PML1_ENTRY EntryAddress, EPT_PML1_ENTRY EntryValue, INVEPT_TYPE InvalidationType)
{
	// acquire the lock
	SpinlockLock(&Pml1ModificationAndInvalidationLock);
	// set the value
	EntryAddress->Flags = EntryValue.Flags;

	// invalidate the cache
	if (InvalidationType == INVEPT_SINGLE_CONTEXT)
	{
		InveptSingleContext(EptState->EptPointer.Flags);
	}
	else
	{
		InveptAllContexts();
	}
	// release the lock
	SpinlockUnlock(&Pml1ModificationAndInvalidationLock);
}
The above function solves the problems of simultaneously modifying the EPT Table as we have one EPT Table for all cores.
System-Call Hook
When it comes to hypervisors, we have different options for hooking system-calls. Each of these methods has its own advantages and disadvantages.
Let’s review some of the methods, that we can use to hook system-calls.
The first method is hooking MSR 0xc0000082 (LSTAR). This MSR is the kernel-entry for dispatching system-calls. Each time an instruction like Syscall is executed in user-mode, the processor automatically switches to kernel-mode and runs the address stored in this MSR. In Windows address of KiSystemCall64 is stored in this MSR.
This means that each time an application needs to call a system-call, it executes a syscall, and now this function is responsible for finding the entries in SSDT and call. In short, SSDT is a table in Windows that stores pointer to Windows function based on a system-call number. All SSDT entries and LSTAR MSR is under the control of PatchGuard.
This brings us three possibilities!
First, we can change the MSR LSTAR to point to our custom function, and to make it PatchGuard compatible, we can set MSR Bitmap that if any kernel routine wants to read this MSR, then a vm-exit occurs so we can change the result. Instead of showing our custom handler, we can show the KiSystemCall64, and PatchGuard will never know that this is a fake MSR.
Hooking MSR LSTAR is complicated, and updates to Meltdown make it even more complicated. In a post-meltdown system, LSTAR points to KiSystemCall64Shadow, which involves changing CR3 and execute KPTI-related instruction and Meltdown mitigation. It’s not a good idea to hook LSTAR as we have difficulties with pre-Meltdown and post-Meltdown mitigations and also as the system-state changes in this MSR so we can’t hook anything in the kernel as the kernel is not mapped on CR3.
Hyperbone uses this method (even it not updated for post-meltdown systems in the time of writing this article).
The second option is finding SSDT tables and change their entry to point to our custom functions, each time the PatchGuard tries to audit these entries, we can show it the not-patched listings. The only thing that we should keep in mind is to find where KiSystemCall64 tries to read that location and save that location somewhere so we can know that if the function that tries to read is syscall dispatcher our other functions (and probably PatchGuard).
Implementing this method is not super-fast as we need to unset EPT Read for SSDT entry, and each time a read happens, a vm-exit occurs, so we have one vm-exit for each syscall thus it makes our computer slow!
The third option is finding functions in SSDT entries and put a hidden hook on the functions that we need to hook. This way, we can catch a custom list of functions because I think hooking all system-calls is stupid!
We implement the third option in this part.
Another possible way is Syscall Hooking Via Extended Feature Enable Register (EFER), as described here. This method is based on disabling Syscall Enable (or SCE bit) of the EFER MSR; hence each time a Syscall is executed, a #UD exception is generated by the processor, and we can intercept #UD by using Exception Bitmap (described above) to handle these syscalls.
Again it’s not a good idea because it leads to a vm-exit for each syscall; thus, it’s substantially slow but usable for experimental purposes.
Also, they might be other options. Don’t hesitate to send a comment to this post and describe if you know one!
Finding Kernel Base
To find SSDT, we need to find nt!KeServiceDescriptorTable and nt!KeServiceDescriptorTableShadow, these tables are exported in x86 systems but not in x64. This makes the things much complicated as the routines to find these tables might change in future versions of Windows; thus, our Syscall hooker might have problems in future versions.
First of all, we need to find the base address of ntoskrnl, and it’s the image size, this is done by using ZwQuerySystemInformation, first, we find this function by using MmGetSystemRoutineAddress.
Then we allocate a memory to get the details from Windows and find the base address and module size.
1
2
3
4
5
6
7
8
9
10
11
12
13
14
15
16
17
18
19
20
21
22
23
24
25
26
27
28
29
30
31
32
33
34
35
36
37
38
39
40
41
42
43
44
45
46
47
48
49
50
51
52
53
54
55
56
57
/* Get the kernel base and Image size */
PVOID SyscallHookGetKernelBase(PULONG pImageSize)
{
	NTSTATUS status;
	ZWQUERYSYSTEMINFORMATION ZwQSI = 0;
	UNICODE_STRING routineName;
	PVOID pModuleBase = NULL;
	PSYSTEM_MODULE_INFORMATION pSystemInfoBuffer = NULL;
	ULONG SystemInfoBufferSize = 0;


	RtlInitUnicodeString(&routineName, L"ZwQuerySystemInformation");
	ZwQSI = (ZWQUERYSYSTEMINFORMATION)MmGetSystemRoutineAddress(&routineName);
	if (!ZwQSI)
		return NULL;


	status = ZwQSI(SystemModuleInformation,
		&SystemInfoBufferSize,
		0,
		&SystemInfoBufferSize);

	if (!SystemInfoBufferSize)
	{
		LogError("ZwQuerySystemInformation (1) failed");
		return NULL;
	}

	pSystemInfoBuffer = (PSYSTEM_MODULE_INFORMATION)ExAllocatePool(NonPagedPool, SystemInfoBufferSize * 2);

	if (!pSystemInfoBuffer)
	{
		LogError("ExAllocatePool failed");
		return NULL;
	}

	memset(pSystemInfoBuffer, 0, SystemInfoBufferSize * 2);

	status = ZwQSI(SystemModuleInformation,
		pSystemInfoBuffer,
		SystemInfoBufferSize * 2,
		&SystemInfoBufferSize);

	if (NT_SUCCESS(status))
	{
		pModuleBase = pSystemInfoBuffer->Module[0].ImageBase;
		if (pImageSize)
			*pImageSize = pSystemInfoBuffer->Module[0].ImageSize;
	}
	else {
		LogError("ZwQuerySystemInformation (2) failed");
		return NULL;
	}

	ExFreePool(pSystemInfoBuffer);
	return pModuleBase;
}
Update 2: You can also use RtlPcToFileHeader instead of above method:
1
RtlPcToFileHeader(&RtlPcToFileHeader, &NtoskrnlBase);
Finding SSDT and Shadow SSDT Tables
Now that we have the base address ntoskrnl we can search for this pattern to find nt!KeServiceDescriptorTableShadow.
1
	const unsigned char KiSystemServiceStartPattern[] = { 0x8B, 0xF8, 0xC1, 0xEF, 0x07, 0x83, 0xE7, 0x20, 0x25, 0xFF, 0x0F, 0x00, 0x00 };
nt!KeServiceDescriptorTableShadow contains the nt!KiServiceTable and win32k!W32pServiceTable, which is the SSDT of Syscall function for both NT Syscalls and Win32K Syscalls.
1
2
3
4
5
6
7
8
9
10
11
12
13
14
15
16
17
18
19
20
21
22
23
24
25
26
27
28
29
30
31
32
33
34
35
36
37
38
39
40
41
42
43
44
45
46
47
48
49
50
51
52
53
54
55
56
57
58
59
60

/* Find SSDT address of Nt fucntions and W32Table */
BOOLEAN SyscallHookFindSsdt(PUINT64 NtTable, PUINT64 Win32kTable)
{
	ULONG kernelSize = 0;
	ULONG_PTR kernelBase;
	const unsigned char KiSystemServiceStartPattern[] = { 0x8B, 0xF8, 0xC1, 0xEF, 0x07, 0x83, 0xE7, 0x20, 0x25, 0xFF, 0x0F, 0x00, 0x00 };
	const ULONG signatureSize = sizeof(KiSystemServiceStartPattern);
	BOOLEAN found = FALSE;
	LONG relativeOffset = 0;
	ULONG_PTR addressAfterPattern;
	ULONG_PTR address;
	SSDTStruct* shadow;
	PVOID ntTable;
	PVOID win32kTable;

	//x64 code
	kernelBase = (ULONG_PTR)SyscallHookGetKernelBase(&kernelSize);

	if (kernelBase == 0 || kernelSize == 0)
		return FALSE;

	// Find KiSystemServiceStart

	ULONG KiSSSOffset;
	for (KiSSSOffset = 0; KiSSSOffset < kernelSize - signatureSize; KiSSSOffset++)
	{
		if (RtlCompareMemory(((unsigned char*)kernelBase + KiSSSOffset), KiSystemServiceStartPattern, signatureSize) == signatureSize)
		{
			found = TRUE;
			break;
		}
	}

	if (!found)
		return FALSE;

	addressAfterPattern = kernelBase + KiSSSOffset + signatureSize;
	address = addressAfterPattern + 7; // Skip lea r10,[nt!KeServiceDescriptorTable]
	// lea r11, KeServiceDescriptorTableShadow
	if ((*(unsigned char*)address == 0x4c) &&
		(*(unsigned char*)(address + 1) == 0x8d) &&
		(*(unsigned char*)(address + 2) == 0x1d))
	{
		relativeOffset = *(LONG*)(address + 3);
	}

	if (relativeOffset == 0)
		return FALSE;

	shadow = (SSDTStruct*)(address + relativeOffset + 7);

	ntTable = (PVOID)shadow;
	win32kTable = (PVOID)((ULONG_PTR)shadow + 0x20);    // Offset showed in Windbg

	*NtTable = ntTable;
	*Win32kTable = win32kTable;

	return TRUE;
}
Note that nt!KeServiceDescriptorTable only contains the nt!KiServiceTable, and it doesn’t provide win32k!W32pServiceTable.
Get Routine Address by Syscall Number
After finding the NT Syscall Table and Win32k Syscall Table, now it’s time to translate Syscall Numbers to its corresponding address.
The following formula converts API Number to function address.
1
((SSDT->pServiceTable[ApiNumber] >> 4) + SSDTbase);
Keep in mind that NT Syscalls start from 0x0, but Win32k Syscalls start from 0x1000, so as we computer indexes based on the start of the table, we should minus the Win32k Syscalls with 0x1000.
All in all, we have the following function.
1
2
3
4
5
6
7
8
9
10
11
12
13
14
15
16
17
18
19
20
21
22
23
24
25
26
27
28
29
30
31
32
33
34
35
36
37
38
39
/* Find entry from SSDT table of Nt fucntions and W32Table syscalls */
PVOID SyscallHookGetFunctionAddress(INT32 ApiNumber, BOOLEAN GetFromWin32k)
{
	SSDTStruct* SSDT;
	BOOLEAN Result;
	ULONG_PTR SSDTbase;
	ULONG ReadOffset;
	UINT64 NtTable, Win32kTable;

	// Read the address og SSDT
	Result = SyscallHookFindSsdt(&NtTable, &Win32kTable);

	if (!Result)
	{
		LogError("SSDT not found");
		return 0;
	}

	if (!GetFromWin32k)
	{
		SSDT = NtTable;
	}
	else
	{
		// Win32k APIs start from 0x1000
		ApiNumber = ApiNumber - 0x1000;
		SSDT = Win32kTable;
	}

	SSDTbase = (ULONG_PTR)SSDT->pServiceTable;

	if (!SSDTbase)
	{
		LogError("ServiceTable not found");
		return 0;
	}
	return (PVOID)((SSDT->pServiceTable[ApiNumber] >> 4) + SSDTbase);

}
Now that we have the address of the routine that we want, now it’s time to put a hidden hook on that function, we also need their functions prototypes so we can read their arguments appropriately.
The syscall hook example is demonstrated later in the (How to test?) section.

Virtual Processor ID (VPID) & TLB
In Intel, its explanation about VPIDs is vague, so I found a great link that explains is so much more straightforward; hence it’s better to read the details below instead of starting with SDM.
The translation lookaside buffer (TLB) is a high-speed memory page cache for virtual to physical address translation. It follows the local principle to avoid time-consuming lookups for recently used pages.
Host mappings are not coherent to the guest and vice versa. Each guest has it’s own address space, the mapping table cannot be re-used in another guest (or host). Therefore first-generation VMs like Intel Core 2 (VMX) flush the TLB on each VM-enter (resume) and VM-exit. But flushing the TLB is a show-stopper, it is one of the most critical components in a modern CPU.
Intel engineers started to think about that. Intel Nehalem TLB entries have changed by introducing a Virtual Processor ID. So each TLB entry is tagged with this ID. The CPU does not specify VPIDs, the hypervisor allocates them, whereas the host VPID is 0. Starting with Intel Nehalem, the TLB must not be flushed. When a process tries to access a mapping where the actual VPID does not match with the TLB entry VPID a standard TLB miss occurs. Some Intel numbers show that the latency performance gain is 40% for a VM round trip transition compared to Meron, an Intel Core 2.
Imagine you have two or more VMs:
- If you enable VPIDs, you don’t have to worry that VM1 accidentally, fetches cached memory of VM2 (or even hypervisor itself)
- If you don’t enable VPIDs, CPU assigns VPID=0 to all operations (VMX root & VMX non-root) and flushes TLB on each transition for you
A logical processor may tag some cached information with a 16-bit VPID.
The VPID is 0000H in the following situations:
- Outside VMX operation. (e.g System Management Mode (SMM)).
- VMX root operation
- VMX non-root operation when the “enable VPID” VM-execution control is 0
INVVPID - Invalidate Translations Based on VPID
In order to support VPIDs, we have to add CPU_BASED_CTL2_ENABLE_VPID to Secondary Processor-Based VM-Execution Controls.
The next step is to set a 16-bit value to VMCS’s VIRTUAL_PROCESSOR_ID field using VMWRITE instruction. This value is used as an index for the current VMCS on this core so our current VMCS’s VPID is 1.
Also, as described above, 0 has special meaning and should not be used.
1
2
3
4
5
6
	// Set up VPID

	/* For all processors, we will use a VPID = 1. This allows the processor to separate caching
	   of EPT structures away from the regular OS page translation tables in the TLB.	*/

	__vmx_vmwrite(VIRTUAL_PROCESSOR_ID, 1);
INVVPID (instruction) invalidates mappings in the translation lookaside buffers (TLBs) and paging-structure caches based on the virtual processor identifier (VPID).
For the INVVPID there are 4 types that currently supported by the processors which are reported in the IA32_VMX_EPT_VPID_CAP MSR.
The enumeration for these types are :
1
2
3
4
5
6
7
typedef enum _INVVPID_ENUM
{
	INDIVIDUAL_ADDRESS = 0x00000000,
	SINGLE_CONTEXT = 0x00000001,
	ALL_CONTEXT = 0x00000002,
	SINGLE_CONTEXT_RETAINING_GLOBALS = 0x00000003
}INVVPID_ENUM, *PINVVPID_ENUM;
I’ll describe these types in detail later.
For the implementation of INVVPID we use an assembly function like this (which executes invvpid from the RCX and RDX for x64 fast calling convention) :
1
2
3
4
5
6
7
8
9
10
11
12
13
14
15
16
17
AsmInvept PROC PUBLIC

    invept  rcx, oword ptr [rdx]
    jz @jz
    jc @jc
    xor     rax, rax
    ret

    @jz:
    mov     rax, VMX_ERROR_CODE_FAILED_WITH_STATUS
    ret

    @jc:
    mov     rax, VMX_ERROR_CODE_FAILED
    ret

AsmInvept ENDP
and then, a general purpose function for calling this assembly function :
1
2
3
4
5
6
7
8
9
10
inline Invvpid(INVVPID_ENUM Type, INVVPID_DESCRIPTOR* Descriptor)
{
	if (!Descriptor)
	{
		static INVVPID_DESCRIPTOR ZeroDescriptor = { 0 };
		Descriptor = &ZeroDescriptor;
	}

	return AsmInvvpid(Type, Descriptor);
}
For INVVPID, there is a descriptor defined below.
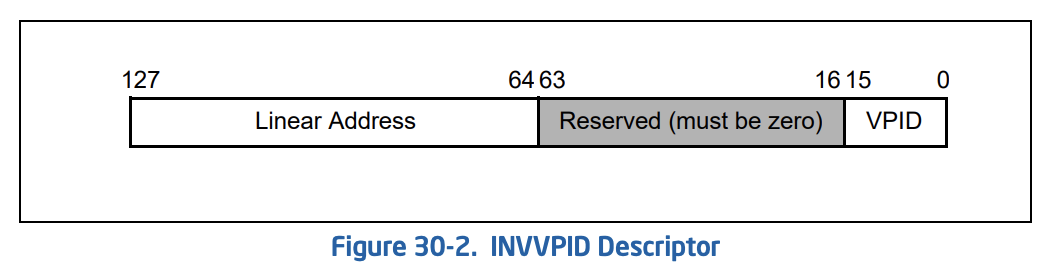
This structure defined like this :
1
2
3
4
5
6
7
typedef struct _INVVPID_DESCRIPTOR
{
	UINT64 VPID : 16;
	UINT64 RESERVED : 48;
	UINT64 LINEAR_ADDRESS;

} INVVPID_DESCRIPTOR, *PINVVPID_DESCRIPTOR;
The types of INVVPID is defined as below :
- Individual-address invalidation: If the INVVPID type is 0, the logical processor invalidates mappings for the linear address, and VPID specified in the INVVPID descriptor. In some cases, it may invalidate mappings for other linear addresses (or other VPIDs) as well.
1
2
3
4
5
inline InvvpidIndividualAddress(UINT16 Vpid, UINT64 LinearAddress)
{
	INVVPID_DESCRIPTOR Descriptor = { Vpid, 0, LinearAddress };
	return Invvpid(INDIVIDUAL_ADDRESS, &Descriptor);
}
- Single-context invalidation: If the INVVPID type is 1, the logical processor invalidates all mappings tagged with the VPID specified in the INVVPID descriptor. In some cases, it may invalidate mappings for other VPIDs as well.
1
2
3
4
5
inline InvvpidSingleContext(UINT16 Vpid)
{
	INVVPID_DESCRIPTOR Descriptor = { Vpid, 0, 0 };
	return Invvpid(SINGLE_CONTEXT, &Descriptor);
}
- All-contexts invalidation: If the INVVPID type is 2, the logical processor invalidates all mappings tagged with all VPIDs except VPID 0000H. In some cases, it may invalidate translations with VPID 0000H as well.
1
2
3
4
inline InvvpidAllContexts()
{
	return Invvpid(ALL_CONTEXT, NULL);
}
- Single-context invalidation, retaining global translations: If the INVVPID type is 3, the logical processor invalidates all mappings tagged with the VPID specified in the INVVPID descriptor except global translations. In some cases, it may invalidate global translations (and mappings with other VPIDs) as well. See the “Caching Translation Information” section in Chapter 4 of the IA-32 Intel Architecture Software Developer’s Manual, Volumes 3A for information about global translations.
1
2
3
4
5
inline InvvpidSingleContextRetainingGlobals(UINT16 Vpid)
{
	INVVPID_DESCRIPTOR Descriptor = { Vpid, 0, 0 };
	return Invvpid(SINGLE_CONTEXT_RETAINING_GLOBALS, &Descriptor);
}
You probably think about how VPIDs can be used in the hypervisor. We can use it instead of INVEPT, but generally, it doesn’t have any particular usage for us. I described it more in the Discussion Section. By the way, VPIDs will be used in implementing special features as it’s more flexible than INVEPT and also when we have multiple VMCS (EPTP). (Can you think about some of them?).
Important Notes For Using VPIDs
There are some important things that you should know when using VPIDs.
Enabling VPIDs have a side-effect of not flushing TLB on VMEntry/VMExit. You should manually flush guest TLB entries if required (By using INVEPT/INVVPID). These issues might be hidden when VPID is disabled.
When VPID is disabled, VMEntry flushes the entire TLB. Thus, the hypervisor doesn’t need to explicitly invalidate TLB entries populated by the guest when performing an operation that should invalidate them (e.g., Modifying an EPT entry). When VPID is enabled, INVEPT/INVVPID should be used.
An easy way for you to find these kinds of issues is indeed the issue you have, is to execute INVEPT global-context before every VMEntry to flush entire TLB while still keeping VPID enabled. If it now works, you should check where you are missing an INVEPT execution.
In my experience, if you just enable VPIDs without any extra assumption, all processes start to crash one by one, and eventually, kernel crashes, and this is because we didn’t invalidate the TLB.
In order to solve the problem of crashing every process, we have to invalidate TLB in the case of Mov to Cr3 thus whenever a vm-exit occurs with reason == EXIT_REASON_CR_ACCESS (28) then if it’s a Mov to Cr3 we have to invalidate TLB (INVEPT or INVVPID [Look at the Update 1 for more details]).
So we edit the code like this:
1
2
3
4
5
6
7
8
9
10
11
12
13
14
15
16
17
18
19
20
21
22
23
	case TYPE_MOV_TO_CR:
	{
		switch (CrExitQualification->Fields.ControlRegister)
		{
		case 0:
			__vmx_vmwrite(GUEST_CR0, *RegPtr);
			__vmx_vmwrite(CR0_READ_SHADOW, *RegPtr);
			break;
		case 3:
			__vmx_vmwrite(GUEST_CR3, (*RegPtr & ~(1ULL << 63)));
			// InveptSingleContext(EptState->EptPointer.Flags); (changed, look for "Update 1" at the 8th part for more detail)
			InvvpidSingleContext(VPID_TAG);
			break;
		case 4:
			__vmx_vmwrite(GUEST_CR4, *RegPtr);
			__vmx_vmwrite(CR4_READ_SHADOW, *RegPtr);

			break;
		default:
			LogWarning("Unsupported register %d in handling control registers access", CrExitQualification->Fields.ControlRegister);
			break;
		}
	}
Also, note that as we have a single EPTP for all cores then it’s enough to invalidate single-context otherwise we have to invalidate all-contexts.
Update 1 : As Satoshi Tanda mentioned,
The CR3 handler should use INVVPID instead of INVEPT because INVEPT invalidates more than needed. We want to invalid caches of GVA -> HPA (combined mappings), and both instructions do this. This is why INVEPT works too, but INVEPT also invalidates caches of GPA -> HPA (guest-physical mappings), which are not impacted by the guest CR3 change and can be kept without invalidation.
The general guideline is, INVVPID when TLB flush emulation is needed, and INVEPT when EPT entries are changed. You can find more info on those instructions and cache types in :
- 28.3.1 Information That May Be Cached
- 28.3.3.3 Guidelines for Use of the INVVPID Instruction.
so instead of InveptSingleContext we used InvvpidSingleContext.
Honestly, we have some misunderstanding about handling Cr3 vm-exits, even though the above code works fine, but generally, it has some performance penalties. I’ll explain these performance problems in the “Fixing Previous Design Issues” section.
You might also ask why we avoid writing the 63rd bit of the CR3.
1
			__vmx_vmwrite(GUEST_CR3, (*RegPtr & ~(1ULL << 63)));
Bit 63 of CR3 is a new bit that is part of the PCID feature. It allows OS to change CR3 value without invalidating all TLB entries (tagged with the same EP4TA and VPID) besides those marked with global-bit.
EP4TA is the value of bits 51:12 of EPTP.
E.g. Windows KVA Shadowing and Linux KPTI signal this bit on CR3 mov that changes PCID between userspace PCID and kernel space PCID on user and kernel transitions.
We should not write on bit 63 of CR3 on mov reg, cr3 emulation because the processor does not write and attempt to write this will cause a crash on modern Win10.
INVVPID vs. INVPCID
INVPCID is not really relevant to hypervisor but in the case, if you want to know, INVPCID invalidates mappings in the translation lookaside buffers (TLBs) and paging-structure caches based on the process-context identifier (PCID).
So it’s like INVVPID with the difference that it’s not specific to the hypervisor. It also has its particular contexts (currently 3), you can read more here but generally keep in mind that to reduce that overhead, a feature called Process Context ID (PCID) was introduced by Intel’s Westmere architecture and related instruction, INVPCID (invalidate PCID) with Haswell. With PCID enabled, the way the TLB is used and flushed changes. First, the TLB tags each entry with the PCID of the process that owns the entry. This allows two different mappings from the same virtual address to be stored in the TLB as long as they have a different PCID. Second, with PCID enabled, switching from one set of page tables to another doesn’t flush the TLB any more. Since each process can only use TLB entries that have the right PCID, there’s no need to flush the TLB each time.
This behavior is used in Meltdown mitigation to avoid wiping out the entire TLB for the processors that support PCID.
Designing A VMX Root-mode Compatible Message Tracing
Without any doubt, one of the hardest parts of designing a hypervisor is sending a message from Vmx root-mode to Vmx non-root mode. This is because you have lots of limitations like you can’t access non-paged buffer, and of course, most of the NT functions are not (ANY IRQL) compatible as they might access the buffers that reside in paged pool.
The things are ending here, there are plenty of other limitation to deal with.
This section is inspired by Chapter 6: Kernel Mechanisms (High IRQL Synchronization) from the Windows Kernel Programming book by Pavel Yosifovich which is a really amazing book if you want to start with kernel programming.
Concepts
This section describes some of the Operating System concepts, you should know before starting.
What’s a spinlock?
The Spin Lock is a bit in memory that provides atomic test and modify operations. When a CPU tries to acquire a spinlock, and it’s not currently free, the CPU keeps spinning on the spinlock, busy waiting for it to be released by another CPU means that it keeps checking until another thread which acquired it first release it.
Test-and-Set
You probably read about Test and Set in university. Still, in case you didn’t, in computer science, the test-and-set instruction is an instruction used to write 1 (set) to a memory location and return its old value as a single atomic (i.e., non-interruptible) operation. If multiple processes may access the same memory location, and if a process is currently performing a test-and-set, no other process may begin another test-and-set until the first process’s test-and-set is finished.
What do we mean by “Safe”?
The “safe” is used a lot in hypervisors. By “safe,” we mean something that works all the time and won’t cause system crash or system halt. It’s because it’s so tricky to manage codes in vmx root-mode. After all, interrupts are masked (disabled), or transfer buffer from vmx root-mode to vmx non-root mode needs extra effort, and we should be cautious and avoid executing some APIs to be safe.
What is DPC?
A Deferred Procedure Call (DPC) is a Windows mechanism that allows high-priority tasks (e.g., an interrupt handler) to defer required but lower-priority tasks for later execution. This permits device drivers and other low-level event consumers to perform the high-priority part of their processing quickly and schedule non-critical additional processing for execution at a lower priority.
DPCs are implemented by DPC objects which are created and initialized by the kernel when a device driver or some other kernel-mode program issues requests for DPC. The DPC request is then added to the end of a DPC queue. Each processor has a separate DPC queue. DPCs have three priority levels: low, medium, and high. By default, all DPCs are set to medium priority. When Windows drops to an IRQL of Dispatch/DPC level, it checks the DPC queue for any pending DPCs and executes them until the queue is empty or some other interrupt with a higher IRQL occurs.
This is the description of DPCs from MSDN:
Because ISRs must execute as quickly as possible, drivers must usually postpone the completion of servicing an interrupt until after the ISR returns. Therefore, the system provides support for deferred procedure calls (DPCs), which can be queued from ISRs and which are executed at a later time and at a lower IRQL than the ISR.
There are two posts about DPCs here and here, you can read them for more information.
Challenges
For example, Vmx-root mode is not a HIGH_IRQL interrupt (with discussing it in Discussion Section), but as it disables all of the interrupts, we can think like it’s a HIGH_IRQL state. The problem is that must of synchronization functions are designed to be worked on IRQL less than DISPATCH_LEVEL.
Why is it problematic? Imagine you have a one-core processor, and your function requires a spinlock (let say it’s merely a buffer that needs to be accessed). The function raises the IRQL to DISPATCH_LEVEL. Now the Windows Scheduler can’t interrupt the function until it releases the spinlock and lowers the IRQL to PASSIVE_LEVEL or APC_LEVEL. During the execution of the function, a vm-exit occurs; thus, we’re in vmx root-mode now. It’s because, as I told you, vm-exit happens as if it’s a HIGH_IRQL interrupt.
Now, what if we want to access that buffer in vmx root mode? Two scenarios might occur.
- We wait on a spinlock that was previously acquired by a thread in vmx non-root mode and this we have to wait forever. A deadlock occurs.
- We enter the function without looking at the lock (while there is another thread that enters the function at the same time.) so it results in a corrupted buffer and invalid data.
The other limitation is in Windows design putting the thread into a waiting state cannot be done at IRQL DISPATCH_LEVEL or higher. It’s because in Windows when you acquire a spinlock it raises the IRQL to 2 – DISPATCH_LEVEL (if not already there), acquire the spinlock, perform the work and finally release the spinlock and lower IRQL back.
If you look at a function like KeAcquireSpinLock and KeReleaseSpinLock, they get an IRQL in their arguments. First, KeAcquireSpinLock saves current IRQL to the parameter supplied by the user then raises the IRQL to DISPATCH_LEVEL and sets a bit. When the function finished its works with shared data, then it calls KeReleaseSpinLock and passes that old IRQL parameter so this function unsets the bit and restore the old IRQL (lowers the IRQL).
Windows has 4 kinds of Spinlocks,
- KeAcquireSpinLock – KeReleaseSpinLock : This pair can be called at IRQL <= DISPATCH_LEVEL.
- KeAcquireSpinLockAtDpcLevel – KeReleaseSpinLockFromDpcLevel : This pair can be call at IRQL = DISPATCH_LEVEL only, it’s more optimized if you are already in IRQL 2 as it doesn’t saves the old IRQL and it’s specially designed to work on DPC routine.
- KeAcquireInterruptSpinLock – KeReleaseInterruptSpinLock: Hardware based use this pair e.g in Interrupt Service Routine (ISR) or it used by drivers with an interrupt source.
- ExInterlockedXxx : This function raises the IRQL to HIGH_LEVEL and perform it’s task, it doesn’t need a release function as no one interrupt us on HIGH_IRQL.
But unfortunately, things are more complicated when it comes to vmx root-mode. We don’t have IRQL in the vmx root-mode. It’s an operating system thing, so we can’t use any of the above functions, and things are getting worst if we want to use our message tracing mechanism between multiple cores!
For these reasons, we have to design our custom spinlock.
Designing A Spinlock
Designing spinlock in a multi-core system by its nature needs the hardware support for atomic operation means that hardware (most of the time processor) should guarantee that an operation is performed just by logical (hyper-threaded) core and it’s non-interruptible.
There is an article here that describes different kinds of spinlock with different optimizations, also it’s implemented here.
The design of this mechanism in the processor is beyond the scope of this article. We simply use an intrinsic function provided by Windows called “_interlockedbittestandset”.
This makes our implementation super simple. We just need to use the following function, and it’s the responsibility of the processor to take care of everything.
Update 2: We should use volatile keyword in parameters too, otherwise it’s like un-volatiling.
1
2
3
4
inline BOOLEAN SpinlockTryLock(volatile LONG* Lock)
{
	return (!(*Lock) && !_interlockedbittestandset(Lock, 0));
}
Now we need to spin! If the above function was not successful, then we have to keep CPU checking to see when another processor releases the lock.
Update 2: We should use volatile keyword in parameters too, otherwise it’s like un-volatiling.
1
2
3
4
5
6
7
8
9
10
11
12
13
14
15
16
17
18
19
20
21
22
23
24
void SpinlockLock(volatile LONG* Lock)
{
	unsigned wait = 1;

	while (!SpinlockTryLock(Lock))
	{
		for (unsigned i = 0; i < wait; ++i)
		{
			_mm_pause();
		}

		// Don't call "pause" too many times. If the wait becomes too big,
		// clamp it to the max_wait.

		if (wait * 2 > max_wait)
		{
			wait = max_wait;
		}
		else
		{
			wait = wait * 2;
		}
	}
}
If you wonder what is the _mm_pause() then it’s equal to PAUSE instruction in x86.
Pause instruction is commonly used in the loop of testing spinlock, when some other thread owns the spinlock, to mitigate the tight loop.
PAUSE notifies the CPU that this is a spinlock wait loop, so memory and cache accesses may be optimized. See also pause instruction in x86 for some more details about avoiding the memory-order mis-speculation when leaving the spin-loop. PAUSE may stop CPU for some time to save power. Older CPUs decode it as REP NOP, so you don’t have to check if it’s supported. Older CPUs will simply do nothing (NOP) as fast as possible.
For releasing the lock, there is nothing special to do, so simply unset it without caring for any other processor as there is no other processor that wants to unset it.
Update 2: We should use volatile keyword in parameters too, otherwise it’s like un-volatiling.
1
2
3
4
void SpinlockUnlock(volatile LONG* Lock)
{
	*Lock = 0;
}
The last step is to use a volatile variable as the lock.
1
2
// Vmx-root lock for logging
volatile LONG VmxRootLoggingLock;
The “volatile” keyword tells the compiler that the value of the variable may change at any time without any action being taken by the code the compiler finds nearby. The implications of this are quite serious. There are lots of examples here if you have a problem with understanding “volatile”.
Message Tracer Design
For solving the above the challenge about deadlock, I create two message pools for saving messages. The first pool is designed to be used as storage for vmx non-root messages (buffers) and the second pool is used for vmx-root messages.
We have the following structure that describes the state of each of these two pools.
1
2
3
4
5
6
7
8
9
10
11
12
13
14
15
16
17
// Core-specific buffers
typedef struct _LOG_BUFFER_INFORMATION {

	UINT64 BufferStartAddress;						// Start address of the buffer
	UINT64 BufferEndAddress;						// End address of the buffer

	UINT64 BufferForMultipleNonImmediateMessage;	// Start address of the buffer for accumulating non-immadiate messages
	UINT32 CurrentLengthOfNonImmBuffer;				// the current size of the buffer for accumulating non-immadiate messages


	KSPIN_LOCK BufferLock;							// SpinLock to protect access to the queue
	KSPIN_LOCK BufferLockForNonImmMessage;			// SpinLock to protect access to the queue of non-imm messages

	UINT32 CurrentIndexToSend;						// Current buffer index to send to user-mode
	UINT32 CurrentIndexToWrite;						// Current buffer index to write new messages

} LOG_BUFFER_INFORMATION, * PLOG_BUFFER_INFORMATION;
Generally, we’ll save the buffer as illustrated below, each chunk of the message came with BUFFER_HEADER that describes that chunk.
Other information for the buffer like Current Index to Write and Current to Send is saved in the above structure.
1
2
3
4
5
6
7
8
9
10
11
12
13
14
15
16
17
18
19
20
21
22
23
24
25
26
27
28
29
30
31
32
33
34
35
36
37
38
39
40
A core buffer is like this , it's divided into MaximumPacketsCapacity chucks,
each chunk has PacketChunkSize + sizeof(BUFFER_HEADER) size

			 __________________________
			|      BUFFER_HEADER      |
			|_________________________|
			|                         |
			|           BODY          |
			|         (Buffer)        |
			| size = PacketChunkSize  |
			|                         |
			|_________________________|
			|      BUFFER_HEADER      |
			|_________________________|
			|                         |
			|           BODY          |
			|         (Buffer)        |
			| size = PacketChunkSize  |
			|                         |
			|_________________________|
			|                         |
			|                         |
			|                         |
			|                         |
			|           .             |
			|           .             |
			|           .             |
			|                         |
			|                         |
			|                         |
			|                         |
			|_________________________|
			|      BUFFER_HEADER      |
			|_________________________|
			|                         |
			|           BODY          |
			|         (Buffer)        |
			| size = PacketChunkSize  |
			|                         |
			|_________________________|
The BUFFER_HEADER is defined like this,
1
2
3
4
5
6
// Message buffer structure
typedef struct _BUFFER_HEADER {
	UINT32 OpeationNumber;	// Operation ID to user-mode
	UINT32 BufferLength;	// The actual length
	BOOLEAN Valid;			// Determine whether the buffer was valid to send or not
} BUFFER_HEADER, * PBUFFER_HEADER;
We save the length of used length of the chunk and a bit which determine whether we sent it before or not.
Operation Number is number, which will be sent to the user-mode to show the type of the buffer that came from the kernel. In other words, it’s a number that indicates the intention (and structure) of the buffer, so the user-mode application will know what to do with this buffer.
The following Operation Numbers are currently defined :
1
2
3
4
5
// Message area >= 0x4
#define OPERATION_LOG_INFO_MESSAGE							0x1
#define OPERATION_LOG_WARNING_MESSAGE						0x2
#define OPERATION_LOG_ERROR_MESSAGE							0x3
#define OPERATION_LOG_NON_IMMEDIATE_MESSAGE					0x4
Each of them shows a different type of message, and the last one shows that a bunch buffer is accumulated in this buffer. This message tracing is designed to send any kind of the buffer from both vmx root and OS to the user-mode, so it’s not limited just to sending messages, we can send buffers with custom structures and different Operation Numbers.
The last thing about our message tracing is, it can be configured with the following constants, you can change them in order to have a better performance for your exclusive use.
1
2
3
4
5
// Default buffer size
#define MaximumPacketsCapacity 1000 // number of packets
#define PacketChunkSize		1000 // NOTE : REMEMBER TO CHANGE IT IN USER-MODE APP TOO
#define UsermodeBufferSize  sizeof(UINT32) + PacketChunkSize + 1 /* Becausee of Opeation code at the start of the buffer + 1 for null-termminating */
#define LogBufferSize MaximumPacketsCapacity * (PacketChunkSize + sizeof(BUFFER_HEADER))
You can configure things like the maximum number of chunks in a buffer and also the size of each chunk. Setting the above variables is necessary in some cases if there is no thread to consume (read) these chunks and pools are full; it replaces the previous unread buffer. Hence, if you can’t frequently consume the pools, then it’s better to specify a higher number for MaximumPacketsCapacity so that you won’t lose anything.
Initialization Phase
In the initialization phase, we allocate space for the above structure (2 times, one for vmx non-root and one for vmx-root) and then allocate the buffers to be used as the storage for saving our messages.
We have to zero them all and also KeInitializeSpinLock to initialize the spinlock. We use this spinlock only for vmx non-root, and this function makes sure that the value for the lock is unset. We do the same for our custom spinlock (VmxRootLoggingLock), just unset it.
You might ask, what is the “BufferLockForNonImmMessage”, it’s another lock that will use it as optimization (see later).
All in all, we have the following code.
1
2
3
4
5
6
7
8
9
10
11
12
13
14
15
16
17
18
19
20
21
22
23
24
25
26
27
28
29
30
31
32
33
34
35
36
37
38
39
40
41
42
43
44
/* Initialize the buffer relating to log message tracing */
BOOLEAN LogInitialize() {


	// Initialize buffers for trace message and data messages (wee have two buffers one for vmx root and one for vmx non-root)
	MessageBufferInformation = ExAllocatePoolWithTag(NonPagedPool, sizeof(LOG_BUFFER_INFORMATION) * 2, POOLTAG);

	if (!MessageBufferInformation)
	{
		return FALSE; //STATUS_INSUFFICIENT_RESOURCES
	}

	// Zeroing the memory
	RtlZeroMemory(MessageBufferInformation, sizeof(LOG_BUFFER_INFORMATION) * 2);

	// Initialize the lock for Vmx-root mode (HIGH_IRQL Spinlock)
	VmxRootLoggingLock = 0;

	// Allocate buffer for messages and initialize the core buffer information
	for (int i = 0; i < 2; i++)
	{

		// initialize the lock
		// Actually, only the 0th buffer use this spinlock but let initialize it for both but the second buffer spinlock is useless
		// as we use our custom spinlock.
		KeInitializeSpinLock(&MessageBufferInformation[i].BufferLock);
		KeInitializeSpinLock(&MessageBufferInformation[i].BufferLockForNonImmMessage);

		// allocate the buffer
		MessageBufferInformation[i].BufferStartAddress = ExAllocatePoolWithTag(NonPagedPool, LogBufferSize, POOLTAG);
		MessageBufferInformation[i].BufferForMultipleNonImmediateMessage = ExAllocatePoolWithTag(NonPagedPool, PacketChunkSize, POOLTAG);

		if (!MessageBufferInformation[i].BufferStartAddress)
		{
			return FALSE; // STATUS_INSUFFICIENT_RESOURCES
		}

		// Zeroing the buffer
		RtlZeroMemory(MessageBufferInformation[i].BufferStartAddress, LogBufferSize);

		// Set the end address
		MessageBufferInformation[i].BufferEndAddress = (UINT64)MessageBufferInformation[i].BufferStartAddress + LogBufferSize;
	}
}
Sending Phase (Saving Buffer and adding them to pools)
In a regular Windows routine generally, we shouldn’t be on IRQL more than Dispatch Level. There is no case that our log manager needs to be used in higher IRQLs, so we don’t care about them; thus, we have two different approaches here. First, we acquire the lock (spinlock) using KeAcquireSpinLock in vmx non-root as it’s a Windows optimized way to acquire a lock and for vmx-root mode, we acquire the lock using our previously designed spinlock.
As I told you above, we want to fix this problem that might a vmx-exit occurs when we acquired a lock, so it’s not possible to use the same spinlock as deadlock might happen.
Now we have to see whether we are operating from vmx non-root or vmx root, based on this condition, we select our lock and the index of the buffer that we want to put our message into it.
I’m not gonna explain each step, as it’s easy, it’s just managing buffer and copying data from a buffer to another buffer and also the code is well commented so you can read the code, instead, I explain tricky parts of our message tracing.
After creating a header for our new message buffer, we will copy the bytes and change the information about buffer’s indexes. The last step here is to see whether any thread is waiting to receive our message or not.
If there is no thread waiting for our message then nothing more to do here but if there is a thread which is IRP Pending state (I explain about it later), then we use KeInsertQueueDpc so that it will be added to our DPC Queue which will be subsequently executed by Windows in IRQL == DISPATCH_LEVEL.
It means that our callback function will execute by Windows later and of course, Windows execute our function in vmx non-root so it’s safe. I’ll describe this callback and how we create a DPC later.
Finally, we have to release the locks so that other threads can enter.
1
2
3
4
5
6
7
8
9
10
11
12
13
14
15
16
17
18
19
20
21
22
23
24
25
26
27
28
29
30
31
32
33
34
35
36
37
38
39
40
41
42
43
44
45
46
47
48
49
50
51
52
53
54
55
56
57
58
59
60
61
62
63
64
65
66
67
68
69
70
71
72
73
74
75
76
77
78
79
80
81
/* Save buffer to the pool */
BOOLEAN LogSendBuffer(UINT32 OperationCode, PVOID Buffer, UINT32 BufferLength)
{
	KIRQL OldIRQL;
	UINT32 Index;
	BOOLEAN IsVmxRoot;

	if (BufferLength > PacketChunkSize - 1 || BufferLength == 0)
	{
		// We can't save this huge buffer
		return FALSE;
	}

	// Check that if we're in vmx root-mode
	IsVmxRoot = GuestState[KeGetCurrentProcessorNumber()].IsOnVmxRootMode;

	// Check if we're in Vmx-root, if it is then we use our customized HIGH_IRQL Spinlock, if not we use the windows spinlock
	if (IsVmxRoot)
	{
		// Set the index
		Index = 1;
		SpinlockLock(&VmxRootLoggingLock);
	}
	else
	{
		// Set the index
		Index = 0;
		// Acquire the lock
		KeAcquireSpinLock(&MessageBufferInformation[Index].BufferLock, &OldIRQL);
	}

	// check if the buffer is filled to it's maximum index or not
	if (MessageBufferInformation[Index].CurrentIndexToWrite > MaximumPacketsCapacity - 1)
	{
		// start from the begining
		MessageBufferInformation[Index].CurrentIndexToWrite = 0;
	}

	// Compute the start of the buffer header
	BUFFER_HEADER* Header = (BUFFER_HEADER*)((UINT64)MessageBufferInformation[Index].BufferStartAddress + (MessageBufferInformation[Index].CurrentIndexToWrite * (PacketChunkSize + sizeof(BUFFER_HEADER))));

	// Set the header
	Header->OpeationNumber = OperationCode;
	Header->BufferLength = BufferLength;
	Header->Valid = TRUE;

	/* Now it's time to fill the buffer */

	// compute the saving index
	PVOID SavingBuffer = ((UINT64)MessageBufferInformation[Index].BufferStartAddress + (MessageBufferInformation[Index].CurrentIndexToWrite * (PacketChunkSize + sizeof(BUFFER_HEADER))) + sizeof(BUFFER_HEADER));

	// Copy the buffer
	RtlCopyBytes(SavingBuffer, Buffer, BufferLength);

	// Increment the next index to write
	MessageBufferInformation[Index].CurrentIndexToWrite = MessageBufferInformation[Index].CurrentIndexToWrite + 1;

	// check if there is any thread in IRP Pending state, so we can complete their request
	if (GlobalNotifyRecord != NULL)
	{
		/* there is some threads that needs to be completed */
		// set the target pool
		GlobalNotifyRecord->CheckVmxRootMessagePool = IsVmxRoot;
		// Insert dpc to queue
		KeInsertQueueDpc(&GlobalNotifyRecord->Dpc, GlobalNotifyRecord, NULL);

		// set notify routine to null
		GlobalNotifyRecord = NULL;
	}

	// Check if we're in Vmx-root, if it is then we use our customized HIGH_IRQL Spinlock, if not we use the windows spinlock
	if (IsVmxRoot)
	{
		SpinlockUnlock(&VmxRootLoggingLock);
	}
	else
	{
		// Release the lock
		KeReleaseSpinLock(&MessageBufferInformation[Index].BufferLock, OldIRQL);
	}
}
Reading Phase (Read buffers and send them to user-mode)
It’s time to read the previously filled buffer! The fact that we add a DPC in the previous function “LogSendBuffer” shows that the “LogReadBuffer” is executed in vmx non-root mode so we can freely use most of the APIs (not all of them).
Theoretically, we have a problem here, if we want to read a buffer from the vmx root-mode pool, then it might cause a deadlock as we acquired a vmx root-mode lock and might a vm-exit occur. Hence, we spin on this lock in vmx root mode forever, but practically there is no deadlock here. Can you guess why?
It’s because our LogReadBuffer executes in DISPATCH_LEVEL so the Windows scheduler won’t interrupt us, and our function is executed without any interruption and the fact that we’re not doing anything fancy here. I mean, we’re not performing anything (like CPUID) that causes a vm-exit in our code, so practically there is nothing to cause deadlock here, but we should keep in mind that we’re not allowed to run codes that cause vmx-exit.
We compute the header address based on previous information and also set the valid bit to zero so that it shows that this buffer is previously used.
Then we copy the buffer to the buffer that specified in arguments also put the Operation Number on the top of the target buffer so that the future functions will know about the intention of this buffer. We can also use DbgPrint to show the messages to the kernel debugger. Using DbgPrint in DISPATCH_LEVEL (vmx non-root mode) is safe. We might need to use DbgPrint multiple times as this function has a maximum of 512 bytes by default. Even though you can change the limit number but we assume the default size is selected.
Finally, we have to reset some of the information regarding buffer, clear the buffer messages (it’s not necessary to zero the buffer, but for making debug process easier, I prefer to zero the buffer), and release the locks.
1
2
3
4
5
6
7
8
9
10
11
12
13
14
15
16
17
18
19
20
21
22
23
24
25
26
27
28
29
30
31
32
33
34
35
36
37
38
39
40
41
42
43
44
45
46
47
48
49
50
51
52
53
54
55
56
57
58
59
60
61
62
63
64
65
66
67
68
69
70
71
72
73
74
75
76
77
78
79
80
81
82
83
84
85
86
87
88
89
90
91
92
93
94
95
96
97
98
99
100
101
102
103
104
105
106
107
/* return of this function shows whether the read was successfull or not (e.g FALSE shows there's no new buffer available.)*/
BOOLEAN LogReadBuffer(BOOLEAN IsVmxRoot, PVOID BufferToSaveMessage, UINT32* ReturnedLength) {

	KIRQL OldIRQL;
	UINT32 Index;

	// Check if we're in Vmx-root, if it is then we use our customized HIGH_IRQL Spinlock, if not we use the windows spinlock
	if (IsVmxRoot)
	{
		// Set the index
		Index = 1;

		// Acquire the lock
		SpinlockLock(&VmxRootLoggingLock);
	}
	else
	{
		// Set the index
		Index = 0;

		// Acquire the lock
		KeAcquireSpinLock(&MessageBufferInformation[Index].BufferLock, &OldIRQL);
	}

	// Compute the current buffer to read
	BUFFER_HEADER* Header = (BUFFER_HEADER*)((UINT64)MessageBufferInformation[Index].BufferStartAddress + (MessageBufferInformation[Index].CurrentIndexToSend * (PacketChunkSize + sizeof(BUFFER_HEADER))));

	if (!Header->Valid)
	{
		// there is nothing to send
		return FALSE;
	}

	/* If we reached here, means that there is sth to send  */
	// First copy the header
	RtlCopyBytes(BufferToSaveMessage, &Header->OpeationNumber, sizeof(UINT32));


	// Second, save the buffer contents
	PVOID SendingBuffer = ((UINT64)MessageBufferInformation[Index].BufferStartAddress + (MessageBufferInformation[Index].CurrentIndexToSend * (PacketChunkSize + sizeof(BUFFER_HEADER))) + sizeof(BUFFER_HEADER));
	PVOID SavingAddress = ((UINT64)BufferToSaveMessage + sizeof(UINT32)); // Because we want to pass the header of usermode header
	RtlCopyBytes(SavingAddress, SendingBuffer, Header->BufferLength);


#if ShowMessagesOnDebugger

	// Means that show just messages
	if (Header->OpeationNumber <= OPERATION_LOG_NON_IMMEDIATE_MESSAGE)
	{
		/* We're in Dpc level here so it's safe to use DbgPrint*/
		// DbgPrint limitation is 512 Byte
		if (Header->BufferLength > DbgPrintLimitation)
		{
			for (size_t i = 0; i <= Header->BufferLength / DbgPrintLimitation; i++)
			{
				if (i != 0)
				{
					DbgPrint("%s", (char*)((UINT64)SendingBuffer + (DbgPrintLimitation * i) - 2));
				}
				else
				{
					DbgPrint("%s", (char*)((UINT64)SendingBuffer + (DbgPrintLimitation * i)));
				}
			}
		}
		else
		{
			DbgPrint("%s", (char*)SendingBuffer);
		}

	}
#endif

	// Finally, set the current index to invalid as we sent it
	Header->Valid = FALSE;

	// Set the length to show as the ReturnedByted in usermode ioctl funtion + size of header
	*ReturnedLength = Header->BufferLength + sizeof(UINT32);


	// Last step is to clear the current buffer (we can't do it once when CurrentIndexToSend is zero because
	// there might be multiple messages on the start of the queue that didn't read yet)
	// we don't free the header
	RtlZeroMemory(SendingBuffer, Header->BufferLength);

	// Check to see whether we passed the index or not
	if (MessageBufferInformation[Index].CurrentIndexToSend > MaximumPacketsCapacity - 2)
	{
		MessageBufferInformation[Index].CurrentIndexToSend = 0;
	}
	else
	{
		// Increment the next index to read
		MessageBufferInformation[Index].CurrentIndexToSend = MessageBufferInformation[Index].CurrentIndexToSend + 1;
	}

	// Check if we're in Vmx-root, if it is then we use our customized HIGH_IRQL Spinlock, if not we use the windows spinlock
	if (IsVmxRoot)
	{
		SpinlockUnlock(&VmxRootLoggingLock);
	}
	else
	{
		// Release the lock
		KeReleaseSpinLock(&MessageBufferInformation[Index].BufferLock, OldIRQL);
	}
}
Checking for new messages
Checking for the new message is simple; we just need to check the current message index based on previous information and see if its header is valid or not. If it’s valid then it shows that we have a new message, but if it’s not valid, then some function reads the message previously, and there is no new message.
For checking the new message, we even don’t need to acquire a lock because basically we don’t write anything and in our case reading doesn’t need a lock.
1
2
3
4
5
6
7
8
9
10
11
12
13
14
15
16
17
18
19
20
21
22
23
24
25
26
/* return of this function shows whether the read was successfull or not (e.g FALSE shows there's no new buffer available.)*/
BOOLEAN LogCheckForNewMessage(BOOLEAN IsVmxRoot) {

	KIRQL OldIRQL;
	UINT32 Index;

	if (IsVmxRoot)
	{
		Index = 1;
	}
	else
	{
		Index = 0;
	}
	// Compute the current buffer to read
	BUFFER_HEADER* Header = (BUFFER_HEADER*)((UINT64)MessageBufferInformation[Index].BufferStartAddress + (MessageBufferInformation[Index].CurrentIndexToSend * (PacketChunkSize + sizeof(BUFFER_HEADER))));

	if (!Header->Valid)
	{
		// there is nothing to send
		return FALSE;
	}

	/* If we reached here, means that there is sth to send  */
	return TRUE;
}
Sending messages to pools
Previously, we see how to save (send) buffers and read them. Each message is a buffer of strings, so finally, we have to use “LogSendBuffer” to send our buffer, but we need to consider extra effort to send a well-formed message.
va_start and va_end are used to support multiple arguments to one function, e.g like DbgPrint or printf.
You can use a combination of KeQuerySystemTime, ExSystemTimeToLocalTime, and RtlTimeToTimeFields to get the current system time (see the example) then putting them together with sprintf_s.
There is a particular reason why we use the sprintf-like function instead of RtlString* functions; the reason is described in the Discussion section. The next step is computing length using strnlen_s.
Finally, we have a vital optimization here; logically we create two kinds of messages, one called “Immediate Message” which we will directly send it into the pool and another type is “Non-Immediate Message” which we gather the messages in another buffer and append new messages in that buffer until its capacity is full (we shouldn’t pass the PacketChunkSize limit).
Using this way, we don’t send each message to the user-mode separately but instead, we send multiple messages in one buffer to the user-mode. We will gain visible performance improvement. For example with a configuration with PacketChunkSize == 1000 bytes we send 6 messages on a buffer (it’s average basically it depends on each message size) because you probably know that CPU has to do a lot to change its state from kernel-mode to user-mode and also creating new IRP Packet is a heavy task.
You can also change the configuration, e.g., increase the PacketChunkSize so that more messages will hold on the temporary buffer, but generally, it delays the time you see the message.
Also, we work on a buffer so we need another spinlock here.
Putting it all together we have the following code :
1
2
3
4
5
6
7
8
9
10
11
12
13
14
15
16
17
18
19
20
21
22
23
24
25
26
27
28
29
30
31
32
33
34
35
36
37
38
39
40
41
42
43
44
45
46
47
48
49
50
51
52
53
54
55
56
57
58
59
60
61
62
63
64
65
66
67
68
69
70
71
72
73
74
75
76
77
78
79
80
81
82
83
84
85
86
87
88
89
90
91
92
93
94
95
96
97
98
99
100
101
102
103
104
105
106
107
108
109
110
111
112
113
114
115
116
117
118
119
120
121
122
123
124
125
126
127
128
129
130
131
132
133
134
135
136
137
138
139
140
141
142
143
144
145
146
147
148
149
150
151
152
153
154
155
// Send string messages and tracing for logging and monitoring
BOOLEAN LogSendMessageToQueue(UINT32 OperationCode, BOOLEAN IsImmediateMessage, BOOLEAN ShowCurrentSystemTime, const char* Fmt, ...)
{
	BOOLEAN Result;
	va_list ArgList;
	size_t WrittenSize;
	UINT32 Index;
	KIRQL OldIRQL;
	BOOLEAN IsVmxRootMode;
	int SprintfResult;
	char LogMessage[PacketChunkSize];
	char TempMessage[PacketChunkSize];
	char TimeBuffer[20] = { 0 };

	// Set Vmx State
	IsVmxRootMode = GuestState[KeGetCurrentProcessorNumber()].IsOnVmxRootMode;

	if (ShowCurrentSystemTime)
	{
		// It's actually not necessary to use -1 but because user-mode code might assume a null-terminated buffer so
		// it's better to use - 1
		va_start(ArgList, Fmt);
		// We won't use this because we can't use in any IRQL
		/*Status = RtlStringCchVPrintfA(TempMessage, PacketChunkSize - 1, Fmt, ArgList);*/
		SprintfResult = vsprintf_s(TempMessage, PacketChunkSize - 1, Fmt, ArgList);
		va_end(ArgList);

		// Check if the buffer passed the limit
		if (SprintfResult == -1)
		{
			// Probably the buffer is large that we can't store it
			return FALSE;
		}

		// Fill the above with timer
		TIME_FIELDS TimeFields;
		LARGE_INTEGER SystemTime, LocalTime;
		KeQuerySystemTime(&SystemTime);
		ExSystemTimeToLocalTime(&SystemTime, &LocalTime);
		RtlTimeToTimeFields(&LocalTime, &TimeFields);

		// We won't use this because we can't use in any IRQL
		/*Status = RtlStringCchPrintfA(TimeBuffer, RTL_NUMBER_OF(TimeBuffer),
			"%02hd:%02hd:%02hd.%03hd", TimeFields.Hour,
			TimeFields.Minute, TimeFields.Second,
			TimeFields.Milliseconds);

		// Append time with previous message
		Status = RtlStringCchPrintfA(LogMessage, PacketChunkSize - 1, "(%s)\t %s", TimeBuffer, TempMessage);*/

		// this function probably run without error, so there is no need to check the return value
		sprintf_s(TimeBuffer, RTL_NUMBER_OF(TimeBuffer), "%02hd:%02hd:%02hd.%03hd", TimeFields.Hour,
			TimeFields.Minute, TimeFields.Second,
			TimeFields.Milliseconds);

		// Append time with previous message
		SprintfResult = sprintf_s(LogMessage, PacketChunkSize - 1, "(%s - core : %d - vmx-root? %s)\t %s", TimeBuffer, KeGetCurrentProcessorNumberEx(0), IsVmxRootMode ? "yes" : "no", TempMessage);

		// Check if the buffer passed the limit
		if (SprintfResult == -1)
		{
			// Probably the buffer is large that we can't store it
			return FALSE;
		}


	}
	else
	{
		// It's actually not necessary to use -1 but because user-mode code might assume a null-terminated buffer so
		// it's better to use - 1
		va_start(ArgList, Fmt);
		// We won't use this because we can't use in any IRQL
		/* Status = RtlStringCchVPrintfA(LogMessage, PacketChunkSize - 1, Fmt, ArgList); */
		SprintfResult = vsprintf_s(LogMessage, PacketChunkSize - 1, Fmt, ArgList);
		va_end(ArgList);

		// Check if the buffer passed the limit
		if (SprintfResult == -1)
		{
			// Probably the buffer is large that we can't store it
			return FALSE;
		}

	}
	// Use std function because they can be run in any IRQL
	// RtlStringCchLengthA(LogMessage, PacketChunkSize - 1, &WrittenSize);
	WrittenSize = strnlen_s(LogMessage, PacketChunkSize - 1);

	if (LogMessage[0] == '\0') {

		// nothing to write
		DbgBreakPoint();
		return FALSE;
	}

	if (IsImmediateMessage)
	{
		return LogSendBuffer(OperationCode, LogMessage, WrittenSize);
	}
	else
	{
		// Check if we're in Vmx-root, if it is then we use our customized HIGH_IRQL Spinlock, if not we use the windows spinlock
		if (IsVmxRootMode)
		{
			// Set the index
			Index = 1;
			SpinlockLock(&VmxRootLoggingLockForNonImmBuffers);
		}
		else
		{
			// Set the index
			Index = 0;
			// Acquire the lock
			KeAcquireSpinLock(&MessageBufferInformation[Index].BufferLockForNonImmMessage, &OldIRQL);
		}
		//Set the result to True
		Result = TRUE;

		// If log message WrittenSize is above the buffer then we have to send the previous buffer
		if ((MessageBufferInformation[Index].CurrentLengthOfNonImmBuffer + WrittenSize) > PacketChunkSize - 1 && MessageBufferInformation[Index].CurrentLengthOfNonImmBuffer != 0)
		{

			// Send the previous buffer (non-immediate message)
			Result = LogSendBuffer(OPERATION_LOG_NON_IMMEDIATE_MESSAGE,
				MessageBufferInformation[Index].BufferForMultipleNonImmediateMessage,
				MessageBufferInformation[Index].CurrentLengthOfNonImmBuffer);

			// Free the immediate buffer
			MessageBufferInformation[Index].CurrentLengthOfNonImmBuffer = 0;
			RtlZeroMemory(MessageBufferInformation[Index].BufferForMultipleNonImmediateMessage, PacketChunkSize);
		}

		// We have to save the message
		RtlCopyBytes(MessageBufferInformation[Index].BufferForMultipleNonImmediateMessage +
			MessageBufferInformation[Index].CurrentLengthOfNonImmBuffer, LogMessage, WrittenSize);

		// add the length
		MessageBufferInformation[Index].CurrentLengthOfNonImmBuffer += WrittenSize;


		// Check if we're in Vmx-root, if it is then we use our customized HIGH_IRQL Spinlock, if not we use the windows spinlock
		if (IsVmxRootMode)
		{
			SpinlockUnlock(&VmxRootLoggingLockForNonImmBuffers);
		}
		else
		{
			// Release the lock
			KeReleaseSpinLock(&MessageBufferInformation[Index].BufferLockForNonImmMessage, OldIRQL);
		}

		return Result;
	}
}
Receiving buffers and messages in user-mode
Receiving buffers from the user-mode is done by using an IOCTL. First, we create another thread in our user-mode application. This thread is responsible for bringing the kernel-mode buffers to the user-mode and then operate based on Operation Number.
1
2
3
4
		HANDLE Thread = CreateThread(NULL, 0, ThreadFunc, Handle, 0, NULL);
		if (Thread) {
			printf("[*] Thread Created successfully !!!");
		}
This thread executes the following function. We use IRP Pending for transferring data from kernel-mode to user-mode. IRP Pending is primarily used for transferring a packet. For example, you send an IRP packet to the kernel, and kernel marks this packet as Pending. Whenever the user-mode buffer is available to send to the user-mode, the kernel completes the IRP request, and the IOCTL function returns to the user-mode and continues the execution.
It’s somehow like when you use Wait for an object. We can also use events in Windows and whenever the buffer is available the event is triggered but IRP Pending is better as it designed for the purpose of sending messages to user-mode.
What we have to do is allocating a buffer for kernel-mode code and using DeviceIoControl to request the packet. When the packet from the kernel received, we process the packet and switch through the Operation Number.
1
2
3
4
5
6
7
8
9
10
11
12
13
14
15
16
17
18
19
20
21
22
23
24
25
26
27
28
29
30
31
32
33
34
35
36
37
38
39
40
41
42
43
44
45
46
47
48
49
50
51
52
53
54
55
56
57
58
59
60
61
62
63
64
65
66
67
68
69
70
71
72
73
74
75
76
void ReadIrpBasedBuffer(HANDLE  Device) {

	BOOL    Status;
	ULONG   ReturnedLength;
	REGISTER_EVENT RegisterEvent;
	UINT32 OperationCode;

	printf(" =============================== Kernel-Mode Logs (Driver) ===============================\n");
	RegisterEvent.hEvent = NULL;
	RegisterEvent.Type = IRP_BASED;
	char OutputBuffer[UsermodeBufferSize + 100] = { 0 };

	try
	{

		while (TRUE) {

			ZeroMemory(OutputBuffer, UsermodeBufferSize);

			Sleep(200);							// we're not trying to eat all of the CPU ;)

			Status = DeviceIoControl(
				Device,							// Handle to device
				IOCTL_REGISTER_EVENT,			// IO Control code
				&RegisterEvent,					// Input Buffer to driver.
				SIZEOF_REGISTER_EVENT * 2,		// Length of input buffer in bytes. (x 2 is bcuz as the driver is x64 and has 64 bit values)
				OutputBuffer,					// Output Buffer from driver.
				sizeof(OutputBuffer),			// Length of output buffer in bytes.
				&ReturnedLength,				// Bytes placed in buffer.
				NULL							// synchronous call
			);

			if (!Status) {
				printf("Ioctl failed with code %d\n", GetLastError());
				break;
			}
			printf("\n========================= Kernel Mode (Buffer) =========================\n");

			OperationCode = 0;
			memcpy(&OperationCode, OutputBuffer, sizeof(UINT32));

			printf("Returned Length : 0x%x \n", ReturnedLength);
			printf("Operation Code : 0x%x \n", OperationCode);

			switch (OperationCode)
			{
			case OPERATION_LOG_NON_IMMEDIATE_MESSAGE:
				printf("A buffer of messages (OPERATION_LOG_NON_IMMEDIATE_MESSAGE) :\n");
				printf("%s", OutputBuffer + sizeof(UINT32));
				break;
			case OPERATION_LOG_INFO_MESSAGE:
				printf("Information log (OPERATION_LOG_INFO_MESSAGE) :\n");
				printf("%s", OutputBuffer + sizeof(UINT32));
				break;
			case OPERATION_LOG_ERROR_MESSAGE:
				printf("Error log (OPERATION_LOG_ERROR_MESSAGE) :\n");
				printf("%s", OutputBuffer + sizeof(UINT32));
				break;
			case OPERATION_LOG_WARNING_MESSAGE:
				printf("Warning log (OPERATION_LOG_WARNING_MESSAGE) :\n");
				printf("%s", OutputBuffer + sizeof(UINT32));
				break;

			default:
				break;
			}


			printf("\n========================================================================\n");
		}
	}
	catch (const std::exception&)
	{
		printf("\n Exception !\n");
	}
}
IOCTL and managing user-mode requests
When the IOCTL arrived on the kernel side, DrvDispatchIoControl from major functions is called. This function returns a pointer to the caller’s I/O stack location in the specified IRP.
From the IRP Stack we can read the IOCTL code and buffers address, this time we perform necessary checks and pass the arguments to LogRegisterIrpBasedNotification.
1
2
3
4
5
6
7
8
9
10
11
12
13
14
15
16
17
18
19
20
21
22
23
24
25
26
27
28
29
30
31
32
33
34
35
36
37
38
39
40
41
42
43
44
45
46
47
48
49
50
51

/* Driver IOCTL Dispatcher*/
NTSTATUS DrvDispatchIoControl(PDEVICE_OBJECT DeviceObject, PIRP Irp)
{
	PIO_STACK_LOCATION  IrpStack;
	PREGISTER_EVENT RegisterEvent;
	NTSTATUS    Status;

	IrpStack = IoGetCurrentIrpStackLocation(Irp);

	switch (IrpStack->Parameters.DeviceIoControl.IoControlCode)
	{
	case IOCTL_REGISTER_EVENT:

		// First validate the parameters.
		if (IrpStack->Parameters.DeviceIoControl.InputBufferLength < SIZEOF_REGISTER_EVENT || Irp->AssociatedIrp.SystemBuffer == NULL) {
			Status = STATUS_INVALID_PARAMETER;
			DbgBreakPoint();
			break;
		}

		RegisterEvent = (PREGISTER_EVENT)Irp->AssociatedIrp.SystemBuffer;

		switch (RegisterEvent->Type) {
		case IRP_BASED:
			Status = LogRegisterIrpBasedNotification(DeviceObject, Irp);
			break;
		case EVENT_BASED:
			Status = LogRegisterEventBasedNotification(DeviceObject, Irp);
			break;
		default:
			ASSERTMSG("\tUnknow notification type from user-mode\n", FALSE);
			Status = STATUS_INVALID_PARAMETER;
			break;
		}
		break;

	default:
		ASSERT(FALSE);  // should never hit this
		Status = STATUS_NOT_IMPLEMENTED;
		break;
	}

	if (Status != STATUS_PENDING) {
		Irp->IoStatus.Status = Status;
		Irp->IoStatus.Information = 0;
		IoCompleteRequest(Irp, IO_NO_INCREMENT);
	}

	return Status;
}
To register an IRP notification, first, we check whether any other thread is pending by checking GlobalNotifyRecord if there is any thread we complete the IRP and return to the user-mode because in our design we ignore multiple threads that request the buffers means that only one thread can read the kernel-mode buffer.
Second, we initialize a custom structure that describes the state. The following structure is responsible for saving Type, DPC Object, and target buffer.
1
2
3
4
5
6
7
8
9
typedef struct _NOTIFY_RECORD {
	NOTIFY_TYPE     Type;
	union {
		PKEVENT     Event;
		PIRP        PendingIrp;
	} Message;
	KDPC            Dpc;
	BOOLEAN			CheckVmxRootMessagePool; // Set so that notify callback can understand where to check (Vmx root or Vmx non-root)
} NOTIFY_RECORD, * PNOTIFY_RECORD;
In order to fill this structure, we initialize a DPC object by calling KeInitializeDpc, this function gets the function callback that should be called later (LogNotifyUsermodeCallback) and the parameter(s) to this function (NotifyRecord).
We first check the vmx non-root pools to see if anything new is available. Otherwise, we check the vmx-root mode buffer. This precedence is because vmx non-root buffers are more important. After all, we spent must of the time in VMX Root-mode, so we might see thousands of messages from vmx-root while we have fewer messages from vmx non-root. If we check the vmx root message buffer first, then we might lose some messages from vmx non-root or never find a time to process them.
If any new message is available then we directly add a DPC to the queue (KeInsertQueueDpc).
If there isn’t any new message available, then we simply save our Notify Record for future use, and also we mark IRP to pending state using IoMarkIrpPending and return STATUS_PENDING.
1
2
3
4
5
6
7
8
9
10
11
12
13
14
15
16
17
18
19
20
21
22
23
24
25
26
27
28
29
30
31
32
33
34
35
36
37
38
39
40
41
42
43
44
45
46
47
48
49
50
51
52
53
54
55
56
57
58
59
60
61
62
63
64
/* Register a new IRP Pending thread which listens for new buffers */
NTSTATUS LogRegisterIrpBasedNotification(PDEVICE_OBJECT DeviceObject, PIRP Irp)
{
	PNOTIFY_RECORD NotifyRecord;
	PIO_STACK_LOCATION IrpStack;
	KIRQL   OOldIrql;
	PREGISTER_EVENT RegisterEvent;

	// check if current core has another thread with pending IRP, if no then put the current thread to pending
	// otherwise return and complete thread with STATUS_SUCCESS as there is another thread waiting for message

	if (GlobalNotifyRecord == NULL)
	{
		IrpStack = IoGetCurrentIrpStackLocation(Irp);
		RegisterEvent = (PREGISTER_EVENT)Irp->AssociatedIrp.SystemBuffer;

		// Allocate a record and save all the event context.
		NotifyRecord = ExAllocatePoolWithQuotaTag(NonPagedPool, sizeof(NOTIFY_RECORD), POOLTAG);

		if (NULL == NotifyRecord) {
			return  STATUS_INSUFFICIENT_RESOURCES;
		}

		NotifyRecord->Type = IRP_BASED;
		NotifyRecord->Message.PendingIrp = Irp;

		KeInitializeDpc(&NotifyRecord->Dpc, // Dpc
			LogNotifyUsermodeCallback,     // DeferredRoutine
			NotifyRecord        // DeferredContext
		);

		IoMarkIrpPending(Irp);

		// check for new message (for both Vmx-root mode or Vmx non root-mode)
		if (LogCheckForNewMessage(FALSE))
		{
			// check vmx root
			NotifyRecord->CheckVmxRootMessagePool = FALSE;

			// Insert dpc to queue
			KeInsertQueueDpc(&NotifyRecord->Dpc, NotifyRecord, NULL);
		}
		else if (LogCheckForNewMessage(TRUE))
		{
			// check vmx non-root
			NotifyRecord->CheckVmxRootMessagePool = TRUE;

			// Insert dpc to queue
			KeInsertQueueDpc(&NotifyRecord->Dpc, NotifyRecord, NULL);
		}
		else
		{
			// Set the notify routine to the global structure
			GlobalNotifyRecord = NotifyRecord;
		}

		// We will return pending as we have marked the IRP pending.
		return STATUS_PENDING;
	}
	else
	{
		return STATUS_SUCCESS;
	}
}
Usermode notify callback
As you see in the above codes, we add DPCs to queue in two functions (LogRegisterIrpBasedNotification and LogSendBuffer). This way, we won’t miss anything, and everything is processed as a message is generated. For example, if there is any thread waiting for the message then LogSendBuffer notifies it about the new message, if there isn’t any thread waiting for the message then LogSendBuffer can’t do anything, as long as a new thread comes to the kernel then it checks for the new message. Think about it one more time. It’s beautiful.
Now it’s time to read the packets from kernel pools and send them to the user-mode.
When LogNotifyUsermodeCallback is called then we sure that we’re in DISPATCH_LEVEL and vmx non-root mode.
In this function, we check if the parameters sent to the kernel are valid or not. It’s because the user-mode provides them. For example, we check the IRP stack’s Parameters. DeviceIoControl. InputBufferLength and Parameters. DeviceIoControl. OutputBufferLength to make sure they are not null or check whether the SystemBuffer is null or not.
Then we call LogReadBuffer with user-mode buffers, so this function will fill the user-mode buffer and adds the Operation Number in a suitable place. Also, Irp->IoStatus.Information provides the buffer length to the user-mode.
The last step here is to complete the IRP, so I/O Manager sends the results to the user-mode, and the thread can continue to its normal life.
The reason why we access the user-mode buffer in all processes (because DPCs might run on the random user-mode process) and why we use DPCs and don’t use other things like APCs is discussed in the Discussion section.
The following code demonstrates what we talked about it above.
1
2
3
4
5
6
7
8
9
10
11
12
13
14
15
16
17
18
19
20
21
22
23
24
25
26
27
28
29
30
31
32
33
34
35
36
37
38
39
40
41
42
43
44
45
46
47
48
49
50
51
52
53
54
55
56
57
58
59
60
61
62
63
64
65
66
67
68
69
70
71
72
73
74
75
76
77
78
79
80
81
82
83
84
85
86
87
88
89
90
91
92
/* Complete the IRP in IRP Pending state and fill the usermode buffers with pool data */
VOID LogNotifyUsermodeCallback(PKDPC Dpc, PVOID DeferredContext, PVOID SystemArgument1, PVOID SystemArgument2)
{

	PNOTIFY_RECORD NotifyRecord;
	PIRP Irp;
	UINT32 Length;

	UNREFERENCED_PARAMETER(Dpc);
	UNREFERENCED_PARAMETER(SystemArgument1);
	UNREFERENCED_PARAMETER(SystemArgument2);

	NotifyRecord = DeferredContext;

	ASSERT(NotifyRecord != NULL); // can't be NULL
	_Analysis_assume_(NotifyRecord != NULL);

	switch (NotifyRecord->Type)
	{

	case IRP_BASED:
		Irp = NotifyRecord->Message.PendingIrp;

		if (Irp != NULL) {

			PCHAR OutBuff; // pointer to output buffer
			ULONG InBuffLength; // Input buffer length
			ULONG OutBuffLength; // Output buffer length
			PIO_STACK_LOCATION IrpSp;

			// Make suree that concurrent calls to notify function never occurs
			if (!(Irp->CurrentLocation <= Irp->StackCount + 1))
			{
				DbgBreakPoint();
				return;
			}

			IrpSp = IoGetCurrentIrpStackLocation(Irp);
			InBuffLength = IrpSp->Parameters.DeviceIoControl.InputBufferLength;
			OutBuffLength = IrpSp->Parameters.DeviceIoControl.OutputBufferLength;

			if (!InBuffLength || !OutBuffLength)
			{
				Irp->IoStatus.Status = STATUS_INVALID_PARAMETER;
				IoCompleteRequest(Irp, IO_NO_INCREMENT);
				break;
			}

			// Check again that SystemBuffer is not null
			if (!Irp->AssociatedIrp.SystemBuffer)
			{
				// Buffer is invalid
				return;
			}

			OutBuff = Irp->AssociatedIrp.SystemBuffer;
			Length = 0;

			// Read Buffer might be empty (nothing to send)
			if (!LogReadBuffer(NotifyRecord->CheckVmxRootMessagePool, OutBuff, &Length))
			{
				// we have to return here as there is nothing to send here
				return;
			}

			Irp->IoStatus.Information = Length;


			Irp->IoStatus.Status = STATUS_SUCCESS;
			IoCompleteRequest(Irp, IO_NO_INCREMENT);
		}
		break;

	case EVENT_BASED:

		// Signal the Event created in user-mode.
		KeSetEvent(NotifyRecord->Message.Event, 0, FALSE);

		// Dereference the object as we are done with it.
		ObDereferenceObject(NotifyRecord->Message.Event);

		break;

	default:
		ASSERT(FALSE);
		break;
	}

	if (NotifyRecord != NULL) {
		ExFreePoolWithTag(NotifyRecord, POOLTAG);
	}
}
Uninitialization Phase
Nothing special, we just de-allocate the previously allocated buffers. Keep in mind that we should initialize the message tracer at the very first function of our driver so we can use it and, of course, uninitialize it at the end when we don’t have any message anymore.
1
2
3
4
5
6
7
8
9
10
11
12
13
14
15
/* Uninitialize the buffer relating to log message tracing */
VOID LogUnInitialize()
{

	// de-allocate buffer for messages and initialize the core buffer information (for vmx-root core)
	for (int i = 0; i < 2; i++)
	{
		// Free each buffers
		ExFreePoolWithTag(MessageBufferInformation[i].BufferStartAddress, POOLTAG);
		ExFreePoolWithTag(MessageBufferInformation[i].BufferForMultipleNonImmediateMessage, POOLTAG);
	}

	// de-allocate buffers for trace message and data messages
	ExFreePoolWithTag(MessageBufferInformation, POOLTAG);
}

WPP Tracing
WPP Tracing is another mechanism provided by Windows, which can be used to trace messages from both vmx non-root and vmx root-mode and in any IRQL. It is primarily intended for debugging code during development, and it’s capable of publishing events that can be consumed by applications in structured ETW events.
Logging messages with WPP software tracing is similar to using Windows event logging services. The driver logs a message ID and unformatted binary data in a log file. Subsequently, a postprocessor converts the information in the log file to a human-readable form.
In order to use WPP Tracing, first, we should configure our driver to use WPP Tracing as the message tracing by setting UseWPPTracing to TRUE. By default it’s FALSE.
1
2
// Use WPP Tracing instead of all logging functions
#define UseWPPTracing		TRUE
Then we go to our project’s properties and set Run Wpp Tracing to Yes and also add a custom function for sending messages by setting Function To Generate Trace Messages to HypervisorTraceLevelMessage (LEVEL,FLAGS,MSG,…).

Then we need to generate a unique GUID for our driver by using Visual Studio’s Tools -> Create GUID and generate one and put it into the following format.
1
2
3
4
5
6
7
8
#define WPP_CONTROL_GUIDS                                              \
    WPP_DEFINE_CONTROL_GUID(                                           \
        HypervisorFromScratchLogger, (2AE39766,AE4B,46AB,AFC4,002DB8109721), \
        WPP_DEFINE_BIT(HVFS_LOG)             /* bit  0 = 0x00000001 */ \
        WPP_DEFINE_BIT(HVFS_LOG_INFO)        /* bit  1 = 0x00000002 */ \
        WPP_DEFINE_BIT(HVFS_LOG_WARNING)     /* bit  2 = 0x00000004 */ \
        WPP_DEFINE_BIT(HVFS_LOG_ERROR)       /* bit  3 = 0x00000008 */ \
        )
WPP_DEFINE_BIT creates some specific events for our messages that can be used in the future for masking specific events.
After all the above code, we initialize the WPP Tracing by adding the following code at the very first line of the code, e.g., DriverEntry.
1
2
	// Initialize WPP Tracing
	WPP_INIT_TRACING(DriverObject, RegistryPath);
At last we clean up and set WPP Tracing to off by using the following code to Driver Unload function.
1
2
	// Stop the tracing
	WPP_CLEANUP(DriverObject);
For making things easy, I add the following codes to our previous message tracing code, which means that instead of sending the buffers into our custom message tracing buffer, we’ll send it to WPP Tracing buffer.
1
2
3
4
5
6
7
8
9
10
11
12
13
14
15
16
17
18
19
20
21
22
23
24
25
26
27
28
29
30
31
32
33

	if (OperationCode == OPERATION_LOG_INFO_MESSAGE)
	{
		HypervisorTraceLevelMessage(
			TRACE_LEVEL_INFORMATION,  // ETW Level defined in evntrace.h
			HVFS_LOG_INFO,
			"%s",// Flag defined in WPP_CONTROL_GUIDS
			LogMessage);
	}
	else if (OperationCode == OPERATION_LOG_WARNING_MESSAGE)
	{
		HypervisorTraceLevelMessage(
			TRACE_LEVEL_WARNING,  // ETW Level defined in evntrace.h
			HVFS_LOG_WARNING,
			"%s",// Flag defined in WPP_CONTROL_GUIDS
			LogMessage);
	}
	else if (OperationCode == OPERATION_LOG_ERROR_MESSAGE)
	{
		HypervisorTraceLevelMessage(
			TRACE_LEVEL_ERROR,  // ETW Level defined in evntrace.h
			HVFS_LOG_ERROR,
			"%s",// Flag defined in WPP_CONTROL_GUIDS
			LogMessage);
	}
	else
	{
		HypervisorTraceLevelMessage(
			TRACE_LEVEL_NONE,  // ETW Level defined in evntrace.h
			HVFS_LOG,
			"%s",// Flag defined in WPP_CONTROL_GUIDS
			LogMessage);
	}
Also, we have to .tmh files. These files are auto-generated by the WPP framework, which contains the required code for trace messages. TMH file name should be the same as the C file, for example, if we are adding the trace message in “Driver.c” then we are supposed to include “Driver.tmh”. We used WPP Tracing APIs in two files, first Driver.c and Logging.c, so we have to include Driver.tmh and Logging.tmh and no need for these files in other project files as long as we gathered everything in one file.
The WPP Tracing is complete! In order to see the messages in user-mode, we have to use another application, e.g traceview.
Personally, I prefer to use my custom message tracing as WPP Tracing needs to some other application to parse the .pdb file or other files to show the messages, and I didn’t find any good example of parsing messages in an application without using another app.
You can see the results of WPP Tracing later in Let’s Test it! section.
Supporting to Hyper-V
As I told you in the previous parts, testing and building hypervisor for Hyper-V needs extra consideration and adding a few more lines of code to support Hyper-V nested virtualization.
At the time of writing this part, Hyper-V and VMware Workstation are incompatible with each other, which means that if you run Hyper-V you can’t run VMware and a message like this will appear.
VMware Workstation and Hyper-V are not compatible. Remove the Hyper-V role from the system before running VMware Workstation.
The same is true for VMware, if you run VMware you can’t run Hyper-V and you need to execute a command then restart your computer to use another VMM.
In order to use Hyper-V, you should run the following command (as administrator) and then restart your computer.
1
bcdedit /set hypervisorlaunchtype auto
And if you want to run VMware, you can run the following command (as administrator) and restart your computer.
1
bcdedit /set hypervisorlaunchtype off
Enable Nested Virtualization
In part 1, there is a section that describes how to enable VMware’s nested virtualization and test your driver. For Hyper-V we have an exact same scenario, first, turn off the target VM then enable nested virtualization for the target virtual machine by running the following command on Powershell:
Note that instead of PutYourVmNameHere, put the name of your virtual machine that you want to enable nested virtualization for it.
1
Set-VMProcessor -VMName PutYourVmNameHere -ExposeVirtualizationExtensions $true
And if you need to disable it, you can run:
1
Set-VMProcessor -VMName PutYourVmNameHere -ExposeVirtualizationExtensions $false
Now you need to attach your Hyper-V machine to a windbg debugger. There are many ways to do it. You can read here and here (I prefer using kdnet.exe).
Now we have the testing environment, it’s time to modify our hypervisor so we can support Hyper-V.
Hyper-V’s visible behavior in nested virtualization
Hyper-V has some visible behavior for our hypervisor, which means that you should manage some of them that relate to us and give some of them to the Hyper-V as a top-level hypervisor to manage them, you’re confused? Let me explain it one more time.
In a nested virtualization environment, you’re not directly getting the vm-exits and all other hypervisor events, instead it’s the top-level hypervisor that gets the vm-exit (in our case Hyper-V is the top-level). Top-level hypervisor calls the vm-exit handler of lower-level hypervisors (our hypervisor is a low-level hypervisor in this case.) now the lower level hypervisor manages the vm-exit (for example it injects an event (interrupt) to be delivered to the guest) after vm-exit finishes it executes VMRESUME, but this instruction won’t directly go to the guest vmx non-root. Instead, it goes to the vm-exit handler of the top-level hypervisor, and now it’s the top-level hypervisor that performs the tasks (In our example, insert event to the guest).
So, even our hypervisor is not the first hypervisor that gets the event, but our hypervisor is the first to manage them.
On the other hand, Windows kernel is highly integrated to Hyper-V, which means that it uses lots of Hypercalls (Vmcalls) and MSRs to contact with Hyper-V and if the Windows kernel doesn’t get the valid response from Hyper-V then it crashes or halts.
As the first hypervisor to manage the vm-exits, we have to inspect vm-exit details to see if the vm-exit relates to us our refers to Hyper-V. In other words, it’s a general vm-exit, or it’s because Windows wants to talk with Hyper-V.
OK, let see what we should manage and what we should not.
Hyper-V Hypervisor Top-Level Functional Specification (TLFS)
The Hyper-V Hypervisor Top-Level Functional Specification (TLFS) describes the hypervisor’s externally visible behavior to other operating system components. This specification is meant to be useful for guest operating system developers.
If you want to research Hyper-V, you have to read the documentation about Hyper-V’s TLFS here, but we just want to support Hyper-V. Hence, there is documentation (Requirements for Implementing the Microsoft Hypervisor Interface) that describes the things we should do in order to support Hyper-V. Of course, we’re not going to implement all of them to make our hypervisor work on Hyper-V.
Out of Range MSRs
In part 6, I described MSR Bitmaps, if you remember MSR bitmap support MSR index (RCX) between 0x00000000 to 0x00001FFF and 0xC0000000 to 0xC0001FFF. Windows uses other MSRs from 0x40000000 to 0x400000F0 for requesting something or reporting something to vmx-root.
You might ask why they don’t use VMCALLs. Of course, they can use VMCALL, but most hypervisors do this. It’s cheaper and predates VMCALLs, and also this range is specifically designed to be used by hypervisors.
The reason why it’s cheaper is the same discussion about why use int 2e and not sysenter as the cost of sending data over vmcall and allowing it from ring 0 or ring 3 and deciding things (rdmsr doesn’t need that ring check) and sending data back is greater than a simple MSR interface and can work with legacy compilers and systems too.
You can find the definitions of these MSRs here.
All in all, I modified our previous MSR handler (both MSR Read - RDMSR and MSR Write - WRMSR to support MSRs between 0x40000000 to 0x400000F0). All we have to do is execute RDMSR or WRMSR in vmx-root mode.
You might ask, is it ok to run WRMSR or RDMSR with hardware invalid MSRs?
The answer is no! but the reason why we execute it is because we’re are in a nested virtualization environment and it’s not a real vmx-root, physically we’re in vmx non-root mode if that makes sense.
In other words, VMware or Hyper-V or any nested virtualization environment calls our vm-exit handler in vmx non-root and pretend that it’s in vmx-root mode, so executing WRMSR or RDMSR causes a real vm-exit to Hyper-V, and that’s how they can handle the actual vm-exit.
For example RDMSR handles like this :
1
2
3
4
5
6
7
8
9
10
11
12
13
14
15
16
17
18
19
20
21
22
23
24
25
26
27
28
29
30
31
32
33
34
35
36
37
38
39
/* Handles in the cases when RDMSR causes a Vmexit*/
VOID HvHandleMsrRead(PGUEST_REGS GuestRegs)
{

	MSR msr = { 0 };


	// RDMSR. The RDMSR instruction causes a VM exit if any of the following are true:
	//
	// The "use MSR bitmaps" VM-execution control is 0.
	// The value of ECX is not in the ranges 00000000H - 00001FFFH and C0000000H - C0001FFFH
	// The value of ECX is in the range 00000000H - 00001FFFH and bit n in read bitmap for low MSRs is 1,
	//   where n is the value of ECX.
	// The value of ECX is in the range C0000000H - C0001FFFH and bit n in read bitmap for high MSRs is 1,
	//   where n is the value of ECX & 00001FFFH.

	/*
	   Execute WRMSR or RDMSR on behalf of the guest. Important that this
	   can cause bug check when the guest tries to access unimplemented MSR
	   even within the SEH block* because the below WRMSR or RDMSR raises
	   #GP and are not protected by the SEH block (or cannot be protected
	   either as this code run outside the thread stack region Windows
	   requires to proceed SEH). Hypervisors typically handle this by noop-ing
	   WRMSR and returning zero for RDMSR with non-architecturally defined
	   MSRs. Alternatively, one can probe which MSRs should cause #GP prior
	   to installation of a hypervisor and the hypervisor can emulate the
	   results.
	   */

	   // Check for sanity of MSR if they're valid or they're for reserved range for WRMSR and RDMSR
	if ((GuestRegs->rcx <= 0x00001FFF) || ((0xC0000000 <= GuestRegs->rcx) && (GuestRegs->rcx <= 0xC0001FFF))
		|| (GuestRegs->rcx >= RESERVED_MSR_RANGE_LOW && (GuestRegs->rcx <= RESERVED_MSR_RANGE_HI)))
	{
		msr.Content = __readmsr(GuestRegs->rcx);
	}

	GuestRegs->rax = msr.Low;
	GuestRegs->rdx = msr.High;
}
Same checks apply to WRMSR too.
Hyper-V Hypercalls (VMCALLs)
VMCALL is exactly like RDMSR and WRMSR, even though running VMCALL on vmx-root mode has a known behavior (invokes an SMM monitor). Still, in our case, in a nested virtualization environment, it causes a vm-exit to Hyper-V so Hyper-V can manage the hypercall.
Hyper-V has the following convention for its VMCALLs (hypercall).
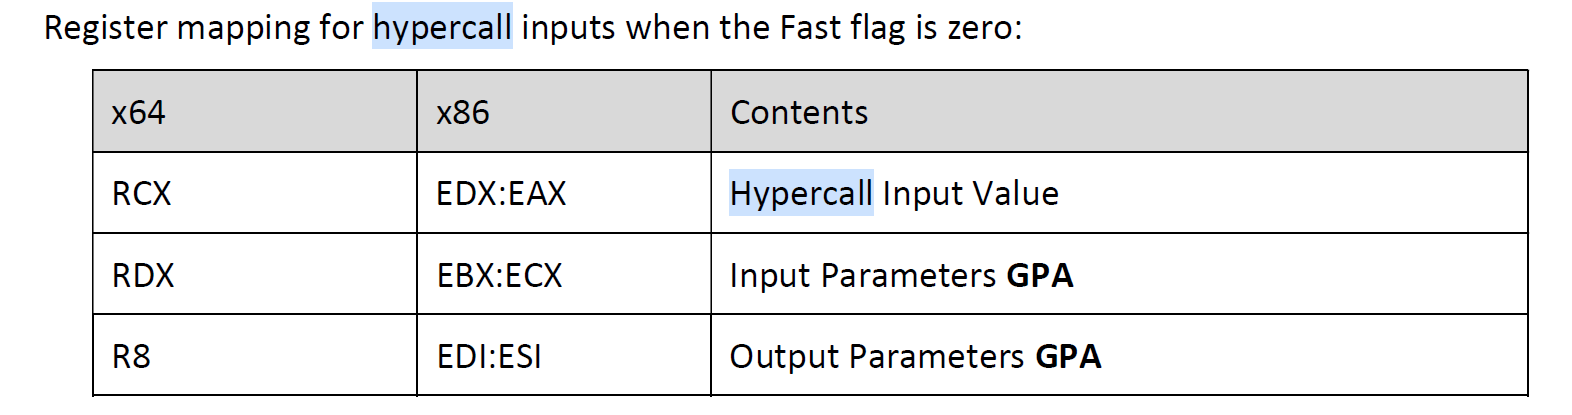
As we want to use our hypervisor VMCALLs, a quick and dirty fix for this problem is somehow show the vm-exit handler that our hypervisor routines should manage this VMCALL; thus we put some random hex values to r10, r11, r12 (as these registers are not used in fastcall calling convention, you can choose other registers too) thus we can check for these registers on the vm-exit handler to make sure that this VMCALL relates to our hypervisor.
As some of the registers should not be changed due to the Windows x64 fastcall calling convention, we save them to restore them later.
Generally, The registers RAX, RCX, RDX, R8, R9, R10, R11 are considered volatile (caller-saved) and registers RBX, RBP, RDI, RSI, RSP, R12, R13, R14, and R15 are considered nonvolatile (callee-saved).
1
2
3
4
5
6
7
8
9
10
11
12
13
     ; We change r10 to HVFS Hex ASCII and r11 to VMCALL Hex ASCII and r12 to NOHYPERV Hex ASCII so we can make sure that the calling Vmcall comes
    ; from our hypervisor and we're resposible for managing it, otherwise it has to be managed by Hyper-V
    push    r10
    push    r11
    push    r12
    mov     r10, 48564653H          ; [HVFS]
    mov     r11, 564d43414c4cH      ; [VMCALL]
    mov     r12, 4e4f485950455256H   ; [NOHYPERV]
    vmcall                          ; VmxVmcallHandler(UINT64 VmcallNumber, UINT64 OptionalParam1, UINT64 OptionalParam2, UINT64 OptionalParam3)
    pop     r12
    pop     r11
    pop     r10
    ret                             ; Return type is NTSTATUS and it's on RAX from the previous function, no need to change anything
For Hyper-V VMCALLs we need to adjust RCX, RDX, R8 as demonstrated in the above picture.
1
2
3
4
5
AsmHypervVmcall PROC
    vmcall                       ; __fastcall Vmcall(rcx = HypercallInputValue, rdx = InputParamGPA, r8 = OutputParamGPA)
    ret

AsmHypervVmcall ENDP
Finally, in the vm-exit handler, we check for the VMCALL to see if our random values are store in the registers or not. If it’s on those registers, then we call our hypervisor VMCALL handler. Otherwise, we let Hyper-V do whatever it wants to its VMCALLs.
1
2
3
4
5
6
7
8
9
10
11
12
13
14
15
	case EXIT_REASON_VMCALL:
	{
		// Check if it's our routines that request the VMCALL our it relates to Hyper-V
		if (GuestRegs->r10 == 0x48564653 && GuestRegs->r11 == 0x564d43414c4c && GuestRegs->r12 == 0x4e4f485950455256)
		{
			// Then we have to manage it as it relates to us
			GuestRegs->rax = VmxVmcallHandler(GuestRegs->rcx, GuestRegs->rdx, GuestRegs->r8, GuestRegs->r9);
		}
		else
		{
			// Otherwise let the top-level hypervisor to manage it
			GuestRegs->rax = AsmHypervVmcall(GuestRegs->rcx, GuestRegs->rdx, GuestRegs->r8);
		}
		break;
	}
Hyper-V Interface CPUID Leaves
The last step on supporting Hyper-V is managing CPUID leaves, here are some of the CPUID leaves that we have to manage them.
Note that based on the document I mentioned, we have to return non “Hv#1” value. This indicates that our hypervisor does NOT conform to the Microsoft hypervisor interface.
1
2
3
4
5
6
7
8
9
10
11
12
13
14
15
16
17
18
19
20
21
22
23
	else if (RegistersState->rax == CPUID_HV_VENDOR_AND_MAX_FUNCTIONS)
	{

		// Return a maximum supported hypervisor CPUID leaf range and a vendor
		// ID signature as required by the spec.

		cpu_info[0] = HYPERV_CPUID_INTERFACE;
		cpu_info[1] = 'rFvH';  // "[H]yper[v]isor [Fr]o[m] [Scratch] = HvFrmScratch"
		cpu_info[2] = 'rcSm';
		cpu_info[3] = 'hcta';
	}
	else if (RegistersState->rax == HYPERV_CPUID_INTERFACE)
	{
		// Return our interface identifier
		//cpu_info[0] = 'HVFS'; // [H]yper[V]isor [F]rom [S]cratch

		// Return non Hv#1 value. This indicate that our hypervisor does NOT
		// conform to the Microsoft hypervisor interface.

		cpu_info[0] = '0#vH';  // Hv#0
		cpu_info[1] = cpu_info[2] = cpu_info[3] = 0;

	}
By the way, it works without the above modification about CPUID leaves, but it’s better to manage them based on TLFS.
One other thing that I noticed during the development on Hyper-V was the fact that we have vm-exits because the guest executes HLT (Halt) instruction, of course, we don’t want to halt the processor so in the case of EXIT_REASON_HLT we simply ignore it.
Finished! From now you can test your hypervisor on Hyper-V too : )
Fixing Previous Design Issues
In this part, we want to improve our hypervisor and fix some issues from the previous parts regarding problems and misunderstandings.
Fixing the problem with pre-allocated buffers
Our previous buffer pre-allocation has 2 problems,
- It doesn’t allow us to hook page from VMX Root mode, which means that every pool allocation should start from vmx non-root mode.
- In the process of allocation, we didn’t acquire spinlock so that the processor might interrupt us. Next time we want to continue our execution, there is no allocation as we allocate pools per core.
To fix them, we need to design a global pool manager. You can see the pool manager code in “PoolManager.c” and “PoolManager.h”. I’m not gonna describe how it works as it’s pretty clear if you see the source code, but I’ll explain the functionality of this pool manager and how you can use its functions.
In this pool manager, instead of allocating core-core specific pre-allocated buffers, we’ll use global pre-allocated buffers with ten pre-allocated buffers ready, each time one of these buffers is used we add a request to pool manager to replace another pool as soon as possible, this way we’ll never run out of pre-allocated pools.
Of course, we might run out of the pre-allocated pool if ten requests arrive at the pool manager, but we don’t need such a request and, of course, between them, pool manager gets a chance to re-allocate new pools.
Here the functions explanation :
1
BOOLEAN PoolManagerInitialize();
Initializes the Pool Manager and pre-allocate some pools.
1
VOID PoolManagerUninitialize();
De-allocate all the allocated pools
1
BOOLEAN PoolManagerCheckAndPerformAllocation();
The above function tries to see whether a new pool request is available, if available, then allocates it. It should be called in PASSIVE_LEVEL (vmx non-root mode) because we want paging allocation, and also, the best place to check for it is on IOCTL handler as we call it frequently and it’s PASSIVE_LEVEL and safe.
1
BOOLEAN PoolManagerRequestAllocation(SIZE_T Size, UINT32 Count, POOL_ALLOCATION_INTENTION Intention);
If we have requested to allocate a new pool, we can call this function. It stores the requests somewhere in the memory to be allocated when it’s safe (IRQL == PASSIVE_LEVEL).
POOL_ALLOCATION_INTENTION is an enum that describes why we need this pool. It’s used because we might need pools for other purposes with different sizes, so we use our pool manager without any problem.
1
UINT64 PoolManagerRequestPool(POOL_ALLOCATION_INTENTION Intention, BOOLEAN RequestNewPool, UINT32 Size);
In the vmx-root mode, if we need a safe pool address immediately we call it, it also requests a new pool if we set RequestNewPool to TRUE; thus, next time that it’s safe, the pool will be allocated.
Also, you can look at the code for other explanations.
Avoid Intercepting Accesses to CR3
One of misunderstanding that we have from part 5 until this part was that we intercept CR3 accesses because we set CR3 load-exiting and CR3 store-exiting on the Cpu Based VM Exec Controls.
In general, it’s quite unusual to intercept guest accesses to CR3 when you run it under EPT. It’s a behavior mostly done when you implementing shadow MMU (Because lack of EPT support in CPU) so not intercepting CR3 accesses is the standard behavior for any hypervisor running with EPT enabled.
Intercepting CR3 access is always configurable, we have to clear bits CPU_BASED_CR3_STORE_EXITING, CPU_BASED_CR3_LOAD_EXITING, and CPU_BASED_INVLPG_EXITING in VMCS’s CPU_BASED_VM_EXEC_CONTROL.
But wait, why we should clear them, we never set them !
As noted in previous parts, certain VMX controls are reserved and must be set to a specific value (0 or 1), which is determined by the processor. That’s why we used the function “HvAdjustControls” and pass them an MSR (MSR_IA32_VMX_PROCBASED_CTLS, MSR_IA32_VMX_PINBASED_CTLS, MSR_IA32_VMX_EXIT_CTLS, MSR_IA32_VMX_ENTRY_CTLS) which represents these settings.
Actually, there are 3 types of settings for VMCS controls.
- Always-flexible. These have never been reserved.
- Default0. These are (or have been) reserved with a default setting of 0.
- Default1. They are (or have been) reserved with a default setting of 1.
On newer processors, if Bit 55 (IA32_VMX_BASIC) is read as 1 if any VMX controls that are default1 may be cleared to 0. This bit also reports support for the VMX capability MSRs A32_VMX_TRUE_PINBASED_CTLS, IA32_VMX_TRUE_PROCBASED_CTLS, IA32_VMX_TRUE_EXIT_CTLS, and IA32_VMX_TRUE_ENTRY_CTLS.
So we have to check if our CPU supports this bit, if it supports then we have to use new A32_VMX_TRUE_PINBASED_CTLS, IA32_VMX_TRUE_PROCBASED_CTLS, IA32_VMX_TRUE_EXIT_CTLS, and IA32_VMX_TRUE_ENTRY_CTLS instead of MSR_IA32_VMX_PROCBASED_CTLS, MSR_IA32_VMX_PINBASED_CTLS, MSR_IA32_VMX_EXIT_CTLS, MSR_IA32_VMX_ENTRY_CTLS.
Note that MSR_IA32_VMX_PROCBASED_CTLS2 doesn’t have another version.
For this purpose, first we read the MSR_IA32_VMX_BASIC.
1
2
3
4
	IA32_VMX_BASIC_MSR VmxBasicMsr = { 0 };

	// Reading IA32_VMX_BASIC_MSR
	VmxBasicMsr.All = __readmsr(MSR_IA32_VMX_BASIC);
Then we check whether the 55th bit of the MSR_IA32_VMX_BASIC is set or not. If it’s set, then we use different MSR to our HvAdjustControls.
1
2
3
4
5
6
7
8
9
10
11
12
13
14
15
16
17
18
19
20
21
22
23
	CpuBasedVmExecControls = HvAdjustControls(CPU_BASED_ACTIVATE_MSR_BITMAP	| CPU_BASED_ACTIVATE_SECONDARY_CONTROLS,
		VmxBasicMsr.Fields.VmxCapabilityHint ? MSR_IA32_VMX_TRUE_PROCBASED_CTLS : MSR_IA32_VMX_PROCBASED_CTLS);

	__vmx_vmwrite(CPU_BASED_VM_EXEC_CONTROL, CpuBasedVmExecControls);

	LogInfo("Cpu Based VM Exec Controls (Based on %s) : 0x%x",
		VmxBasicMsr.Fields.VmxCapabilityHint ? "MSR_IA32_VMX_TRUE_PROCBASED_CTLS" : "MSR_IA32_VMX_PROCBASED_CTLS", CpuBasedVmExecControls);

	SecondaryProcBasedVmExecControls = HvAdjustControls(CPU_BASED_CTL2_RDTSCP |
		CPU_BASED_CTL2_ENABLE_EPT | CPU_BASED_CTL2_ENABLE_INVPCID |
		CPU_BASED_CTL2_ENABLE_XSAVE_XRSTORS  | CPU_BASED_CTL2_ENABLE_VPID | CPU_BASED_CTL2_ENABLE_USER_WAIT_PAUSE, MSR_IA32_VMX_PROCBASED_CTLS2);

	__vmx_vmwrite(SECONDARY_VM_EXEC_CONTROL, SecondaryProcBasedVmExecControls);
	LogInfo("Secondary Proc Based VM Exec Controls (MSR_IA32_VMX_PROCBASED_CTLS2) : 0x%x", SecondaryProcBasedVmExecControls);

	__vmx_vmwrite(PIN_BASED_VM_EXEC_CONTROL, HvAdjustControls(0,
		VmxBasicMsr.Fields.VmxCapabilityHint ? MSR_IA32_VMX_TRUE_PINBASED_CTLS : MSR_IA32_VMX_PINBASED_CTLS));

	__vmx_vmwrite(VM_EXIT_CONTROLS, HvAdjustControls(VM_EXIT_IA32E_MODE,
		VmxBasicMsr.Fields.VmxCapabilityHint ? MSR_IA32_VMX_TRUE_EXIT_CTLS : MSR_IA32_VMX_EXIT_CTLS));

	__vmx_vmwrite(VM_ENTRY_CONTROLS, HvAdjustControls(VM_ENTRY_IA32E_MODE,
		VmxBasicMsr.Fields.VmxCapabilityHint ? MSR_IA32_VMX_TRUE_ENTRY_CTLS : MSR_IA32_VMX_ENTRY_CTLS));
This way, we can gain better performance by disabling unnecessary vm-exits as there are countless CR3 changes for each process in Windows, and also meltdown patch brings twice cr3 changes. We no longer need to intercept them.
Restoring IDTR, GDTR, GS Base and FS Base
One of the things that we didn’t have in the previous parts was that we didn’t restore the IDTR, GDTR, GS Base, and FS Base when we want to turn off the hypervisor. We should reset GDTR/IDTR when you do vmxoff, or PatchGuard will detect them left modified.
In order to restore them, before executing vmxoff in each core, the following function is called and it takes care of everything that should be restored to avoid PatchGuard errors.
It read GUEST_GS_BASE and GUEST_FS_BASE from VMCS and write to restore them with WRMSR and also restore the GUEST_GDTR_BASE, GUEST_GDTR_LIMIT, and GUEST_IDTR_BASE, GUEST_IDTR_LIMIT using lgdt and lidt instructions.
1
2
3
4
5
6
7
8
9
10
11
12
13
14
15
16
17
18
19
20
21
22
23
24
25
26
27
28
29
VOID HvRestoreRegisters()
{
	ULONG64 FsBase;
	ULONG64 GsBase;
	ULONG64 GdtrBase;
	ULONG64 GdtrLimit;
	ULONG64 IdtrBase;
	ULONG64 IdtrLimit;

	// Restore FS Base
	__vmx_vmread(GUEST_FS_BASE, &FsBase);
	__writemsr(MSR_FS_BASE, FsBase);

	// Restore Gs Base
	__vmx_vmread(GUEST_GS_BASE, &GsBase);
	__writemsr(MSR_GS_BASE, GsBase);

	// Restore GDTR
	__vmx_vmread(GUEST_GDTR_BASE, &GdtrBase);
	__vmx_vmread(GUEST_GDTR_LIMIT, &GdtrLimit);

	AsmReloadGdtr(GdtrBase, GdtrLimit);

	// Restore IDTR
	__vmx_vmread(GUEST_IDTR_BASE, &IdtrBase);
	__vmx_vmread(GUEST_IDTR_LIMIT, &IdtrLimit);

	AsmReloadIdtr(IdtrBase, IdtrLimit);
}
This is the assembly part to restore IDTR and GDTR.
1
2
3
4
5
6
7
8
9
10
11
12
13
14
15
16
17
18
19
20
21
22
23
24
25
26
27
28
29
;------------------------------------------------------------------------

; AsmReloadGdtr (PVOID GdtBase (rcx), ULONG GdtLimit (rdx) );

AsmReloadGdtr PROC
	push	rcx
	shl		rdx, 48
	push	rdx
	lgdt	fword ptr [rsp+6]	; do not try to modify stack selector with this ;)
	pop		rax
	pop		rax
	ret
AsmReloadGdtr ENDP

;------------------------------------------------------------------------

; AsmReloadIdtr (PVOID IdtBase (rcx), ULONG IdtLimit (rdx) );

AsmReloadIdtr PROC
	push	rcx
	shl		rdx, 48
	push	rdx
	lidt	fword ptr [rsp+6]
	pop		rax
	pop		rax
	ret
AsmReloadIdtr ENDP

;------------------------------------------------------------------------
Also, it’s better to unset vmx-enable bit of cr4 after executing vmxoff on each core separately.
1
2
	// Now that VMX is OFF, we have to unset vmx-enable bit on cr4
	__writecr4(__readcr4() & (~X86_CR4_VMXE));
Let’s Test it!
The code for our hypervisor is tested on bare-metal (physical machine), VMware’s nested virtualization and Hyper-V’s nested virtualization.
View WPP Tracing Messages
To test WPP Tracing you need an application for parsing messages, I use TraceView.
TraceView is located in the tools\<Platform> subdirectory of the Windows Driver Kit (WDK), where <Platform> represents the platform you are running the trace session on, for example, x86, x64, or arm64.
There are also other applications both GUI and Command-line for this purpose, you can see a list of some of these apps here.
First, open the traceview (run as administrator), go to File-> Create New Log Session, and use the .pdb file generated by visual studio. PDB file contains debugging information, and for WPP Tracing, they contain GUID and format of messages.
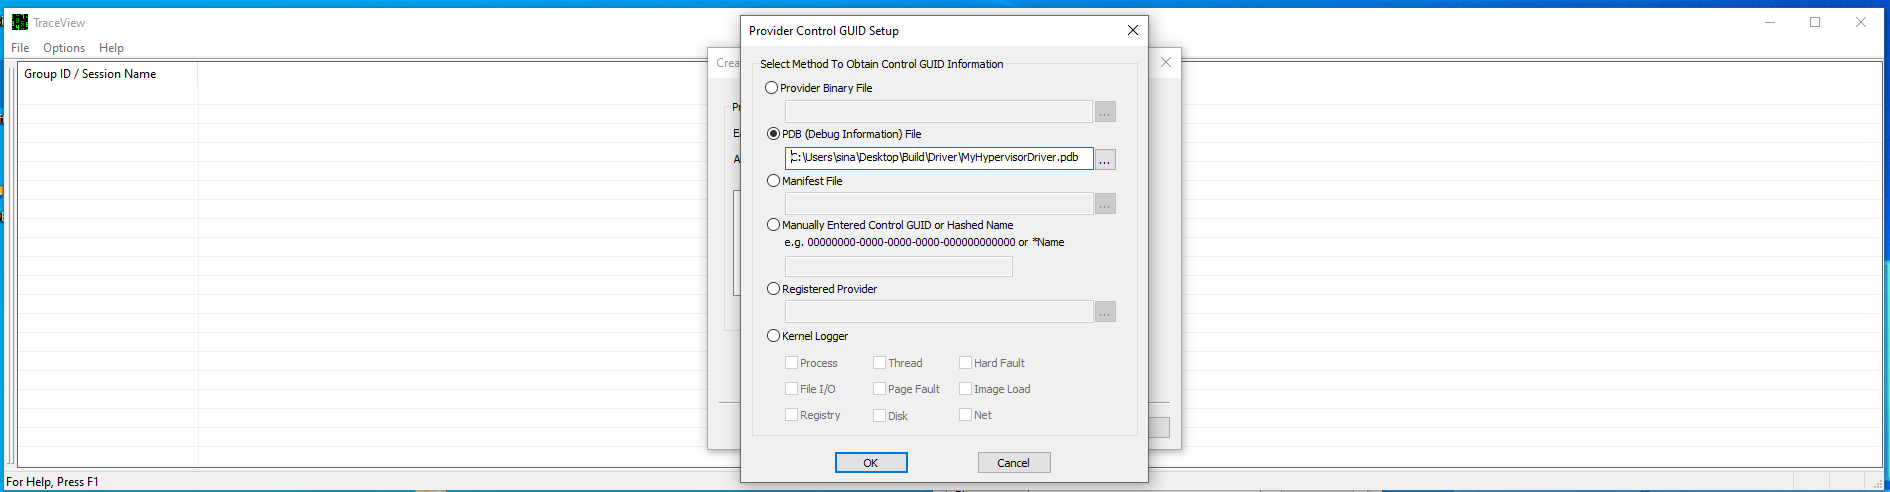
When you select your provider, then click Next.

Here you can configure what kind of messages you want to see, e.g you only want to see error messages.
The default configuration is to see all the messages.

Finally, you’ll see the following results.

How to test?
Now it’s time to see what we’ve done in this part !
Note: None of the below tests are active by default, you have to uncomment specific lines to see results in your hypervisor!
Event Injection & Exception Bitmap Demo
In order to test event injection and exception bitmap we have a scenario where we want to monitor each debug breakpoint that is triggered in a user-mode application.
For this, I debugged an application with Immunity Debugger and put a breakpoint on multiple addresses. We want to intercept each breakpoint from any applications.
First, uncomment the following line in Vmx.c .
1
2
	// Set exception bitmap to hook division by zero (bit 1 of EXCEPTION_BITMAP)
	 __vmx_vmwrite(EXCEPTION_BITMAP, 0x8); // breakpoint 3nd bit
This will cause a vm-exit on each execution of breakpoint exception using Exception Bitmap.
The following codes are responsible to handle the vm-exits for Exception Bitmap. We check to see what was the interrupt/exception that causes this vm-exit by VM_EXIT_INTR_INFO from VMCS. If it’s a SOFTWARE EXCEPTION and its a vector is BREAKPOINT then we’re sure that execution of an (int 3 or 0xcc) was the cause for this vm-exit.
Now, we create a log that shows a breakpoint that happened in GUEST_RIP then re-inject the breakpoint back to the guest (Event Injection). We have to re-inject it back to the guest because the event is canceled after this vm-exit, you can check it, just remove the EventInjectBreakpoint(), and your user-mode debugger will no longer work.
1
2
3
4
5
6
7
8
9
10
11
12
13
14
15
16
17
18
19
20
21
22
23
24
25
26
27
28
29
30
31
32
33
34
35
36
37
38
	case EXIT_REASON_EXCEPTION_NMI:
	{
		/*

		Exception or non-maskable interrupt (NMI). Either:
			1: Guest software caused an exception and the bit in the exception bitmap associated with exception’s vector was set to 1
			2: An NMI was delivered to the logical processor and the “NMI exiting” VM-execution control was 1.

		VM_EXIT_INTR_INFO shows the exit infromation about event that occured and causes this exit
		Don't forget to read VM_EXIT_INTR_ERROR_CODE in the case of re-injectiong event

		*/

		// read the exit reason
		__vmx_vmread(VM_EXIT_INTR_INFO, &InterruptExit);

		if (InterruptExit.InterruptionType == INTERRUPT_TYPE_SOFTWARE_EXCEPTION && InterruptExit.Vector == EXCEPTION_VECTOR_BREAKPOINT)
		{

			ULONG64 GuestRip;
			// Reading guest's RIP
			__vmx_vmread(GUEST_RIP, &GuestRip);

			// Send the user
			LogInfo("Breakpoint Hit (Process Id : 0x%x) at : %llx ", PsGetCurrentProcessId(), GuestRip);

			GuestState[CurrentProcessorIndex].IncrementRip = FALSE;

			// re-inject #BP back to the guest
			EventInjectBreakpoint();

		}
		else
		{
			LogError("Not expected event occured");
		}
		break;
	}
To see the result as a gif, click the link below.
View Example as a .gif (event-inject-and-exception-bitmap.gif)
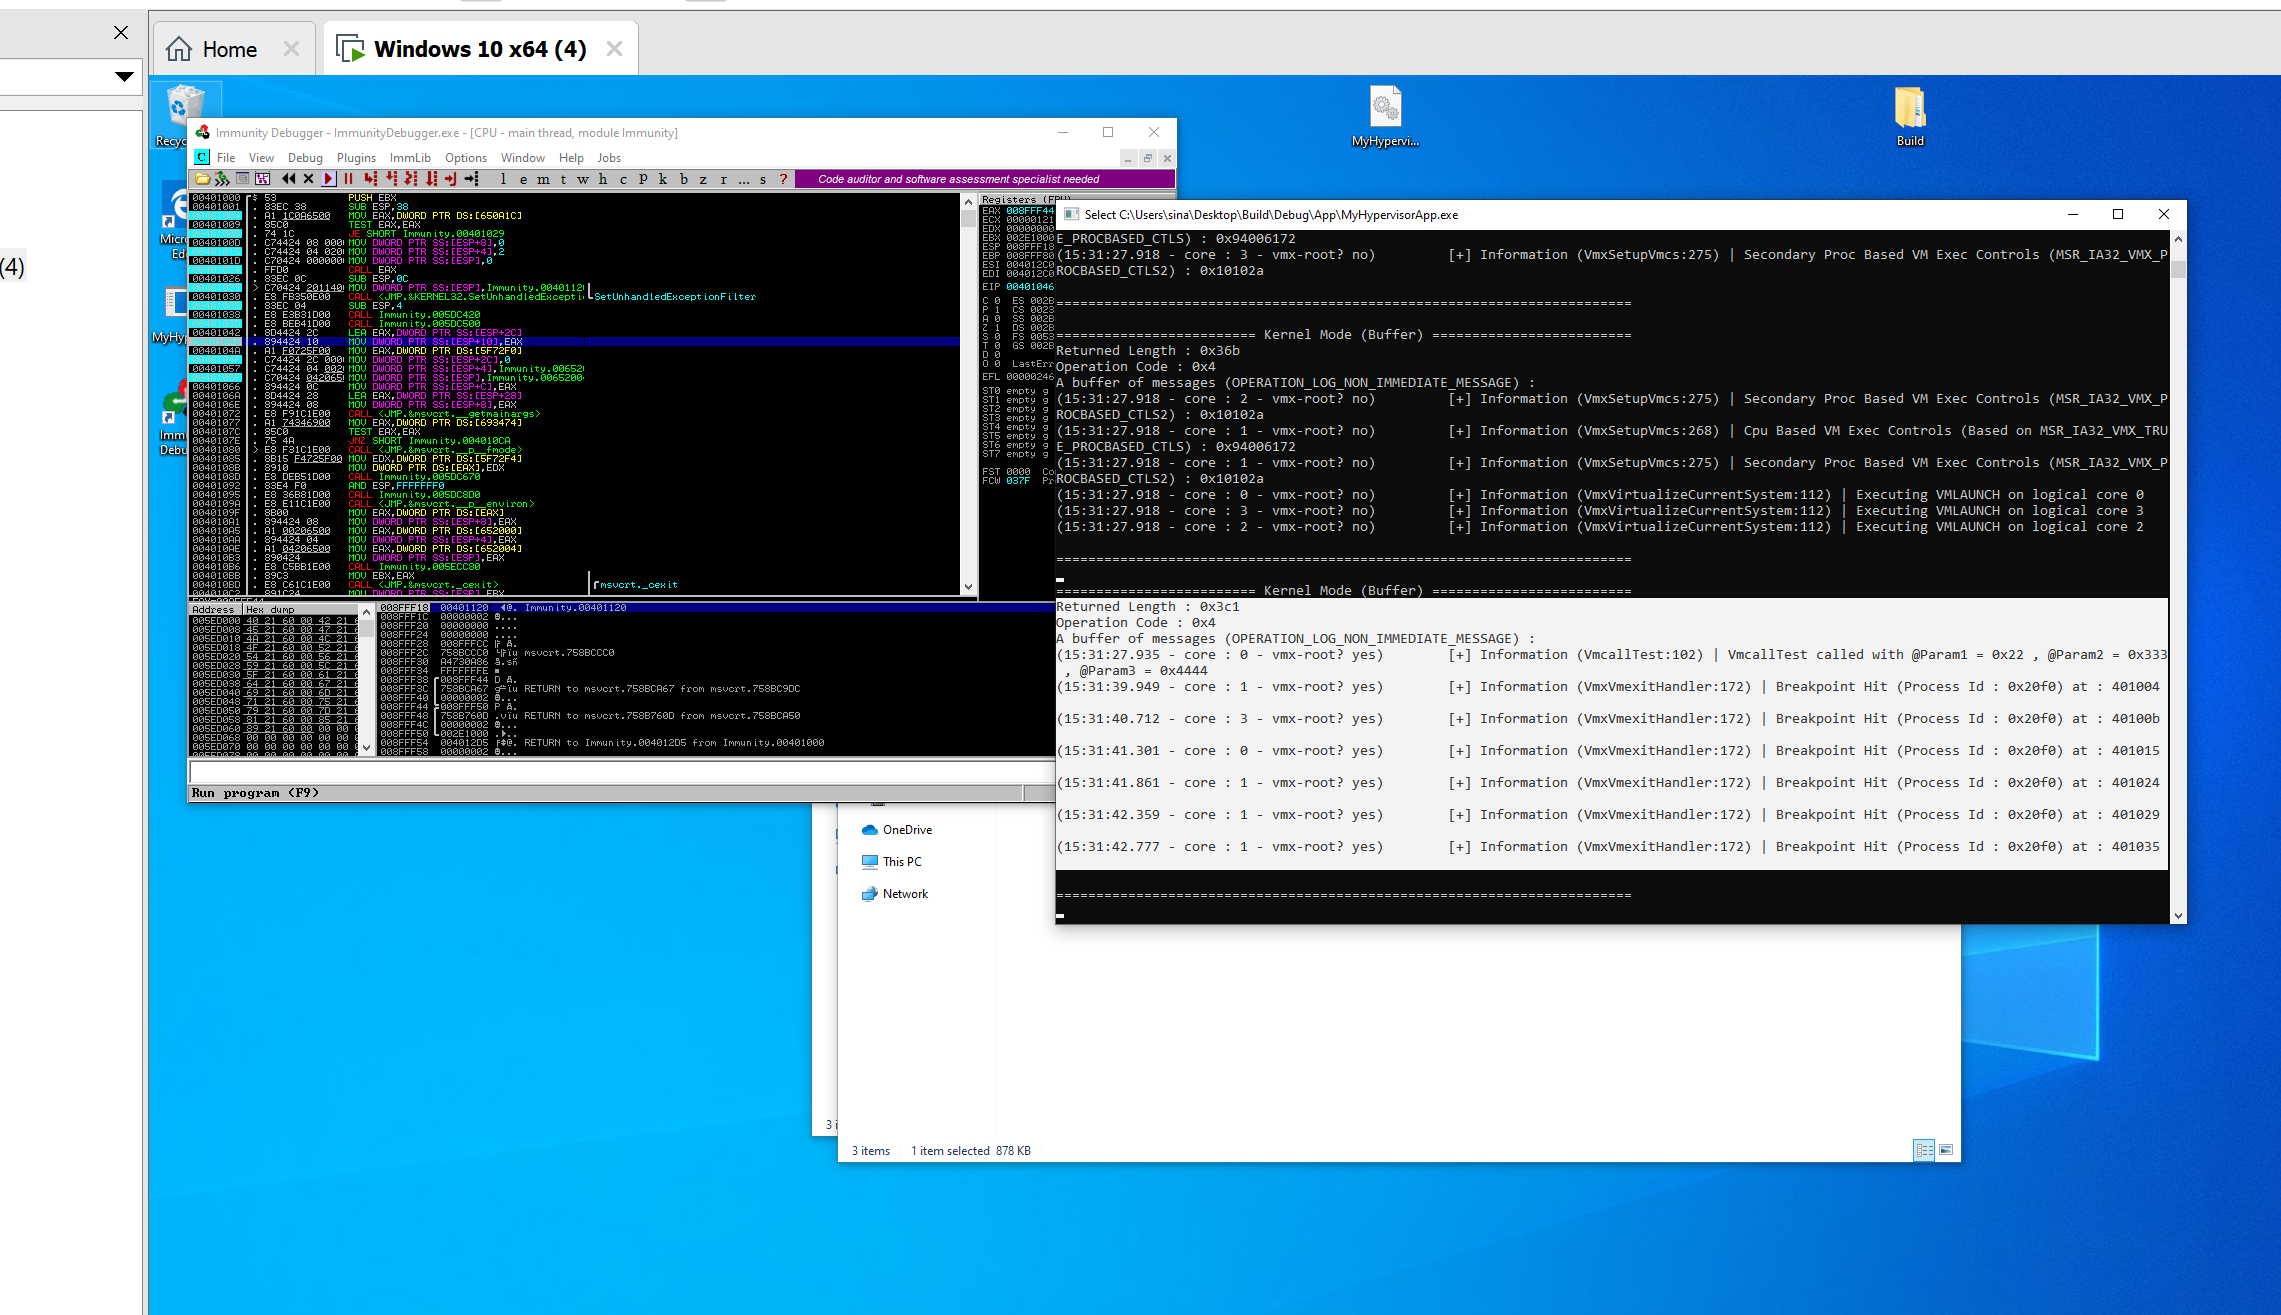
Hidden Hooks Demo
Hidden hooks are divided into two parts, The first part is for hidden hooks of Read/Write (It’s like simulating hardware debug registers without any limitation), and the second part is hidden hooks for execution which is an equivalent of invisible in-line hooks.
In order to activate the hidden hooks test, uncomment HiddenHooksTest() from Driver.c .
Note that you can simultaneously use Hidden Hooks for Read/Write, Execute or syscall hook, there is no limitation.
1
2
3
4
	//////////// test ////////////
	HiddenHooksTest();
	// SyscallHookTest();
	//////////////////////////////
Read/Write Hooks or Hardware Debug Registers Simulation
For testing read and write, uncomment the first line, now you’ll be notified in the case of any Read/Write from any locations to the current thread’s _ETHREAD structure (KeGetCurrentThread()).
1
2
3
4
5
6
7
8
9
10
11
12
/* Make examples for testing hidden hooks */
VOID HiddenHooksTest()
{
	// Hook Test
		EptPageHook(KeGetCurrentThread(), NULL, NULL, TRUE, TRUE, FALSE);
	//	EptPageHook(ExAllocatePoolWithTag, ExAllocatePoolWithTagHook, (PVOID*)&ExAllocatePoolWithTagOrig, FALSE, FALSE, TRUE);

	// Unhook Tests
	//HvPerformPageUnHookSinglePage(ExAllocatePoolWithTag);
	//HvPerformPageUnHookAllPages();

}
To see the result as a gif, click the link below.
View Example as a .gif (hidden-hook-example-read-write.gif)
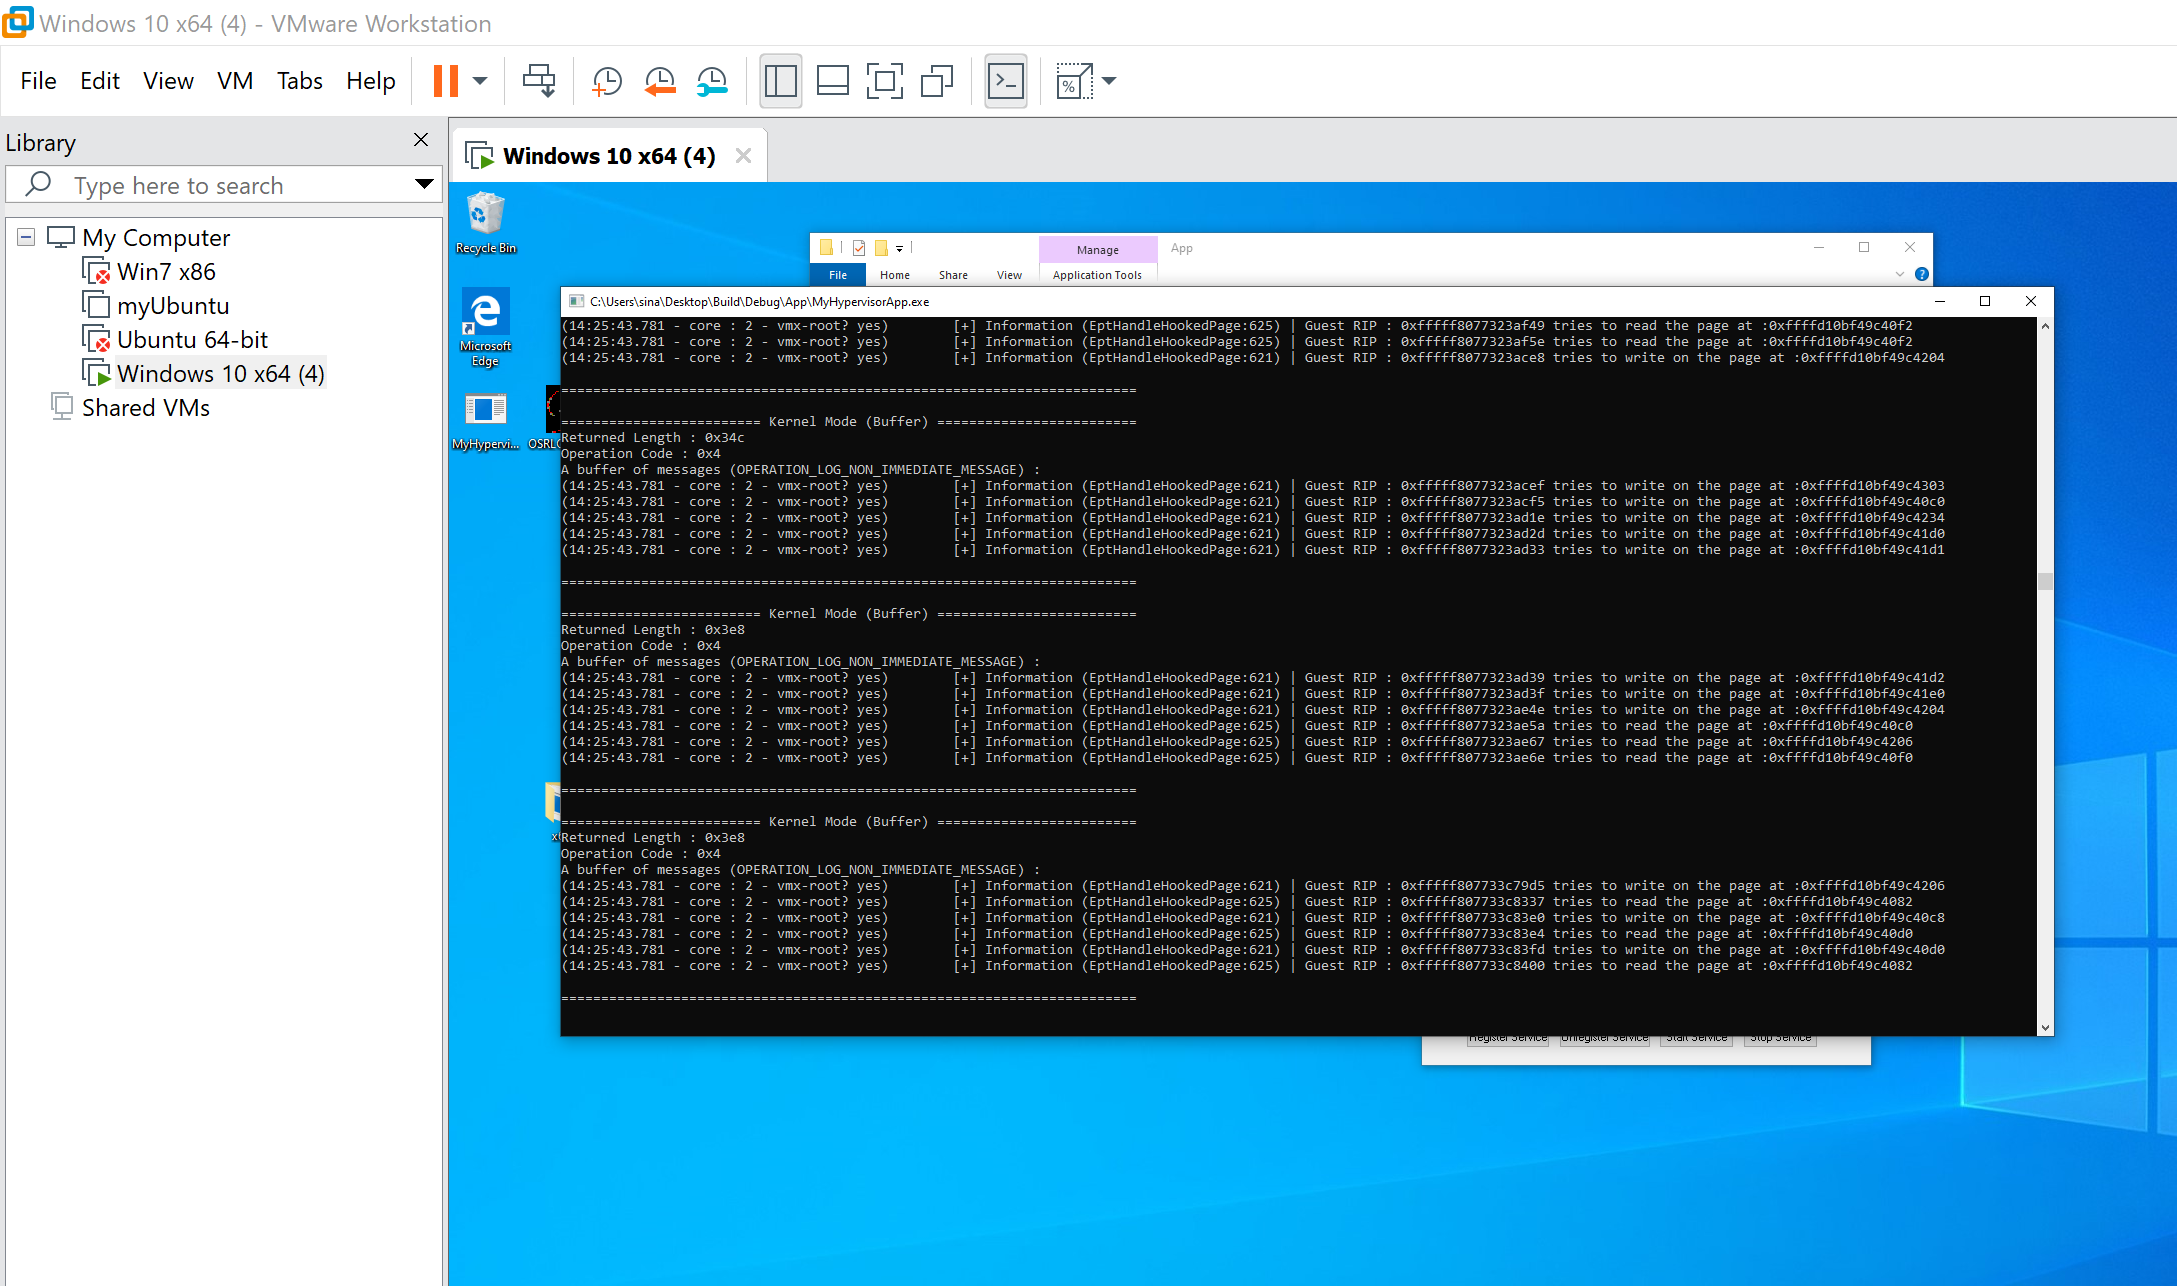
Also, you can see the results in Windbg !

Hidden Execution Hook
The second scenario for hidden hooks is to inline hook the ExAllocatePoolWithTag function.
This is done by uncommenting the following line.
1
2
3
4
5
6
7
8
9
10
11
12
/* Make examples for testing hidden hooks */
VOID HiddenHooksTest()
{
	// Hook Test
	//	EptPageHook(KeGetCurrentThread(), NULL, NULL, TRUE, TRUE, FALSE);
		EptPageHook(ExAllocatePoolWithTag, ExAllocatePoolWithTagHook, (PVOID*)&ExAllocatePoolWithTagOrig, FALSE, FALSE, TRUE);

	// Unhook Tests
	//HvPerformPageUnHookSinglePage(ExAllocatePoolWithTag);
	//HvPerformPageUnHookAllPages();

}
And also a simple fucntion that logs each ExAllocatePoolWithTag.
1
2
3
4
5
6
7
8
9
10
/* Hook function that HooksExAllocatePoolWithTag */
PVOID ExAllocatePoolWithTagHook(
	POOL_TYPE	PoolType,
	SIZE_T      NumberOfBytes,
	ULONG       Tag
)
{
	LogInfo("ExAllocatePoolWithTag Called with : Tag = 0x%x , Number Of Bytes = %d , Pool Type = %d ", Tag, NumberOfBytes, PoolType);
	return ExAllocatePoolWithTagOrig(PoolType, NumberOfBytes, Tag);
}
The hook is applied ! you can also try to use (u nt!ExAllocatePoolWithTag) and see there is no in-line hook there, so it’s completely hidden and of course PatchGuard compatible!
To see the result as a gif, click the link below.
View Example as a .gif (hidden-hook-example-exec.gif)

Syscall Hook Demo
Our scenario for testing system-call hooks is first uncommenting the following line in Driver.c .
1
2
3
4
	//////////// test ////////////
	// HiddenHooksTest();
	SyscallHookTest();
	//////////////////////////////
The following function first searches for API Number 0x55 (on Windows 10 1909, 0x55 represents to NtCreateFile this is not true for all versions of Windows you have to find the correct API Number for NtCreateFile based on your Windows version, a full list of system-call numbers for Nt Table is here and for Win32k Table is here).
After finding the address of NtCreateFile (Syscall number 0x55) we set a hidden hook on this address.
1
2
3
4
5
6
7
8
9
10
11
12
13
14
15
16
17
18
19
20
/* Make examples for testing hidden hooks */
VOID SyscallHookTest() {

	// Note that this syscall number is only valid for Windows 10 1909, you have to find the syscall number of NtCreateFile based on
	// Your Windows version, please visit https://j00ru.vexillium.org/syscalls/nt/64/ for finding NtCreateFile's Syscall number for your Windows.

	INT32 ApiNumberOfNtCreateFile = 0x0055;
	PVOID ApiLocationFromSSDTOfNtCreateFile = SyscallHookGetFunctionAddress(ApiNumberOfNtCreateFile, FALSE);

	if (!ApiLocationFromSSDTOfNtCreateFile)
	{
		LogError("Error in finding base address.");
		return FALSE;
	}

	if (EptPageHook(ApiLocationFromSSDTOfNtCreateFile, NtCreateFileHook, (PVOID*)&NtCreateFileOrig, FALSE, FALSE, TRUE))
	{
		LogInfo("Hook appkied to address of API Number : 0x%x at %llx\n", ApiNumberOfNtCreateFile, ApiLocationFromSSDTOfNtCreateFile);
	}
}
For handling in-line hook, the following function is used which creates a log based on the file name and finally calls the original NtCreateFile.
1
2
3
4
5
6
7
8
9
10
11
12
13
14
15
16
17
18
19
20
21
22
23
24
25
26
27
28
29
30
31
32
33
34
35
36
37
38
39
40
41
42
43
44
45
46
47
48
49
50
51
52
53
/* Hook function that hooks NtCreateFile */
NTSTATUS NtCreateFileHook(
	PHANDLE            FileHandle,
	ACCESS_MASK        DesiredAccess,
	POBJECT_ATTRIBUTES ObjectAttributes,
	PIO_STATUS_BLOCK   IoStatusBlock,
	PLARGE_INTEGER     AllocationSize,
	ULONG              FileAttributes,
	ULONG              ShareAccess,
	ULONG              CreateDisposition,
	ULONG              CreateOptions,
	PVOID              EaBuffer,
	ULONG              EaLength
)
{
	HANDLE kFileHandle;
	NTSTATUS ConvertStatus;
	UNICODE_STRING kObjectName;
	ANSI_STRING FileNameA;

	kObjectName.Buffer = NULL;

	__try
	{

		ProbeForRead(FileHandle, sizeof(HANDLE), 1);
		ProbeForRead(ObjectAttributes, sizeof(OBJECT_ATTRIBUTES), 1);
		ProbeForRead(ObjectAttributes->ObjectName, sizeof(UNICODE_STRING), 1);
		ProbeForRead(ObjectAttributes->ObjectName->Buffer, ObjectAttributes->ObjectName->Length, 1);

		kFileHandle = *FileHandle;
		kObjectName.Length = ObjectAttributes->ObjectName->Length;
		kObjectName.MaximumLength = ObjectAttributes->ObjectName->MaximumLength;
		kObjectName.Buffer = ExAllocatePoolWithTag(NonPagedPool, kObjectName.MaximumLength, 0xA);
		RtlCopyUnicodeString(&kObjectName, ObjectAttributes->ObjectName);

		ConvertStatus = RtlUnicodeStringToAnsiString(&FileNameA, ObjectAttributes->ObjectName, TRUE);
		LogInfo("NtCreateFile called for : %s", FileNameA.Buffer);

	}
	__except (EXCEPTION_EXECUTE_HANDLER)
	{
	}

	if (kObjectName.Buffer)
	{
		ExFreePoolWithTag(kObjectName.Buffer, 0xA);
	}


	return NtCreateFileOrig(FileHandle, DesiredAccess, ObjectAttributes, IoStatusBlock, AllocationSize, FileAttributes,
		ShareAccess, CreateDisposition, CreateOptions, EaBuffer, EaLength);
}
To see the result as a gif, click the link below.
View Example as a .gif (syscall-hook-example-1.gif)

Also, you can see the results in Windbg !

Discussion
It’s time to see the questions and discussions about this part, the discussion is usually about questions and experience about developing hypervisors. Thanks to Petr for making this part ready.
1. What is the IRQL in VMX root-mode? Have you ever tried to use KeGetCurrentIrql() in the VMX root-mode and see the result? It returns the below results in the picture, different IRQLs.

- IRQL is nothing more than Cr8 register, Cr8 register doesn’t change when VM-exit occurs, therefore, your KeGetCurrentIrql() returns the IRQL before the VM-exit happened.
- In VM-root mode, there is “no IRQL”, because VMX doesn’t know such terms as IRQL (it’s Microsoft thingy) but practically speaking, HIGH_IRQL is what’s closest to the state in VMX-root mode because interrupts are disabled
- Actually, IRQL requirements don’t mean much when running in the VMM context. For example, even if you enter at PASSIVE_LEVEL, you are technically at HIGH_LEVEL for all intents and purposes, as interrupts are disabled.
- You can use KeGetEffectiveIrql() in VMX-root mode, and it always returns HIGH_LEVEL (that function checks if IF (Interrupt Flag) bit in EFLAGS is set and if not, it returns HIGH_LEVEL, if yes, then it returns the same value as KeGetCurrentIrql(). The EFLAGS.IF is cleared when VM-exit happened but the IF only affects hardware interrupt, and exceptions can still occur.
- If you still have a problem with understanding IRQL in VMM then there are some interesting questions answered by Alex in Hyperplatform: https://github.com/tandasat/HyperPlatform/issues/3#issuecomment-231804839 that tries to explain why vmx root-mode is like HIGH_IRQL. I try to add some explanation to them.
2. Is it safe for you to be context switched by the OS while in the middle of VMM mode?
- Of course not. So you are at least at DISPATCH_LEVEL (As Windows schedules all threads to run at IRQLs below DISPATCH_LEVEL ).
3. Is it safe for you to “wait” on an object while at VMM mode?
- Of course not, you would be context switched to another thread/idle thread which would now be running as VMM Host. (Means that you wait on some objects and when another vm-exit occurs, you’re no longer in the previous thread.)
4. Is it safe/OK for you to receive DPCs while in the middle of VMM mode?
- Again, of course not. Another reason why you are at least at DISPATCH_LEVEL.
5. Could you receive a DPC, even if you wanted to?
- Nope. Receiving a DPC requires an interrupt, and IF in r/eflags is off, so Local APIC will never deliver it.
6. Will you receive any Device Interrupts?
- Nope, because EFLAGS.IF is off.
7. Would you want to be interrupted in the middle of VMM mode?
- Also nope. So you are at least at MAX_DIRQL.
8. Will you receive the clock interrupt?
- Nope (also why you hit a CLOCK WATCHDOG BSOD sometimes)… So you are at least at CLOCK_LEVEL.
9. Will you receive IPIs?
- Nope, because IF is off, so Local APIC will never send them. You also probably don’t want to be running IPI while inside the VMM host… So you are at least at IPI_LEVEL. Technically because you are not in the middle of handling an IPI, but rather you’ve disabled interrupts completely, you are at IPI_LEVEL + 1, aka HIGH_LEVEL.
10. Why ExAllocatePoolWithTag doesn’t work on Vmx root-mode?
- In other words, if you call, for example, ExAllocatePoolWithTag, and this is PAGED POOL, you can get unlucky and this will require page-in which requires blocking your thread, and now, some other thread will run in VMM host mode… Sure, you can get lucky and control will come back to you, but this is insane… If you request NON-PAGED POOL, it will “appear to work”… And then in one situation, a TLB flush will be required, which sends an IPI… Which can’t be delivered… And so it will hang. etc.
11. Is it ok that I used Insert DPC in VMX root-mode? I used KeInsertQueueDpc (because according to MSDN this function can be called at Any Level).
- Yes and no. it’s okay when you have GUARANTEED that you won’t get conflicting VM-exit that would somehow result in a recursion/deadlock, but that very depends on the use case.
- For demonstration purposes, I wouldn’t mind using KeInsertQueueDpc in “real/production” environment, I would probably inject NMI from the hypervisor, and in NMI handler I would queue DPC.
- It’s one more indirection, therefore it’s going to be slightly slower, but I think it’s a generally safer way… (I use it this way) however, I must note that it’s not bulletproof, as I already ran into recursive NMI injection and deadlocks in NMI handler too.
- As I said, there’s no silver bullet, there always will be some dark corners when you try to communicate with the underlying OS.
12. Using functions like RtlStringCchLengthA and RtlStringCchLengthA is not allowed because according to MSDN its IRQL is PASSIVE_LEVEL, so we can’t use them in VMX-Root mode? What should we do instead?
- We can use sprintf (and sprintf like functions) from the C std library. it’s safe to use since it doesn’t allocate any memory. AFAIK RtlString* functions are in the PAGE section, therefore they can be paged out and if you call them from VMX-root mode when they’re paged out…. you know what happens ;)
13. I was reading about VPID (INVVPID) and this seems to be unusable for hypervisors like hvpp and hyperplatform and ours? Am I right? I mean is there any special case in hypervisors that virtualize an already running system that INVVPID is preferred instead of INVEPT?
- You are right, invvpid is generally useless in our cases. the only case I can think of where invvpid might be beneficial is in emulation of “invlpg” instruction, see here.
- Simply said, invept will invalidate ALL EPT mappings. with invvpid, you can invalidate SPECIFIC addresses in the guest (i.e. underlying OS). I think you know how caches generally work, but I’ll try to explain anyway: with invept, you lose all cache for the guest, therefore it will take time to fill that cache again (each first memory access after INVEPT will be slow).
- with invvpid, the cache is retained, but the only single address is invalidated, therefore loading of only THAT address will be slow with that said, I really can’t think of any other practical example where you’d need that, except the invlpg emulation mentioned above.
14. What happens if we’re in vmx root and access an address that will cause an EPT violation?
It’s like asking “what happens if we have paging disabled and access an address that will cause a page fault” EPTs are for guests, vmx-root is essentially host. EPT translation doesn’t happen when you’re in vmx root. Only regular paging. Therefore - it doesn’t matter if you access an address that will cause an EPT violation or not, what matters is whether is that address valid in vmx-root’s regular CR3 page tables.
15. What if we want to cause vm-exit on exception/interrupts with IDT Index > 32? Exception Bitmap is just a 32-bit field in VMCS!
There are only 32 exceptions in x86 architecture. The rest are external-interrupts, which are intercepted by the pin-based control “external-interrupt exiting”. This means that you can’t select a special interrupt to cause a vm-exit, but you can configure pin-based control to cause vm-exit in the case of each interrupt.
16. If several CPUs try to acquire the same spinlock at the same time, which CPU gets the spinlock first?
- Normally, there is no order - the CPU with the fastest electrons wins :). The kernel does provide an alternative, called queued spinlocks that serve CPUs on a FIFO basis. These only work with IRQL DISPATCH_LEVEL. The relevant APIs are KeAcquireInStackQueuedSpinLock and KeReleaseInStackQueuedSpinLock. Check the WDK documentation for more details.
17. We use DPCs to transfer messages, and because we may be executing in an arbitrary user-mode process as part DPCs, then why is our message tracing works without problem?
- It works because we use METHOD_BUFFERED in our IOCTL. Generally, you have to specify that you need a buffered method in driver entry.
1
2
	// Establish user-buffer access method.
	DeviceObject->Flags |= DO_BUFFERED_IO;
- But in the case of IOCTLs, you have specified this flag in IOCTL code, if you’re not familiar with METHOD_BUFFERED, it’s a way that Windows gives you a system-wide address which is valid in any process (kernel-mode) that’s why we can fill the buffer from any arbitrary process and address in Irp->AssociatedIrp.SystemBuffer in any process.
- Using METHOD_BUFFERED is, of course, slower, but it solves these kinds of problems and is it’s generally safer.
18. Why we didn’t use APCs instead of DPCs in message tracing?
- We can use APCs instead of DPCs in our case, but using DPCs gives us a better priority as the callback is executed in DISPATCH_LEVEL as soon as possible. APCs are thread-specific means that whenever a thread runs, we have the chance that our callback is executed while DPCs are processor-specific so we can interrupt any random process, so it’s faster.
- Another reason is APCs are undocumented kernel object while DPCs are documented so that’s the reason why programmers prefer to use DPCs.
Conclusion
We come to the end of this part, in this part we saw some important things that can be implemented with virtualizing an already running system like hidden hooks, syscall hook, event injection, exception bitmap, and our custom VMX Root compatible message tracing, by now you should be able to use your hypervisor driver in many kinds of researches and solve your reverse-engineering problems.
In the next part, we’ll look at some advanced virtualization topics like APIC Virtualization and lots of other things to make a stable and useful hypervisor.
Hope you guys enjoyed it, see you in the next part.

References
[1] Virtual Processor IDs and TLB - (http://www.jauu.net/2011/11/13/virtual-processor-ids-and-tlb/)
[2] INVVPID — Invalidate Translations Based on VPID - (https://www.felixcloutier.com/x86/invvpid)
[3] INVPCID — Invalidate Process-Context Identifier - (https://www.felixcloutier.com/x86/invpcid)
[4] Here’s how, and why, the Spectre and Meltdown patches will hurt performance - (https://arstechnica.com/gadgets/2018/01/heres-how-and-why-the-spectre-and-meltdown-patches-will-hurt-performance/)
[5] Is vmxoff path really safe/correct? - (https://github.com/tandasat/HyperPlatform/issues/3)
[6] Day 5: The VM-Exit Handler, Event Injection, Context Modifications, And CPUID Emulation - (https://revers.engineering/day-5-vmexits-interrupts-cpuid-emulation/)
[7] Test-and-set - (https://en.wikipedia.org/wiki/Test-and-set)
[8] _interlockedbittestandset intrinsic functions - (https://docs.microsoft.com/en-us/cpp/intrinsics/interlockedbittestandset-intrinsic-functions?view=vs-2019)
[9] Spinlocks and Read-Write Locks - (https://locklessinc.com/articles/locks/)
[10] PAUSE - Spin Loop Hint - (https://c9x.me/x86/html/file_module_x86_id_232.html)
[11] What is the purpose of the “PAUSE” instruction in x86? - (https://stackoverflow.com/questions/12894078/what-is-the-purpose-of-the-pause-instruction-in-x86)
[12] How does x86 pause instruction work in spinlock and can it be used in other scenarios? - (https://stackoverflow.com/questions/4725676/how-does-x86-pause-instruction-work-in-spinlock-and-can-it-be-used-in-other-sc)
[13] Introduction to the volatile keyword - (https://www.embedded.com/introduction-to-the-volatile-keyword/)
[14] Deferred Procedure Call - (https://en.wikipedia.org/wiki/Deferred_Procedure_Call)
[15] Reversing DPC: KeInsertQueueDpc - (https://repnz.github.io/posts/practical-reverse-engineering/reversing-dpc-keinsertqueuedpc/)
[16] Dumping DPC Queues: Adventures in HIGH_LEVEL IRQL - (https://repnz.github.io/posts/practical-reverse-engineering/dumping-dpc-queues/)
[17] Vol 3C – Chapter 31 – (31.5.1 Algorithms for Determining VMX Capabilities) – (https://software.intel.com/en-us/articles/intel-sdm)
[18] Vol 3D – Appendix A.2 – (RESERVED CONTROLS AND DEFAULT SETTINGS) – (https://software.intel.com/en-us/articles/intel-sdm)
[19] Add WPP tracing to the Kernel Mode (Windows driver) – (http://kernelpool.blogspot.com/2018/05/add-wpp-tracing-to-kernel-mode-windows.html)
[20] WPP Software Tracing – (https://docs.microsoft.com/en-us/windows-hardware/drivers/devtest/wpp-software-tracing)
[21] TraceView – (https://docs.microsoft.com/en-us/windows-hardware/drivers/devtest/traceview)
[22] What is the difference between Trap and Interrupt? – (https://stackoverflow.com/questions/3149175/what-is-the-difference-between-trap-and-interrupt)
[23] How to disable Hyper-V in command line? – (https://stackoverflow.com/questions/30496116/how-to-disable-hyper-v-in-command-line)
[24] Run Hyper-V in a Virtual Machine with Nested Virtualization – (https://docs.microsoft.com/en-us/virtualization/hyper-v-on-windows/user-guide/nested-virtualization)
[25] Hypervisor Top-Level Functional Specification – (https://docs.microsoft.com/en-us/virtualization/hyper-v-on-windows/reference/tlfs)
[26] Requirements for Implementing the Microsoft Hypervisor Interface – (https://github.com/Microsoft/Virtualization-Documentation/raw/master/tlfs/Requirements%20for%20Implementing%20the%20Microsoft%20Hypervisor%20Interface.pdf)
[27] Simple Svm Hook Specification – (https://github.com/tandasat/SimpleSvmHook)
[28] x86 calling conventions – (https://en.wikipedia.org/wiki/X86_calling_conventions)
[29] Exceptions – (https://wiki.osdev.org/Exceptions)
[30] Nt Syscall Table – (https://j00ru.vexillium.org/syscalls/nt/64/)
[31] Win32k Syscall Table – (https://j00ru.vexillium.org/syscalls/win32k/64/)
[32] KVA Shadow: Mitigating Meltdown on Windows – (https://msrc-blog.microsoft.com/2018/03/23/kva-shadow-mitigating-meltdown-on-windows/)
[33] HyperBone - Minimalistic VT-X hypervisor with hooks – (https://github.com/DarthTon/HyperBone)
[34] Syscall Hooking Via Extended Feature Enable Register (EFER) – (https://revers.engineering/syscall-hooking-via-extended-feature-enable-register-efer/)
[35] xdbg64’s TitanHide – (https://github.com/dotfornet/TitanHide/)
[36] System Service Descriptor Table - SSDT – (https://ired.team/miscellaneous-reversing-forensics/windows-kernel/glimpse-into-ssdt-in-windows-x64-kernel)
[37] DdiMon – (https://github.com/tandasat/DdiMon)
[38] Gbhv - Simple x64 Hypervisor Framework – (https://github.com/Gbps/gbhv)
[39] Hook SSDT(Shadow) – (https://m0uk4.gitbook.io/notebooks/mouka/windowsinternal/ssdt-hook)
[40] DetourXS – (https://github.com/DominicTobias/detourxs)
[41] What is the difference between Trap and Interrupt? – (https://stackoverflow.com/questions/3149175/what-is-the-difference-between-trap-and-interrupt)
Comments powered by Disqus.