
If you’re looking to use a hypervisor for analysis and reverse engineering tasks, check out HyperDbg Debugger. It’s a hypervisor-based debugger designed specifically for analyzing, fuzzing, and reversing applications. A free and comprehensive tutorial on hypervisor-based reverse engineering is available at OpenSecurityTraining2’s website (preferred) and YouTube, which demonstrates numerous practical examples on how to utilize hypervisors for reverse engineering.
Introduction
This is the 7th part of the tutorial Hypervisor From Scratch, and it’s about using the Extended Page Table (EPT) in an already running system. As you might know, paging is an essential part of managing memory on modern operating systems. Hypervisors use an additional paging table; this gives us an excellent opportunity to monitor different aspects of memory (Read-Write-Execute) without modifying the operating systems page-tables. EPT is a hardware mechanism, so it’s fast, but on the other hand, we have to deal with different caching and synchronization problems.
This part is highly dependent on the 4th part of the tutorial - Part 4: Address Translation Using Extended Page Table (EPT), so please read this part one more time; thus, I avoid redescribing about the basic concept relating to EPT Tables.
In the 7th part, we’ll see how we can virtualize our currently running system by configuring VMCS and creating identity tables based on Memory Type Range Register (MTRR) then we use monitoring features to detect the execution of some of the Windows functions.
This part is highly inspired by Simplevisor and Gbhv.
The picture of this post was taken by one of my best friends Ahmad, from Khānābād Village, Aligudarz.
Before starting, I should give special thanks to my friend Petr Benes for his contributions to Hypervisor From Scratch, of course, Hypervisor From Scratch could never exist without his help. I also give my regards to Alex Ionescu as he always answers my question patiently.
Overview
This part is divided into seven main sections :
- Implementing mechanisms to manage Vmcalls
- Starting with MMU Virtualization (EPT)
- Explaining Memory Type Range Register (MTRR) concepts
- Describing Page-Level Monitoring features using EPT
- Invalidating Translations Derived from EPT (INVEPT)
- Fixing some previous design caveat regarding deadlocks and synchronization problems
- Discussion (In this section we discuss the different question(s) and approaches about EPT)
At last, I talk about some important notes you need to know in order to debug hypervisor and EPT.
Guys, it’s ok if you didn’t understand some of the parts, by reading this article, you’ll get an idea, you could use EPT and over the time you’ll understand things better.
The source code of this part changed drastically compared to the previous part; naming conventions are improved, so you see a much cleaner and readable code; also lots of new routines added to the code, for examples routines starting with Hv are hypervisor routines, you have to call them from IRP Major functions and avoid calling methods with Vmx prefix directly as these functions manage the operations relating to VMX Operations, functions with Asm prefix are inline-assembly functions and functions starting with Ept are those that relate to Extended Page Table (EPT). Also, functions with Vmcall prefix are for VMCALL services, and functions with Invept are related to Invalidate EPT caches.
The full source code of this tutorial is available on GitHub :
[https://github.com/SinaKarvandi/Hypervisor-From-Scratch]
Note: Remember that hypervisors change over time because new features are added to the operating systems or new technologies are used. For example, updates to Meltdown & Spectre have made a lot of changes to the hypervisors. So, if you want to use Hypervisor From Scratch in your projects, research, or whatever, you should use the HyperDbg drivers. HyperDbg is actively maintained, stable, and reliable, ensuring you avoid the errors and instability problems that can arise from using older parts of the tutorial series.
Table of Contents
- Introduction
- Overview
- Table of Contents
- Implementing Functions to Manage Vmcalls
- Starting with MMU virtualization (EPT)
- Memory Type Range Register (MTRR)
- Building MTRR Map
- Fixed-Range MTRRs and PAT
Virtualizing Current System’s Memory using EPT
- EPT Identity Mapping
- Setting up PML4 and PML3 entries
Setting up PML2 entries
- EPT Violation
- EPT Misconfiguration
- Adding EPT to VMCS
Monitoring Page’s RWX Activity
- Pre-allocating Buffers for VMX Root Mode
- Setting hook before Vmlaunch
- Setting hook after Vmlaunch
- Finding a Page’s entry in EPT Tables
- Finding PML4, PML3, PML2 entries
- Finding PML1 entry
- Splitting 2 MB Pages to 4 KB Pages
Applying the Hook
- Handling hooked pages’ vm-exits
- Invalidating Translations Derived from EPT (INVEPT)
- Invalidating All Contexts
- Invalidating Single Context
- Broadcasting Invept to all logical cores simultaneously
- Fixing Previous Design Issues
- Support to more than 64 logical cores
- Synchronization problem in exiting VMX
- The issues relating to the Meltdown mitigation
- Some tips for debugging hypervisors
- Let’s Test it!
- How to test?
- Demo
- Discussion
- Conclusion
- References

Implementing Functions to Manage Vmcalls
We start this article by implementing functions relating to VMCALL. Intel describes Vmcall by “Call to VM monitor by causing VM exit.”.
Vmcall allows guest software to call for service into an underlying VM monitor. The details of the programming interface for such calls are VMM-specific. This instruction does nothing more than cause a VM exit.
In other words, whenever you execute a Vmcall instruction in Vmx non-root mode (whenever a vm-exit occurs, we are in vmx root-mode, and we stay in vmx root mode until we execute VMRESUME or VMXOFF so any other contexts is vmx non-root mode means that other drivers can use Vmcall in their contexts to request a service from our hypervisor in vmx root mode).
Execution of VMCALL causes a Vm-exit (EXIT_REASON_VMCALL). As we can set registers and stack before execution of VMCALL so we can send parameters to the Vmcall handler, I mean all we need to do is designing a calling-convention so that both vmcall handler and driver which requests a service can work together perfectly.
The first thing we need to implement is a function in assembly, which executes VMCALL and returns.
1
2
3
4
AsmVmxVmcall PROC
    vmcall                  ; VmxVmcallHandler(UINT64 VmcallNumber, UINT64 OptionalParam1, UINT64 OptionalParam2, UINT64 OptionalParam3)
    ret                     ; Return type is NTSTATUS and it's on RAX from the previous function, no need to change anything
AsmVmxVmcall ENDP
It defines like this,
1
extern NTSTATUS inline AsmVmxVmcall(unsigned long long VmcallNumber, unsigned long long OptionalParam1, unsigned long long OptionalParam2, unsigned long long OptionalParam3);
What distinguished from the above code is that we’re not modifying anything in AsmVmxVmcall, means that if someone passes the parameters to the AsmVmxVmcall, then the parameters are in RCX, RDX, R8, R9 and rest of them into the stack, that’s because of x64 FAST CALL calling convention.
Keep in mind that if you’re designing hypervisor for Linux, fast call in Linux is different from the fast-call in Windows.
As we saved all the registers on vm-exit so in vm-exit handler we pass the GuestRegs->rcx, GuestRegs->rdx, GuestRegs->r8, GuestRegs->r9 to the VmxVmcallHandler, the RCX is the Vmcall Number which specifies the service we want our hypervisor to perform and RDX and R8 and R9 are optional parameters.
1
2
3
4
5
	case EXIT_REASON_VMCALL:
	{
		GuestRegs->rax = VmxVmcallHandler(GuestRegs->rcx, GuestRegs->rdx, GuestRegs->r8, GuestRegs->r9);
		break;
	}
For example, we have the following services (Vmcall Numbers) for our hypervisor in this part.
1
2
3
4
5
6

#define VMCALL_TEST						0x1			// Test VMCALL
#define VMCALL_VMXOFF					0x2			// Call VMXOFF to turn off the hypervisor
#define VMCALL_EXEC_HOOK_PAGE			0x3			// VMCALL to Hook ExecuteAccess bit of the EPT Table
#define VMCALL_INVEPT_ALL_CONTEXT		0x4			// VMCALL to invalidate EPT (All Contexts)
#define VMCALL_INVEPT_SINGLE_CONTEXT	0x5			// VMCALL to invalidate EPT (A Single Context)
There is nothing special for VmxVmcallHandler, it’s just a simple switch case.
1
2
3
4
5
6
7
8
9
10
11
12
13
14
15
16
17
18
19
20
21
22
23
/* Main Vmcall Handler */
NTSTATUS VmxVmcallHandler(UINT64 VmcallNumber, UINT64 OptionalParam1, UINT64 OptionalParam2, UINT64 OptionalParam3)
{
	NTSTATUS VmcallStatus;
	BOOLEAN HookResult;

	VmcallStatus = STATUS_UNSUCCESSFUL;
	switch (VmcallNumber)
	{
	case VMCALL_TEST:
	{
		VmcallStatus = VmcallTest(OptionalParam1, OptionalParam2, OptionalParam3);
		break;
	}
	default:
	{
		LogWarning("Unsupported VMCALL");
		VmcallStatus = STATUS_UNSUCCESSFUL;
		break;
	}
	}
	return VmcallStatus;
}
For testing it, I created a function called VmcallTest, it simply shows the parameters passed to Vmcall.
1
2
3
4
5
6
/* Test Vmcall (VMCALL_TEST) */
NTSTATUS VmcallTest(UINT64 Param1, UINT64 Param2, UINT64 Param3) {

	LogInfo("VmcallTest called with @Param1 = 0x%llx , @Param2 = 0x%llx , @Param3 = 0x%llx", Param1, Param2, Param3);
	return STATUS_SUCCESS;
}
Finally, we can use the following piece of code and pass VMCALL_TEST as the Vmcall Number along with other optional parameters.
1
2
//  Check if everything is ok then return true otherwise false
AsmVmxVmcall(VMCALL_TEST, 0x22, 0x333, 0x4444);
Don’t forget that the above code should bee only executed in vmx non-root mode.
There is nothing more I can say about VMCALL, but for further reading (not related to our hypervisor), if you want to know what happens if you execute VMCALL in vmx root-mode, it invokes an SMM monitor. This invocation will activate the dual-monitor treatment of system-management interrupts (SMIs) and system-management mode (SMM) if it is not already active. In other words, executing Vmcall in vmx root mode causes an SMM VM exit!
Read Section 34.15.2 and Section 34.15.6 in Intel SDM for more information.
Starting with MMU virtualization (EPT)
Let me start with differences between physical and virtual address,
Physical addressing means that your program knows the real layout of RAM. When you access a variable at address 0x8746b3, that’s where it stored in the physical RAM chips.
With virtual addressing, all application memory accesses go to a page table, which then maps from the virtual to the physical address. So every application has its own “private” address space, and no program can read or write to another program’s memory.
EPT is a page table with a page-walk length of 4 (or in the newer versions 5). It translates guest-physical addresses to host-physical addresses.
First, you have to understand that EPT maps guest physical pages to host physical pages, mapping physical addresses make hypervisors much easier to understand because you can forget about all the concepts relating to virtual memory and operating system’s memory manager. Why? That’s because you cannot allocate more physical memory. Sure, you can hot-plug RAM right into the motherboard, but let’s forget about that for now 😉 , so the RAM usually starts at 0 and usually ends at AMOUNT OF RAM + SOME MORE, where SOME MORE is some MMIO/device space.
Look at the following picture (from hvpp), Memory Ranges from VMWare VM with 2 GB of RAM.
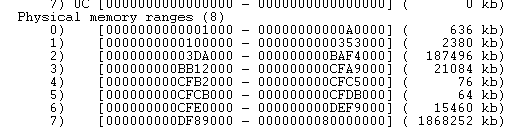
Note the holes between ranges (e.g., A0000 - 100000); the ranges in the screenshot are backed by actual physical RAM, and the holes are the MMIO space.
By now, you know that if you allocate or free memory, the RAM ranges are always present and what changes are the content of data in the RAM.
Keep in mind, there are certainly no holes in the RAM as an electronic circuit, but it’s how BIOS maps certain physical memory ranges to the actual hardware RAM, in other words, RAM usually isn’t one contiguous address space, if you have 1 GB of RAM it’s often not one single piece of 0 … 1GB physical address space, but some parts of that space belongs to, e.g. network card, audio card, USB hub, etc.
Let’s see what hypervisors like VMWare, Hyper-V, VirtualBox do with physical memory. We don’t have the same approach, but it helps you understand MMU virtualization better.
In VMWare (Hyper-v, VirtualBox, etc), the VM has its own physical memory, and our PC (host) also has some physical address space. EPT exists so that you can translate the guest physical memory to host physical memory. For example, if a guest wants to read from Physical Address 0x1000, it looks into EPT, and EPT tells it that the content of the memory is on the host’s physical address 0x5000. You certainly do not want to let some guests in VMWare read physical memory on the host, so it’s VMWare’s job to setup EPTs correctly and have some chunk of physical memory dedicated to a guest.
Memory Type Range Register (MTRR)
By now, you have some idea about how memory (RAM) is divided into regions; these regions can be found using MTRR registers, that’s all!
Now let’s explain them more precisely.
Wikipedia defines MTRRs like this :
Memory type range registers (MTRRs) are a set of processor supplementary capabilities control registers that provide system software with control of how accesses to memory ranges by the CPU are cached. It uses a set of programmable model-specific registers (MSRs), which are special registers provided by most modern CPUs. Possible access modes to memory ranges can be uncached, write-through, write-combining, write-protect, and write-back. In write-back mode, writes are written to the CPU’s cache, and the cache is marked dirty so that its contents are written to memory later.
In old x86 architecture systems, mainly where separate chips provided the cache outside of the CPU package, this function was controlled by the chipset itself and configured through BIOS settings, when the CPU cache was moved inside the CPU, the CPUs implemented fixed-range MTRRs.
Typically, the BIOS software configures the MTRRs. The operating system or executive is then free to modify the memory map using the typical page-level cacheability attributes.
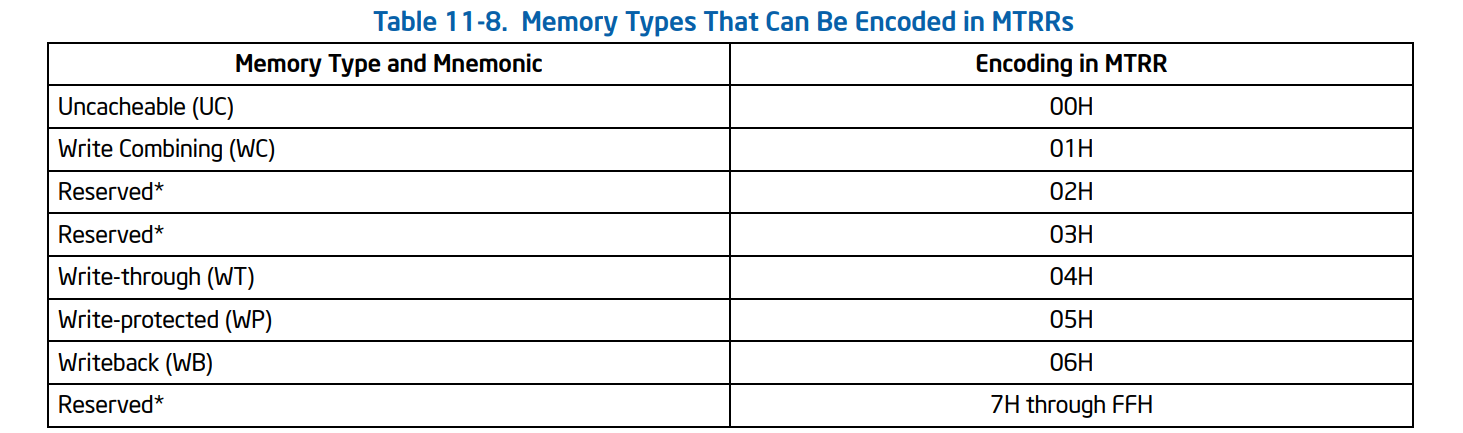
If you confused by reading the above sentences, let me explain it more clearly. RAM is divided into different regions, We want to read the details (Base Address, End Address, and Cache Policy) of these chunks using MTRR Registers. Cache policy is something that BIOS or Operating System sets for a particular region. For example, the operating system decides to put UC (uncached) to a region that starts from 0x1000 to 0x2000 (Physical Address) of RAM then it chooses to put WB (Writeback) to a region starting from 0x5000 to 0x7000 (Physical Address), it’s based on OS policy. If you don’t know about the different memory type caches (e.g., UC, WB), you can read here.
OK, let’s see how to read these MTRRs.
The availability of the MTRR feature is model-specific means that we can determine if MTRRs are supported on a processor by executing the CPUID instruction and reading the state of the MTRR flag (bit 12) in the feature information register (EDX). Still, This check is not essential as our process probably supports as it’s an old feature.
What is essential for us, is an MSR called “IA32_MTRR_DEF_TYPE”. The following structure represents the IA32_MTRR_DEF_TYPE :
1
2
3
4
5
6
7
8
9
10
11
12
13
14
15
16
17
18
19
20
21
22
23
24
25
// MSR_IA32_MTRR_DEF_TYPE
typedef union _IA32_MTRR_DEF_TYPE_REGISTER
{
	struct
	{
		/**
		 * [Bits 2:0] Default Memory Type.
		 */
		UINT64 DefaultMemoryType : 3;
		UINT64 Reserved1 : 7;

		/**
		 * [Bit 10] Fixed Range MTRR Enable.
		 */
		UINT64 FixedRangeMtrrEnable : 1;

		/**
		 * [Bit 11] MTRR Enable.
		 */
		UINT64 MtrrEnable : 1;
		UINT64 Reserved2 : 52;
	};

	UINT64 Flags;
} IA32_MTRR_DEF_TYPE_REGISTER, * PIA32_MTRR_DEF_TYPE_REGISTER;
We implement a function called “EptCheckFeatures,” this function checks to see whether our processor supports basic EPT features or not; for MTRRs, we’ll check whether MTRRs are enabled or not. Having an enabled MTRR is necessary for our hypervisor. (we’ll complete this function later when we’re describing EPT.)
1
2
3
4
5
6
7
8
9
	IA32_MTRR_DEF_TYPE_REGISTER MTRRDefType;

	MTRRDefType.Flags = __readmsr(MSR_IA32_MTRR_DEF_TYPE);

	if (!MTRRDefType.MtrrEnable)
	{
		LogError("Mtrr Dynamic Ranges not supported");
		return FALSE;
	}
Building MTRR Map
Before creating a map from memory regions, It’s good to see how Windbg shows the MTRR regions and their caching policies using the “!mtrr” command.
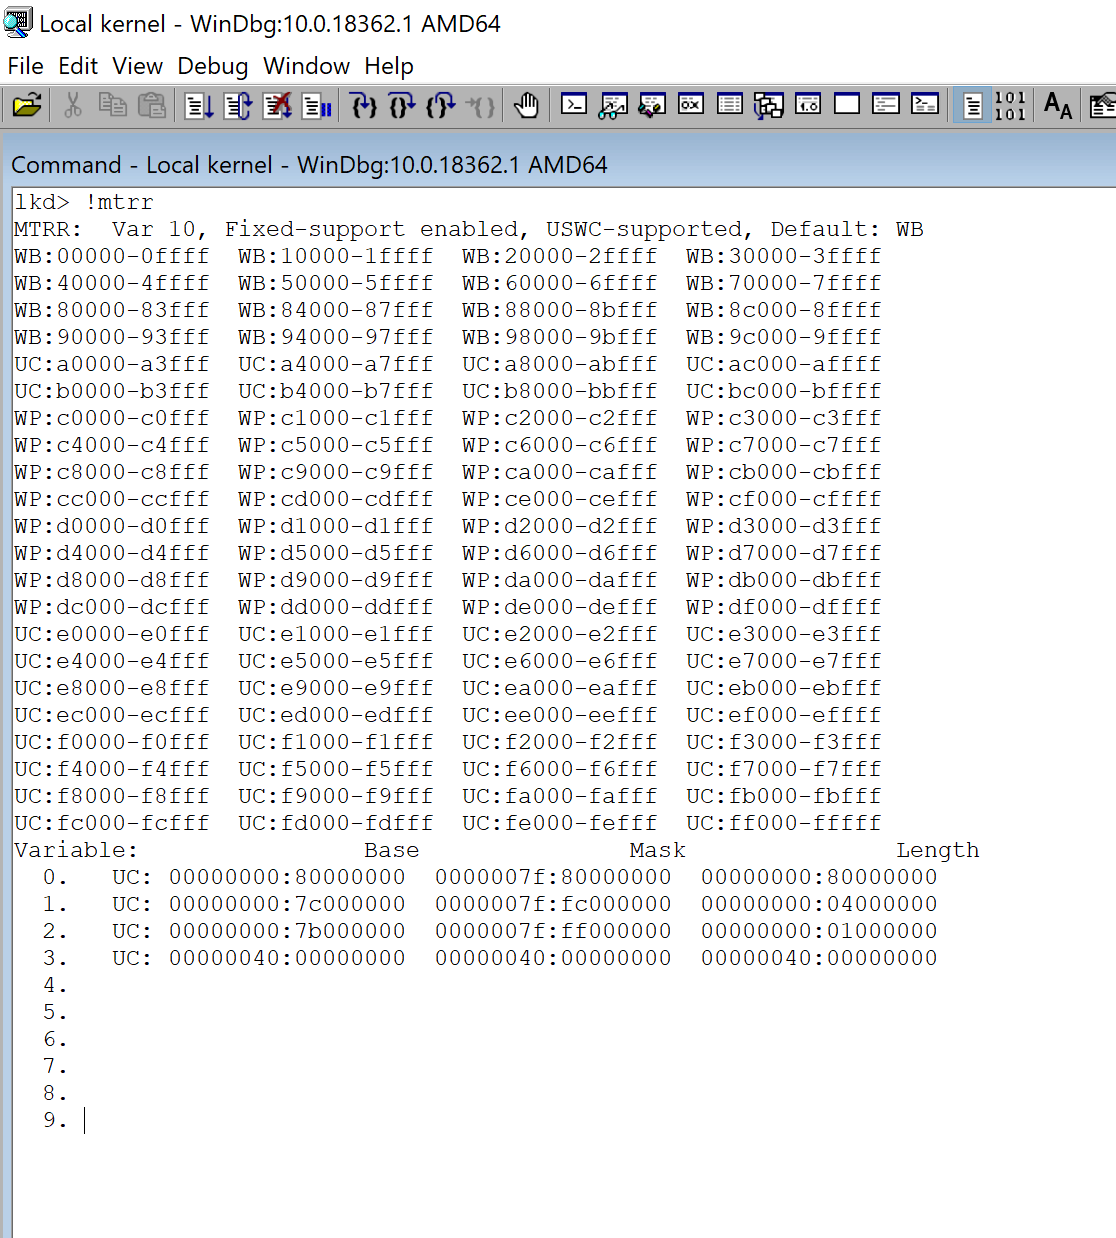
As you can see in the above picture, Windows prefers to use Fixed Range Registers (Fixed-support enabled) and variable range registers.
I’ll talk about fixed range registers later in this article.
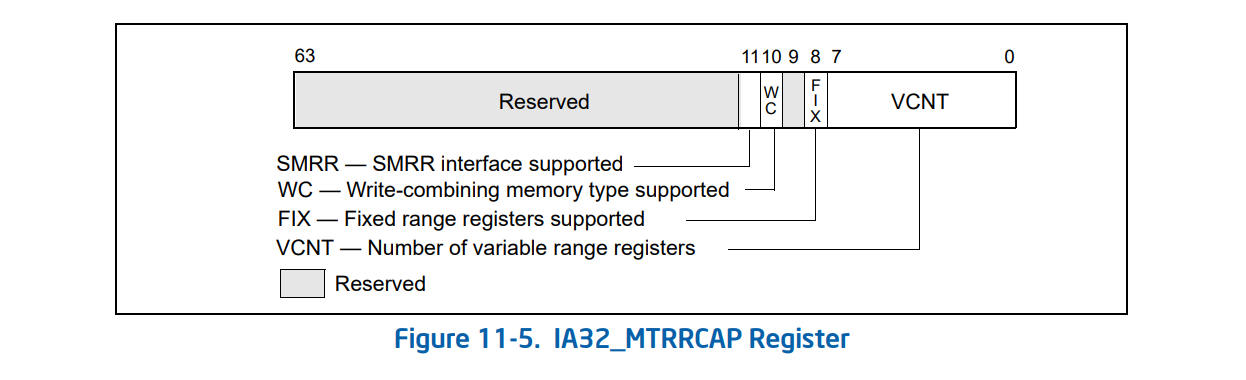
In order to read MTRRs, we start by reading the VCNT value of IA32_MTRRCAP MSR (0xFE), which determines the number of variable MTRRs (Number of regions).
The next step is to iterate through each MTRR variable; we read MSR_IA32_MTRR_PHYSBASE0 and MSR_IA32_MTRR_PHYSMASK0 for each range and check if the range is valid or not (based on IA32_MTRR_PHYSMASK_REGISTER.Valid bit).
1
2
		CurrentPhysBase.Flags = __readmsr(MSR_IA32_MTRR_PHYSBASE0 + (CurrentRegister * 2));
		CurrentPhysMask.Flags = __readmsr(MSR_IA32_MTRR_PHYSMASK0 + (CurrentRegister * 2));
Now we need to calculate the start address and the end address (physical) based on MSRs.
The start address:
1
2
			// Calculate the base address in bytes
			Descriptor->PhysicalBaseAddress = CurrentPhysBase.PageFrameNumber * PAGE_SIZE;
The end address:
1
2
3
4
5
6
7
			// Calculate the total size of the range
			// The lowest bit of the mask that is set to 1 specifies the size of the range
			_BitScanForward64(&NumberOfBitsInMask, CurrentPhysMask.PageFrameNumber * PAGE_SIZE);

			// Size of the range in bytes + Base Address
			Descriptor->PhysicalEndAddress = Descriptor->PhysicalBaseAddress + ((1ULL << NumberOfBitsInMask) - 1ULL);
For further information about the calculation of MTRRs, you can read Intel SDM Vol 3A (11.11.3 Example Base and Mask Calculations).
And finally, read the cache policy which is set by whether BIOS or operating system.
1
2
			// Memory Type (cacheability attributes)
			Descriptor->MemoryType = (UCHAR)CurrentPhysBase.Type;
Putting it all together, we have the following function :
1
2
3
4
5
6
7
8
9
10
11
12
13
14
15
16
17
18
19
20
21
22
23
24
25
26
27
28
29
30
31
32
33
34
35
36
37
38
39
40
41
42
43
44
45
46
47
48
49
50
51
52
53
54

/* Build MTRR Map of current physical addresses */
BOOLEAN EptBuildMtrrMap()
{
	IA32_MTRR_CAPABILITIES_REGISTER MTRRCap;
	IA32_MTRR_PHYSBASE_REGISTER CurrentPhysBase;
	IA32_MTRR_PHYSMASK_REGISTER CurrentPhysMask;
	PMTRR_RANGE_DESCRIPTOR Descriptor;
	ULONG CurrentRegister;
	ULONG NumberOfBitsInMask;


	MTRRCap.Flags = __readmsr(MSR_IA32_MTRR_CAPABILITIES);

	for (CurrentRegister = 0; CurrentRegister < MTRRCap.VariableRangeCount; CurrentRegister++)
	{
		// For each dynamic register pair
		CurrentPhysBase.Flags = __readmsr(MSR_IA32_MTRR_PHYSBASE0 + (CurrentRegister * 2));
		CurrentPhysMask.Flags = __readmsr(MSR_IA32_MTRR_PHYSMASK0 + (CurrentRegister * 2));

		// Is the range enabled?
		if (CurrentPhysMask.Valid)
		{
			// We only need to read these once because the ISA dictates that MTRRs are to be synchronized between all processors
			// during BIOS initialization.
			Descriptor = &EptState->MemoryRanges[EptState->NumberOfEnabledMemoryRanges++];

			// Calculate the base address in bytes
			Descriptor->PhysicalBaseAddress = CurrentPhysBase.PageFrameNumber * PAGE_SIZE;

			// Calculate the total size of the range
			// The lowest bit of the mask that is set to 1 specifies the size of the range
			_BitScanForward64(&NumberOfBitsInMask, CurrentPhysMask.PageFrameNumber * PAGE_SIZE);

			// Size of the range in bytes + Base Address
			Descriptor->PhysicalEndAddress = Descriptor->PhysicalBaseAddress + ((1ULL << NumberOfBitsInMask) - 1ULL);

			// Memory Type (cacheability attributes)
			Descriptor->MemoryType = (UCHAR)CurrentPhysBase.Type;

			if (Descriptor->MemoryType == MEMORY_TYPE_WRITE_BACK)
			{
				/* This is already our default, so no need to store this range.
				 * Simply 'free' the range we just wrote. */
				EptState->NumberOfEnabledMemoryRanges--;
			}
			LogInfo("MTRR Range: Base=0x%llx End=0x%llx Type=0x%x", Descriptor->PhysicalBaseAddress, Descriptor->PhysicalEndAddress, Descriptor->MemoryType);
		}
	}

	LogInfo("Total MTRR Ranges Committed: %d", EptState->NumberOfEnabledMemoryRanges);

	return TRUE;
}
Fixed-Range MTRRs and PAT
The above section is enough for understanding the MTRRs for EPT. Still, I want to talk a little more about physical and virtual memory layout and caching policy (you can skip this section as it does not relate to our hypervisor).
There are other MTRR registers called Fixed Range Registers as its name implies, these registers are some predefined ranges defined by the processor (you can see them in the first lines of !mtrr command in Windbg).
These ranges are showed in the following table:
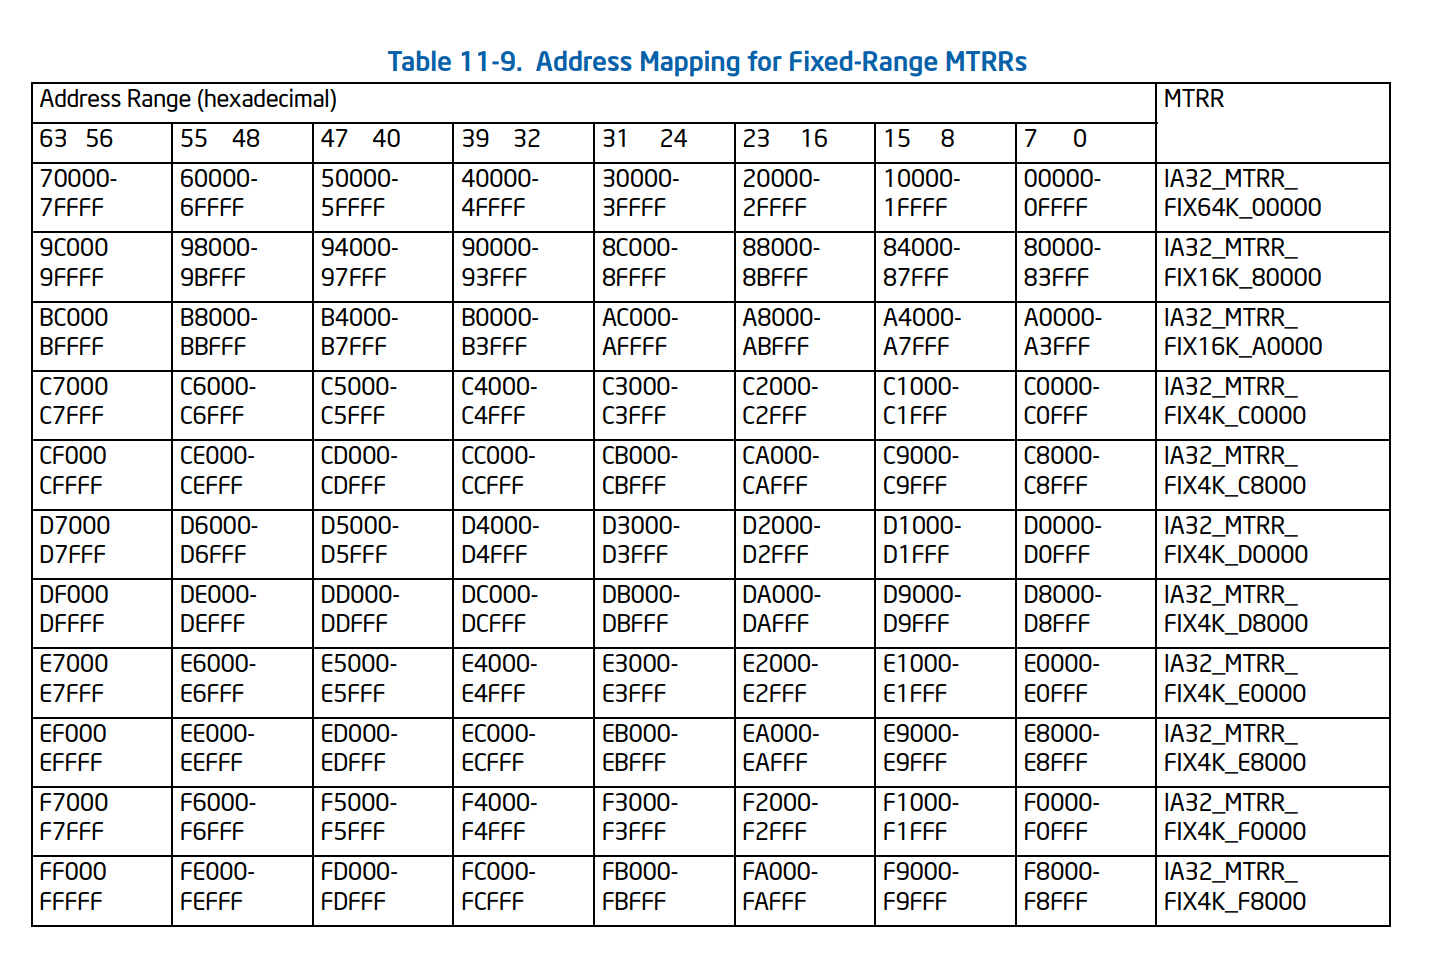
As you can see, the start of physical RAM is defined by these fixed range registers, which are for performance and legacy reasons.
Note that MTRRs should be defined contiguously; if your MTRRs are not contiguous, then the rest of the RAM is typically assumed as a hole.
Keep in mind that caching policy for each region of RAM is defined by MTRRs for PHYSICAL regions and PAGE ATTRIBUTE TABLE (PAT) for virtual areas so that each page can use its own caching policy by configuring IA32_PAT MSR. This means that sometimes the caching policy specified in MTRR registers is ignored, and instead, a page-level cache policy is used. There is a table in Intel SDM that shows the precedence rules between PAT and MTRRs (Table 11-7. Effective Page-Level Memory Types for Pentium III and More Recent Processor Families).
For further reading, you can read Intel SDM (Chapter 11 volume 3 A - 11.11 MEMORY TYPE RANGE REGISTERS (MTRRS) and 11.12 PAGE ATTRIBUTE TABLE (PAT)).

Virtualizing Current System’s Memory using EPT
As you have some previous information from EPT (part 4), we create an EPT table for our VM. In the case of fully virtualizing memory of the current machine, there are different approaches in implementing EPT; we can either have a separate EPT table for each of the cores or an EPT table for all the cores, our approach is using one EPT for all the cores as it’s simpler to implement and manage (more details about the benefits and caveat are discussed in Discussion section).
What we are trying to do is creating an EPT table that maps all of the available physical memory (we have the details of physical memory from MTRRs) to the physical address. It’s something like adding a table that maps the previous addresses to the previous address with some additional fields to control them. It’s ok if you’re confused, just read the rest of the article and things become more clear.
EPT Identity Mapping
In our hypervisor or all of the hypervisors that virtualize an already running system (not VMWare, VirtualBox, etc), we have a term called “Identity Mapping or 1:1 mapping”. It means that if you access guest PA (Physical Address) 0x4000, it will access host PA at 0x4000, thus, you have to map RAM’s hole as well as memory ranges to the guest.
It is the same as regular page tables (you can set page tables that way as well so that virtual address 0x1234 corresponds to the physical address 0x1234);
If you don’t map some physical memory and the guest access it, then you’ll get “EPT Violation”, which can be understood as the hypervisor’s page fault.
In order to map everything one by one, we’ll create PML4Es, then PDPTEs, then PDEs, and finally, PEs. In cases with 2 MB of granularity, we’ll skip PEs. Of course, it’s preferred to have 4 KB granularity but keep in mind that 4GB of RAM results in one million of 4 KB pages thus having a 4 KB granularity will eat a lot of memory, besides this, setting 4 KB granularity will take quite some time which will drive you crazy if you test your hypervisor frequently.
What hvpp, gbhv, and most of the other hypervisors do is initially set up 2 MB for the whole system (including RAM Ranges and MMIO holes) and then break some 2 MB pages into 4 KB pages as needed.
After splitting to 4 KB pages, you can merge them back to 2 MB pages again. We do the same for our hypervisor driver, first initial with 2 MB of granularity, then split them to 4 KB whenever needed.
Why we shouldn’t care about new memory allocations of Windows?
Well, that’s because we mapped all of the physical memory (every possible addresses in physical RAM) using 2 MB chunks, including those which are allocated and those which are not allocated yet, so no matter if Windows allocates a new memory chunk, we already have it in our EPT table.
What we want to do is creating a PML4E; then PDPTE, we’ll add that PDPTE into PML4E, then create PDE and add it to the PDPTE and finally create PE, which will point to physical address 0. Then we create another PE, that will point to address 0x1000 (if the granularity is 4 KB) or 0x200000 ( if the granularity is 2 MB ) and add it again 512 times (maximum entries in all paging tables including EPT Page tables and regular page tables are 512) then we’ll create another PDE and repeat!
All in all, our hypervisor should not care about any virtual address, it’s all about physical memory.
That’s enough for theory, let’s implement it!
Setting up PML4 and PML3 entries
First of all, we have to allocate a large memory for our EPT page table and then zero it.
1
2
3
4
5
6
7
8
9
10
	PageTable = MmAllocateContiguousMemory((sizeof(VMM_EPT_PAGE_TABLE) / PAGE_SIZE) * PAGE_SIZE, MaxSize);

	if (PageTable == NULL)
	{
		LogError("Failed to allocate memory for PageTable");
		return NULL;
	}

	// Zero out all entries to ensure all unused entries are marked Not Present
	RtlZeroMemory(PageTable, sizeof(VMM_EPT_PAGE_TABLE));
We have a linked list that holds the trace of every allocated memory; we have to initialize it first so we can de-allocate our allocated pages whenever we want to turn off our hypervisor.
1
2
	// Initialize the dynamic split list which holds all dynamic page splits
	InitializeListHead(&PageTable->DynamicSplitList);
It’s time to initialize the first table (EPT PML4). For the initialization phase, we set all the accesses to 1 (including Read Access, Write Access, Execute Access) on all of the EPT tables.
The physical address (Page Frame Number - PFN) for the PML4E is PML3’s address, and as it’s aligned and whenever the processor wants to translate it (it performs multiplication by PAGE_SIZE) so we divide it by PAGE_SIZE (4096).
1
2
3
4
5
	// Mark the first 512GB PML4 entry as present, which allows us to manage up to 512GB of discrete paging structures.
	PageTable->PML4[0].PageFrameNumber = (SIZE_T)VirtualAddressToPhysicalAddress(&PageTable->PML3[0]) / PAGE_SIZE;
	PageTable->PML4[0].ReadAccess = 1;
	PageTable->PML4[0].WriteAccess = 1;
	PageTable->PML4[0].ExecuteAccess = 1;
Each PML4 entry covers 512 GB of memory, so one entry is more than enough. Each table has 512 entries, so we have to fill PML3 with 512 of 1 GB entries. We’re done this by creating a template with RWX enabled and use __stosq to fill the table with this template continuously. __stosq generates a store string instruction (rep stosq) means that continuously (in our case VMM_EPT_PML3E_COUNT=512) copy something on a special location.
The next step is to convert our previously allocated PML2 entries to physical addresses and fill the PML3 with those addresses.
1
2
3
4
5
6
7
8
9
10
11
12
13
14
15
16
	// Set up one 'template' RWX PML3 entry and copy it into each of the 512 PML3 entries
	// Using the same method as SimpleVisor for copying each entry using intrinsics.
	RWXTemplate.ReadAccess = 1;
	RWXTemplate.WriteAccess = 1;
	RWXTemplate.ExecuteAccess = 1;

	// Copy the template into each of the 512 PML3 entry slots
	__stosq((SIZE_T*)&PageTable->PML3[0], RWXTemplate.Flags, VMM_EPT_PML3E_COUNT);

	// For each of the 512 PML3 entries
	for (EntryIndex = 0; EntryIndex < VMM_EPT_PML3E_COUNT; EntryIndex++)
	{
		// Map the 1GB PML3 entry to 512 PML2 (2MB) entries to describe each large page.
		// NOTE: We do *not* manage any PML1 (4096 byte) entries and do not allocate them.
		PageTable->PML3[EntryIndex].PageFrameNumber = (SIZE_T)VirtualAddressToPhysicalAddress(&PageTable->PML2[EntryIndex][0]) / PAGE_SIZE;
	}
For PML2, we have the same approach, fill it with an RWX template, but this time we set LargePage to 1 (for the reason I told you above about initialization with 2 MB granularity). Exactly same as above, we use __stosq to fill these entries, this time with 512*512 entries as we have 512 entries, each of which describes 512 entries.
The next step is to set up each entry’s PFN addresses. I’ll describe EptSetupPML2Entry in the next section.
Note that we’re are filling entries for a 512*512 table, so we have to perform a multiplication by 512 for each EntryGroupIndex and then add it to the current PML2’s address (EntryIndex).
1
2
3
4
5
6
7
8
9
10
11
12
13
14
15
16
17
18
19
20
21
22
23
24
	// All PML2 entries will be RWX and 'present'
	PML2EntryTemplate.WriteAccess = 1;
	PML2EntryTemplate.ReadAccess = 1;
	PML2EntryTemplate.ExecuteAccess = 1;

	// We are using 2MB large pages, so we must mark this 1 here.
	PML2EntryTemplate.LargePage = 1;

	/* For each collection of 512 PML2 entries (512 collections * 512 entries per collection), mark it RWX using the same template above.
	   This marks the entries as "Present" regardless of if the actual system has memory at this region or not. We will cause a fault in our
	   EPT handler if the guest access a page outside a usable range, despite the EPT frame being present here.
	 */
	__stosq((SIZE_T*)&PageTable->PML2[0], PML2EntryTemplate.Flags, VMM_EPT_PML3E_COUNT * VMM_EPT_PML2E_COUNT);

	// For each of the 512 collections of 512 2MB PML2 entries
	for (EntryGroupIndex = 0; EntryGroupIndex < VMM_EPT_PML3E_COUNT; EntryGroupIndex++)
	{
		// For each 2MB PML2 entry in the collection
		for (EntryIndex = 0; EntryIndex < VMM_EPT_PML2E_COUNT; EntryIndex++)
		{
			// Setup the memory type and frame number of the PML2 entry.
			EptSetupPML2Entry(&PageTable->PML2[EntryGroupIndex][EntryIndex], (EntryGroupIndex * VMM_EPT_PML2E_COUNT) + EntryIndex);
		}
	}
Putting it all together we have the following code:
1
2
3
4
5
6
7
8
9
10
11
12
13
14
15
16
17
18
19
20
21
22
23
24
25
26
27
28
29
30
31
32
33
34
35
36
37
38
39
40
41
42
43
44
45
46
47
48
49
50
51
52
53
54
55
56
57
58
59
60
61
62
63
64
65
66
67
68
69
70
71
72
73
74
75
76
77
78
79
80
81
82
83
84
85
86
87
/* Allocates page maps and create identity page table */
PVMM_EPT_PAGE_TABLE EptAllocateAndCreateIdentityPageTable()
{
	PVMM_EPT_PAGE_TABLE PageTable;
	EPT_PML3_POINTER RWXTemplate;
	EPT_PML2_ENTRY PML2EntryTemplate;
	SIZE_T EntryGroupIndex;
	SIZE_T EntryIndex;

	// Allocate all paging structures as 4KB aligned pages
	PHYSICAL_ADDRESS MaxSize;
	PVOID Output;

	// Allocate address anywhere in the OS's memory space
	MaxSize.QuadPart = MAXULONG64;

	PageTable = MmAllocateContiguousMemory((sizeof(VMM_EPT_PAGE_TABLE) / PAGE_SIZE) * PAGE_SIZE, MaxSize);

	if (PageTable == NULL)
	{
		LogError("Failed to allocate memory for PageTable");
		return NULL;
	}

	// Zero out all entries to ensure all unused entries are marked Not Present
	RtlZeroMemory(PageTable, sizeof(VMM_EPT_PAGE_TABLE));

	// Initialize the dynamic split list which holds all dynamic page splits
	InitializeListHead(&PageTable->DynamicSplitList);

	// Mark the first 512GB PML4 entry as present, which allows us to manage up to 512GB of discrete paging structures.
	PageTable->PML4[0].PageFrameNumber = (SIZE_T)VirtualAddressToPhysicalAddress(&PageTable->PML3[0]) / PAGE_SIZE;
	PageTable->PML4[0].ReadAccess = 1;
	PageTable->PML4[0].WriteAccess = 1;
	PageTable->PML4[0].ExecuteAccess = 1;

	/* Now mark each 1GB PML3 entry as RWX and map each to their PML2 entry */

	// Ensure stack memory is cleared
	RWXTemplate.Flags = 0;

	// Set up one 'template' RWX PML3 entry and copy it into each of the 512 PML3 entries
	// Using the same method as SimpleVisor for copying each entry using intrinsics.
	RWXTemplate.ReadAccess = 1;
	RWXTemplate.WriteAccess = 1;
	RWXTemplate.ExecuteAccess = 1;

	// Copy the template into each of the 512 PML3 entry slots
	__stosq((SIZE_T*)&PageTable->PML3[0], RWXTemplate.Flags, VMM_EPT_PML3E_COUNT);

	// For each of the 512 PML3 entries
	for (EntryIndex = 0; EntryIndex < VMM_EPT_PML3E_COUNT; EntryIndex++)
	{
		// Map the 1GB PML3 entry to 512 PML2 (2MB) entries to describe each large page.
		// NOTE: We do *not* manage any PML1 (4096 byte) entries and do not allocate them.
		PageTable->PML3[EntryIndex].PageFrameNumber = (SIZE_T)VirtualAddressToPhysicalAddress(&PageTable->PML2[EntryIndex][0]) / PAGE_SIZE;
	}

	PML2EntryTemplate.Flags = 0;

	// All PML2 entries will be RWX and 'present'
	PML2EntryTemplate.WriteAccess = 1;
	PML2EntryTemplate.ReadAccess = 1;
	PML2EntryTemplate.ExecuteAccess = 1;

	// We are using 2MB large pages, so we must mark this 1 here.
	PML2EntryTemplate.LargePage = 1;

	/* For each collection of 512 PML2 entries (512 collections * 512 entries per collection), mark it RWX using the same template above.
	   This marks the entries as "Present" regardless of if the actual system has memory at this region or not. We will cause a fault in our
	   EPT handler if the guest access a page outside a usable range, despite the EPT frame being present here.
	 */
	__stosq((SIZE_T*)&PageTable->PML2[0], PML2EntryTemplate.Flags, VMM_EPT_PML3E_COUNT * VMM_EPT_PML2E_COUNT);

	// For each of the 512 collections of 512 2MB PML2 entries
	for (EntryGroupIndex = 0; EntryGroupIndex < VMM_EPT_PML3E_COUNT; EntryGroupIndex++)
	{
		// For each 2MB PML2 entry in the collection
		for (EntryIndex = 0; EntryIndex < VMM_EPT_PML2E_COUNT; EntryIndex++)
		{
			// Setup the memory type and frame number of the PML2 entry.
			EptSetupPML2Entry(&PageTable->PML2[EntryGroupIndex][EntryIndex], (EntryGroupIndex * VMM_EPT_PML2E_COUNT) + EntryIndex);
		}
	}

	return PageTable;
}
Setting up PML2 entries
PML2 is different from the other tables; this is because, in our 2 MB design, it’s the last table, so it has to deal with MTRRs’ caching policy.
First, we have to set the PageFrameNumber of our PML2 entry. This is because we’re mapping all 512 GB without any hole, I mean, we’re not trying to see just what are MTRR’s base and end address and map based on them, but we map every possible physical address within 512 GB. Think about it one more time.
If you want to know more about PFNs in Windows, then you can read my blog posts Inside Windows Page Frame Number (PFN) – Part 1 and Part 2.
1
2
3
4
5
6
	  Each of the 512 collections of 512 PML2 entries is setup here.
	  This will, in total, identity map every physical address from 0x0 to physical address 0x8000000000 (512GB of memory)

	  ((EntryGroupIndex * VMM_EPT_PML2E_COUNT) + EntryIndex) * 2MB is the actual physical address we're mapping
	 */
	NewEntry->PageFrameNumber = PageFrameNumber;
Now it’s time to see the actual caching policy based on MTRRs. Ranges in MTRRs are not divided by 4 KB or 2 MB, and these are exact physical addresses. What we are going to do is iterating over each MTRR and see whether a special MTRR describes our current physical address or not.
If none of them describe it, then we choose Write-Back (MEMORY_TYPE_WRITE_BACK) as the default caching policy; otherwise, we have to select the caching policy that is used in MTRRs.
This approach will make our EPT PML2 as it’s like a real system.
If we don’t choose the system-specific caching policy, then it will cause catastrophic errors. For example, some of the devices that use physical memory as the command and control mechanism go through the cache and won’t immediately respond to our requests or for APIC devices will not work in the case of real-time interrupts.
The following code is responsible for finding the desired caching policy based on MTRRs.
1
2
3
4
5
6
7
8
9
10
11
12
13
14
15
16
17
18
19
20
21
22
23
24
25
26
27
28
29
30
	// Default memory type is always WB for performance.
	TargetMemoryType = MEMORY_TYPE_WRITE_BACK;

	// For each MTRR range
	for (CurrentMtrrRange = 0; CurrentMtrrRange < EptState->NumberOfEnabledMemoryRanges; CurrentMtrrRange++)
	{
		// If this page's address is below or equal to the max physical address of the range
		if (AddressOfPage <= EptState->MemoryRanges[CurrentMtrrRange].PhysicalEndAddress)
		{
			// And this page's last address is above or equal to the base physical address of the range
			if ((AddressOfPage + SIZE_2_MB - 1) >= EptState->MemoryRanges[CurrentMtrrRange].PhysicalBaseAddress)
			{
				/* If we're here, this page fell within one of the ranges specified by the variable MTRRs
				   Therefore, we must mark this page as the same cache type exposed by the MTRR
				 */
				TargetMemoryType = EptState->MemoryRanges[CurrentMtrrRange].MemoryType;
				// LogInfo("0x%X> Range=%llX -> %llX | Begin=%llX End=%llX", PageFrameNumber, AddressOfPage, AddressOfPage + SIZE_2_MB - 1, EptState->MemoryRanges[CurrentMtrrRange].PhysicalBaseAddress, EptState->MemoryRanges[CurrentMtrrRange].PhysicalEndAddress);

				// 11.11.4.1 MTRR Precedences
				if (TargetMemoryType == MEMORY_TYPE_UNCACHEABLE)
				{
					// If this is going to be marked uncacheable, then we stop the search as UC always takes precedent.
					break;
				}
			}
		}
	}

	// Finally, commit the memory type to the entry.
	NewEntry->MemoryType = TargetMemoryType;
EPT Violation
Intel describes EPT Violation like this:
An EPT violation occurs when there is no EPT misconfiguration, but the EPT paging structure entries disallow access using the guest-physical address.
But that’s hard to understand, in short, every time one instruction tries to read a page (Read Access), or an instruction tries to write on a page (Write Access), or an instruction causes instruction fetch from a page and EPT attributes (the one we configured in the above sections) of that page doesn’t allow this, then an EPT Violation occurs.
Let me explain a little bit more, imagine we have an entry in our EPT Table which is responsible for mapping physical address 0x1000. In this entry, we set Write Access to 0 (Read Access = 1 and Execute Access = 1). If any instruction tries to write on that page, for example by using (Mov [0x1000], RAX) then as the paging attributes doesn’t allow writing, so an EPT Violation occurs and now our callback is called so that we can decide to what we want to do with that page.
By 0x1000, I mean a physical address. Of course, if you have the virtual address, then it gets translated to a physical.
Another example, let’s assume an NT function (for example NtCreateFile) is located fffff801`80230540.
1
2
3
4
nt!NtCreateFile:
fffff801`80230540 4881ec88000000  sub     rsp,88h
fffff801`80230547 33c0            xor     eax,eax
fffff801`80230549 4889442478      mov     qword ptr [rsp+78h],rax
If we convert it to a physical address, then the address of NtCreateFile in physical memory is 0x3B8000, now we try to find this physical address in our EPT PTE Table. Then we set Execute Access of that entry to 0. Now, each time someone tries to call, jmp, ret, etc. to this particular page, then an EPT Violation occurs.
This is the basic idea of using EPT function hooks, we talk about it in detail in Part 8.
For now, first, we have to read the physical address, which caused this EPT Violation. It’s done by reading GUEST_PHYSICAL_ADDRESS using Vmread instruction.
1
2
3
4
		// Reading guest physical address
		GuestPhysicalAddr = 0;
		__vmx_vmread(GUEST_PHYSICAL_ADDRESS, &GuestPhysicalAddr);
		LogInfo("Guest Physical Address : 0x%llx", GuestPhysicalAddr);
The second thing that we have to read is Exit Qualification. If you remember from the previous part, Exit Qualification gives additional details about Exit Reasons.
I mean, each Exit Reason might have a special Exit Qualification that has a special meaning for that special Exit Reason. (how many “special” I used in the previous sentence ?)
Exit Reason can be read from VM_EXIT_REASON using Vmread instruction.
1
2
	ULONG ExitReason = 0;
	__vmx_vmread(VM_EXIT_REASON, &ExitReason);
In the case of EPT Violation, Exit Qualification shows that the reason why this violation occurs. For example, it indicates that EPT Violation occurs because of a data read to a physical page that its Read Access is 0 or instruction fetches (a function tries to execute instruction) from a physical page that its Execute Access is 0.
The following table shows the structure of Exit Qualification and each bit’s meaning for EPT Violation.
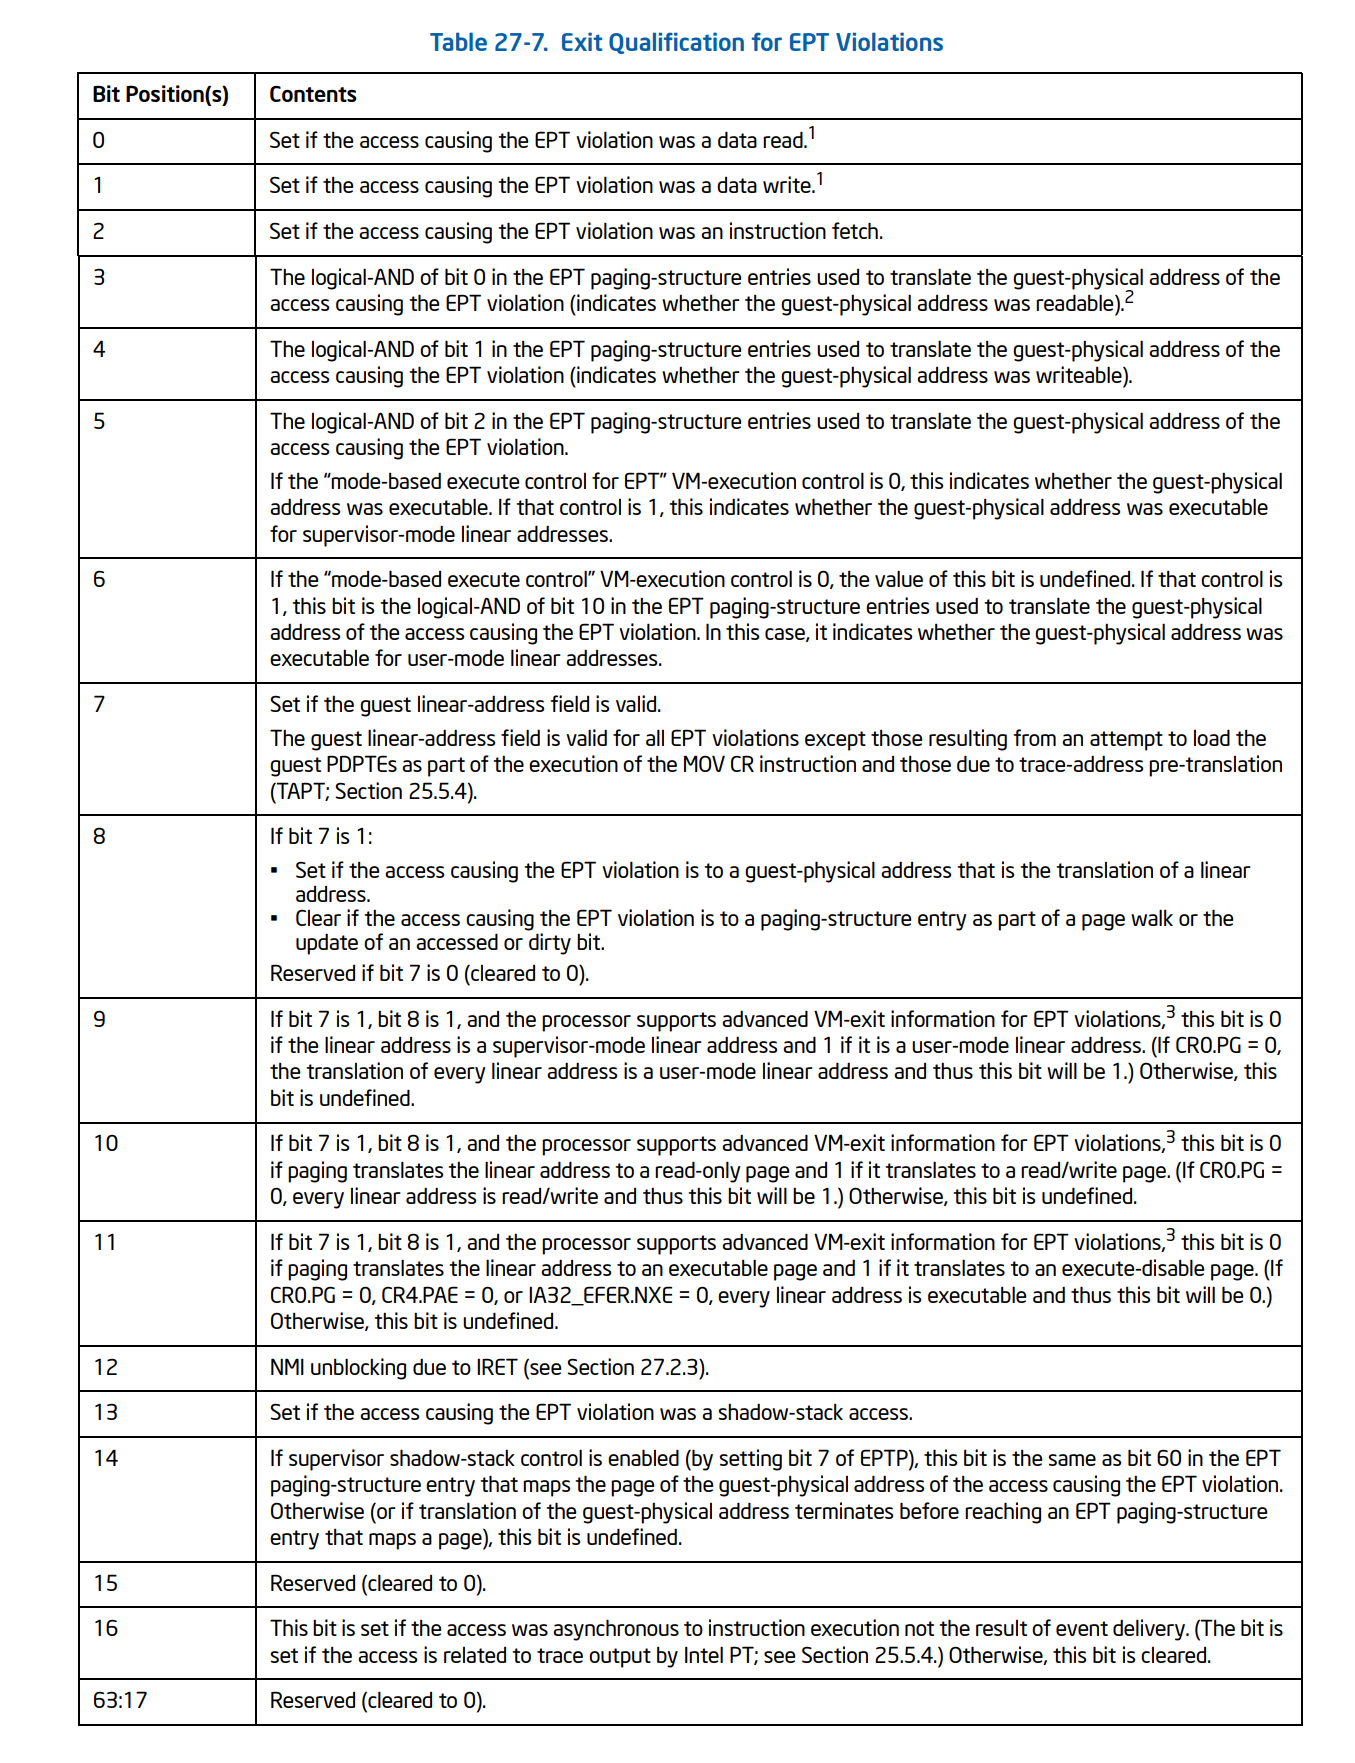
Now that we have all the details, we need to pass them to EptHandlePageHookExit, and we deal with it in the next sections.
1
2
3
4
5
6
7
8
9
10
11
12
13
14
15
16
17
18
19
20
21
22
23
24
25
/*
   Handle VM exits for EPT violations. Violations are thrown whenever an operation is performed
   on an EPT entry that does not provide permissions to access that page.
*/
BOOLEAN EptHandleEptViolation(ULONG ExitQualification, UINT64 GuestPhysicalAddr)
{

	VMX_EXIT_QUALIFICATION_EPT_VIOLATION ViolationQualification;

	DbgBreakPoint();

	ViolationQualification.Flags = ExitQualification;

	if (EptHandlePageHookExit(ViolationQualification, GuestPhysicalAddr))
	{
		// Handled by page hook code.
		return TRUE;
	}

	LogError("Unexpected EPT violation");
	DbgBreakPoint();

	// Redo the instruction that caused the exception.
	return FALSE;
}
EPT Misconfiguration
Another EPT derived vm-exit is EPT Misconfiguration (EXIT_REASON_EPT_MISCONFIG).
An EPT Misconfiguration occurs when, in the course of translating a physical guest address, the logical processor encounters an EPT paging-structure entry that contains an unsupported value.
If you want to know more about all the reasons why EPT Misconfiguration occurs, you can see Intel SDM - Vol 3C Section 28.2.3.1.
Based on my experience, I encountered EPT Misconfiguration most of the time because I clear the bit 0 of the entry (indicating that data reads are not allowed), and bit 1 is set (reporting that data writes are permitted).
Also, EPT misconfigurations occur when an EPT paging-structure entry is configured with settings reserved for future functionality.
It’s fatal error, let’s just break and see what we’ve done wrong !
1
2
3
4
5
6
7
8
9
VOID EptHandleMisconfiguration(UINT64 GuestAddress)
{
	LogInfo("EPT Misconfiguration!");
	LogError("A field in the EPT paging structure was invalid, Faulting guest address : 0x%llx", GuestAddress);

	DbgBreakPoint();
	// We can't continue now.
	// EPT misconfiguration is a fatal exception that will probably crash the OS if we don't get out now.
}
Adding EPT to VMCS
Our hypervisor starts virtualizing MMU by calling EptLogicalProcessorInitialize, which sets a 64-bit value called EPTP. The following table shows the structure of EPTP. If you look at part 4, we have this table in that part too, but there is a change here, bit 7 was reserved at the time I wrote part 4, and now it has something to do with shadow stacks.

EptLogicalProcessorInitialize calls EptAllocateAndCreateIdentityPageTable to allocate identity table (as described above).
For performance, we let the processor know it can cache the EPT (MemoryType to MEMORY_TYPE_WRITE_BACK).
We are not utilizing the ‘access’ and ‘dirty’ flag features (EnableAccessAndDirtyFlags to FALSE).
As Intel mentioned, Page Walk should be the count of the tables we use (4) minus 1, so PageWalkLength = 3 indicates an EPT page-walk length of 4. It is because we’re not using just three tables with 2 MB granularity, we’ll split 2 MB pages to 4 KB granularity.
The last step is to save EPTP somewhere into a global variable so we can use it later.
1
2
3
4
5
6
7
8
9
10
11
12
13
14
15
16
17
18
19
20
21
22
23
24
25
26
27
28
29
30
31
32
33
34
35
36
37
38
39
40
41
42
/*
  Initialize EPT for an individual logical processor.
  Creates an identity mapped page table and sets up an EPTP to be applied to the VMCS later.
*/
BOOLEAN EptLogicalProcessorInitialize()
{
	PVMM_EPT_PAGE_TABLE PageTable;
	EPTP EPTP;

	/* Allocate the identity mapped page table*/
	PageTable = EptAllocateAndCreateIdentityPageTable();
	if (!PageTable)
	{
		LogError("Unable to allocate memory for EPT");
		return FALSE;
	}

	// Virtual address to the page table to keep track of it for later freeing
	EptState->EptPageTable = PageTable;

	EPTP.Flags = 0;

	// For performance, we let the processor know it can cache the EPT.
	EPTP.MemoryType = MEMORY_TYPE_WRITE_BACK;

	// We are not utilizing the 'access' and 'dirty' flag features.
	EPTP.EnableAccessAndDirtyFlags = FALSE;

	/*
	  Bits 5:3 (1 less than the EPT page-walk length) must be 3, indicating an EPT page-walk length of 4;
	  see Section 28.2.2
	 */
	EPTP.PageWalkLength = 3;

	// The physical page number of the page table we will be using
	EPTP.PageFrameNumber = (SIZE_T)VirtualAddressToPhysicalAddress(&PageTable->PML4) / PAGE_SIZE;

	// We will write the EPTP to the VMCS later
	EptState->EptPointer = EPTP;

	return TRUE;
}
Finally, we need to configure Vmcs with our EPTP Table, so we use vmwrite with EPT_POINTER and set it to our EPTP.
1
2
	// Set up EPT
	__vmx_vmwrite(EPT_POINTER, EptState->EptPointer.Flags);
Also, don’t forget to enable EPT feature in Secondary Processor-Based VM-Execution Controls using CPU_BASED_CTL2_ENABLE_EPT; otherwise, it won’t work.
1
2
3
4
5
6
	SecondaryProcBasedVmExecControls = HvAdjustControls(CPU_BASED_CTL2_RDTSCP |
		CPU_BASED_CTL2_ENABLE_EPT | CPU_BASED_CTL2_ENABLE_INVPCID |
		CPU_BASED_CTL2_ENABLE_XSAVE_XRSTORS | CPU_BASED_CTL2_ENABLE_USER_WAIT_PAUSE, MSR_IA32_VMX_PROCBASED_CTLS2);

	__vmx_vmwrite(SECONDARY_VM_EXEC_CONTROL, SecondaryProcBasedVmExecControls);
	LogInfo("Secondary Proc Based VM Exec Controls (MSR_IA32_VMX_PROCBASED_CTLS2) : 0x%x", SecondaryProcBasedVmExecControls);
Now we have a perfect EPT Table which virtualizes MMU and now all of the translations go through the EPT.
Monitoring Page’s RWX Activity
The next important topic is the monitoring of the page’s RWX. From the above section, you saw that we put each of the Read Access, Write Access and Execute Access to 1, but to use EPT’s monitoring features, we have to set some of them to 0 so that we get EPT Violation on each of the accesses mentioned above.
Using these features (setting access to 0) has its difficulties by its nature, problems relating to IRQL, splitting, absence of the ability to use NT functions, synchronization, and deadlock are some of these problems and limitations.
In this section we’re trying to solve these problem.
Pre-allocating Buffers for VMX Root Mode
After executing VMLAUNCH, we shouldn’t modify EPT Tables from Vmx non-root mode; that is because if we do it, then it might (and will) causes system inconsistency.
This limitation and the fact that we couldn’t use any NT function in VMX Root Mode bring us new challenges.
One of these challenges is that we might need to split a 2 MB Page into 4 KB pages, of course, another Page Table (PML1) is necessary to store the details of new 4 KB pages. I mean, we have to create another Page Table (PML1), and it needs a new memory.
We can’t use ExAllocatePoolTag in Vmx root-mode as it’s an NT API. (you can use it in Vmx root-mode, and you’ll see that it sometimes work and sometimes halts the system - the reason is described in the Discussion section).
The solution to this problem is using a previously allocated buffer from Vmx non-root mode and use it in Vmx root mode, so this brings us the first limitation to our hypervisor which is we have to start setting hooks from vmx non-root mode because we want to pre-allocate a buffer then we pass the buffer and hook settings to Vmx root-mode using a special Vmcalls.
By the way, this is not an unsolvable limitation, for example, you can allocate 100 pages from Vmx non-root mode and use them whenever you want in Vmx root-mode, and it’s not necessarily a limitation anymore but for now, let’s assume that the caller should start setting hooks from Vmx non-root mode.
Honestly, I wanted to make a mechanism for running code from Vmx root mode to Vmx non-root mode using NMI events; using this approach will resolve the problem of pre-allocating buffers, but for this part, let’s use pre-allocated buffers.
Hyperplatform and Hvpp use the pre-allocated buffers.
In this section and next sections we’re trying to complete a function called “EptPageHook”.
There is a per-core global variable called “PreAllocatedMemoryDetails” in GuestState that is defined like this:
1
2
3
4
5
typedef struct _VMX_NON_ROOT_MODE_MEMORY_ALLOCATOR
{
	PVOID PreAllocatedBuffer;		// As we can't use ExAllocatePoolWithTag in VMX Root mode, this holds a pre-allocated buffer address
									// PreAllocatedBuffer == 0 indicates that it's not previously allocated
} VMX_NON_ROOT_MODE_MEMORY_ALLOCATOR, * PVMX_NON_ROOT_MODE_MEMORY_ALLOCATOR;
Now that we’re trying to hook, we’ll see whether the current core has a previously pre-allocated buffer or not. If it doesn’t have a buffer, then we allocate it using ExAllocatePoolWithTag.
1
2
3
4
5
6
7
8
9
10
11
12
13
14
15
16
	if (GuestState[LogicalCoreIndex].PreAllocatedMemoryDetails.PreAllocatedBuffer == NULL)
	{
		PreAllocBuff = ExAllocatePoolWithTag(NonPagedPool, sizeof(VMM_EPT_DYNAMIC_SPLIT), POOLTAG);

		if (!PreAllocBuff)
		{
			LogError("Insufficient memory for pre-allocated buffer");
			return FALSE;
		}

		// Zero out the memory
		RtlZeroMemory(PreAllocBuff, sizeof(VMM_EPT_DYNAMIC_SPLIT));

		// Save the pre-allocated buffer
		GuestState[LogicalCoreIndex].PreAllocatedMemoryDetails.PreAllocatedBuffer = PreAllocBuff;
	}
Now we have two different states if we previously configured the VMCS with EPT and we’re already in a hypervisor then we have to ask, Vmx root-mode to set the hook for us (Setting hook after Vmlaunch); otherwise, we can modify it in a regular function as we don’t execute VMLAUNCH (with EPT) yet (Setting hook before Vmlaunch).
By “with EPT,” I mean if we used this EPT in our hypervisor. For example, you might configure VMCS without EPTP, then you execute VMLAUNCH, and now you decide to create an EPT Table, this way doesn’t need Vmx root-mode to modify EPT Table, we can change it from Vmx non-root mode as we didn’t use this EPT Table yet.
Setting hook before Vmlaunch
I prefer to do everything in a function so that EptVmxRootModePageHook can be used for both Vmx root-mode and non-root mode. Still, you shouldn’t directly call this function as it needs a preparing phase (instead, you can call EptPageHook).
What we have to do is calling EptVmxRootModePageHook and a HasLaunched flag that determines whether we used our EPT in our Vmx operation our not.
1
2
3
4
		if (EptVmxRootModePageHook(TargetFunc, HasLaunched) == TRUE) {
			LogInfo("[*] Hook applied (VM has not launched)");
			return TRUE;
		}
I’ll describe EptVmxRootModePageHook in the section, Applying the Hook later.
Setting hook after Vmlaunch
If we’re already used this EPT in our Vmx operation, then we need to ask Vmx root-mode to modify the EPT Table for us; in other words, we have to call EptVmxRootModePageHook from Vmx root-mode, so it needs Vmcall.
We have some additional things to do here, as I told you, each logical core has its own set of caches relating to EPT, so we have to invalidate all the cores’ EPT Tables immediately and of course it has to be done in Vmx non-root mode as we want to use NT APIs.
To call EptVmxRootModePageHook from Vmx root-mode, we’ll use Vmcall with VMCALL_EXEC_HOOK_PAGE and also sent the functions virtual address (TargetFunc) as the first parameter.
1
2
3
4
5
6
7
8
9
10
11
12
	if (HasLaunched)
	{
		if (AsmVmxVmcall(VMCALL_EXEC_HOOK_PAGE, TargetFunc, NULL, NULL, NULL) == STATUS_SUCCESS)
		{
			LogInfo("Hook applied from VMX Root Mode");

			// Now we have to notify all the core to invalidate their EPT
			HvNotifyAllToInvalidateEpt();

			return TRUE;
		}
	}
In Vmcall handler, we just call EptVmxRootModePageHook.
1
2
3
4
5
6
7
8
9
10
11
12
13
14
	case VMCALL_EXEC_HOOK_PAGE:
	{
		HookResult = EptVmxRootModePageHook(OptionalParam1, TRUE);

		if (HookResult)
		{
			VmcallStatus = STATUS_SUCCESS;
		}
		else
		{
			VmcallStatus = STATUS_UNSUCCESSFUL;
		}
		break;
	}
Let’s get down to invalidation part,
HvNotifyAllToInvalidateEpt uses KeIpiGenericCall which broadcasts HvInvalidateEptByVmcall on all the core.
1
2
3
4
5
6
/* Notify all core to invalidate their EPT */
VOID HvNotifyAllToInvalidateEpt()
{
	// Let's notify them all
	KeIpiGenericCall(HvInvalidateEptByVmcall, EptState->EptPointer.Flags);
}
As the invalidation should be within vmx root-mode (INVEPT instruction is only valid in vmx root-mode) thus HvInvalidateEptByVmcall uses Vmcall with VMCALL_INVEPT_ALL_CONTEXT and VMCALL_INVEPT_SINGLE_CONTEXT to notify vmx root-mode about invalidation.
1
2
3
4
5
6
7
8
9
10
11
12
13
14
/* Invalidate EPT using Vmcall (should be called from Vmx non root mode) */
VOID HvInvalidateEptByVmcall(UINT64 Context)
{
	if (Context == NULL)
	{
		// We have to invalidate all contexts
		AsmVmxVmcall(VMCALL_INVEPT_ALL_CONTEXT, NULL, NULL, NULL);
	}
	else
	{
		// We have to invalidate all contexts
		AsmVmxVmcall(VMCALL_INVEPT_SINGLE_CONTEXT, Context, NULL, NULL);
	}
}
The Vmcall handler uses InveptSingleContext and InveptAllContexts to invalidate the contexts; we’ll talk about invalidation in details later in this part (Invalidating Translations Derived from EPT (INVEPT)).
1
2
3
4
5
6
7
8
9
10
11
12
	case VMCALL_INVEPT_SINGLE_CONTEXT:
	{
		InveptSingleContext(OptionalParam1);
		VmcallStatus = STATUS_SUCCESS;
		break;
	}
	case VMCALL_INVEPT_ALL_CONTEXT:
	{
		InveptAllContexts();
		VmcallStatus = STATUS_SUCCESS;
		break;
	}
Finding a Page’s entry in EPT Tables
Let’s see how we can find addresses in PML1, PML2, PML3 and PML4.
Finding PML4, PML3, PML2 entries
We want to find PML2 entry, for finding PML2, first, we have to find PML4 and PML3.
We used an ordinal approach to map the physical addresses so all the physical addresses are stored in the same way so we need some definitions to find the index of the entries from tables.
Here’s the definitions.
1
2
3
4
5
6
7
8
9
10
11
// Index of the 1st paging structure (4096 byte)
#define ADDRMASK_EPT_PML1_INDEX(_VAR_) ((_VAR_ & 0x1FF000ULL) >> 12)

// Index of the 2nd paging structure (2MB)
#define ADDRMASK_EPT_PML2_INDEX(_VAR_) ((_VAR_ & 0x3FE00000ULL) >> 21)

// Index of the 3rd paging structure (1GB)
#define ADDRMASK_EPT_PML3_INDEX(_VAR_) ((_VAR_ & 0x7FC0000000ULL) >> 30)

// Index of the 4th paging structure (512GB)
#define ADDRMASK_EPT_PML4_INDEX(_VAR_) ((_VAR_ & 0xFF8000000000ULL) >> 39)
After finding the indexes, we have to find the virtual address to that index so we can modify the page table. It’s because in protected mode we can’t access physical addresses.
The following code, first finds the indexes then return the virtual address from the EPT Page Table to that indexes.
1
2
3
4
5
6
7
8
9
10
11
12
13
14
15
16
17
18
19
/* Get the PML2 entry for this physical address. */
PEPT_PML2_ENTRY EptGetPml2Entry(PVMM_EPT_PAGE_TABLE EptPageTable, SIZE_T PhysicalAddress)
{
	SIZE_T Directory, DirectoryPointer, PML4Entry;
	PEPT_PML2_ENTRY PML2;

	Directory = ADDRMASK_EPT_PML2_INDEX(PhysicalAddress);
	DirectoryPointer = ADDRMASK_EPT_PML3_INDEX(PhysicalAddress);
	PML4Entry = ADDRMASK_EPT_PML4_INDEX(PhysicalAddress);

	// Addresses above 512GB are invalid because it is > physical address bus width
	if (PML4Entry > 0)
	{
		return NULL;
	}

	PML2 = &EptPageTable->PML2[DirectoryPointer][Directory];
	return PML2;
}
Finding PML1 entry
For PML1, we have the same approach. First, we find the PML2 the same as above. Then we check to see if the PML2 is split or not. It’s because if it’s not split before then we don’t have PML1 and it’s 3-level paging.
Finally, as we saved physical addresses contiguously, so we can find the index using ADDRMASK_EPT_PML1_INDEX (as defined above) and then return the virtual address to that page entry.
1
2
3
4
5
6
7
8
9
10
11
12
13
14
15
16
17
18
19
20
21
22
23
24
25
26
27
28
29
30
31
32
33
34
35
36
37
38
39
40
41
42
43
/* Get the PML1 entry for this physical address if the page is split. Return NULL if the address is invalid or the page wasn't already split. */
PEPT_PML1_ENTRY EptGetPml1Entry(PVMM_EPT_PAGE_TABLE EptPageTable, SIZE_T PhysicalAddress)
{
	SIZE_T Directory, DirectoryPointer, PML4Entry;
	PEPT_PML2_ENTRY PML2;
	PEPT_PML1_ENTRY PML1;
	PEPT_PML2_POINTER PML2Pointer;

	Directory = ADDRMASK_EPT_PML2_INDEX(PhysicalAddress);
	DirectoryPointer = ADDRMASK_EPT_PML3_INDEX(PhysicalAddress);
	PML4Entry = ADDRMASK_EPT_PML4_INDEX(PhysicalAddress);

	// Addresses above 512GB are invalid because it is > physical address bus width
	if (PML4Entry > 0)
	{
		return NULL;
	}

	PML2 = &EptPageTable->PML2[DirectoryPointer][Directory];

	// Check to ensure the page is split
	if (PML2->LargePage)
	{
		return NULL;
	}

	// Conversion to get the right PageFrameNumber.
	// These pointers occupy the same place in the table and are directly convertable.
	PML2Pointer = (PEPT_PML2_POINTER)PML2;

	// If it is, translate to the PML1 pointer
	PML1 = (PEPT_PML1_ENTRY)PhysicalAddressToVirtualAddress((PVOID)(PML2Pointer->PageFrameNumber * PAGE_SIZE));

	if (!PML1)
	{
		return NULL;
	}

	// Index into PML1 for that address
	PML1 = &PML1[ADDRMASK_EPT_PML1_INDEX(PhysicalAddress)];

	return PML1;
}
Splitting 2 MB Pages to 4 KB Pages
As you know, in all of our hypervisor parts we used 3 LEVEL paging (PML4, PML3, PML2) and our granularity is 2 MB. Having pages with 2 MB granularity is not adequate for monitoring purposes because we might get lots of unrelated violations caused by non-relevant areas.
To fix these kind of problems, we use PML1 and 4 KB granularity.
This is where we might need an additional buffer and as we’re in vmx root-mode, then we’ll use our previously allocated buffers.
First, we get the actual entry from PML2 and check if it’s already a 4 KB defined table, if it previously split then nothing to do, we can use it.
1
2
3
4
5
6
7
8
9
10
11
12
13
14
	// Find the PML2 entry that's currently used
	TargetEntry = EptGetPml2Entry(EptPageTable, PhysicalAddress);
	if (!TargetEntry)
	{
		LogError("An invalid physical address passed");
		return FALSE;
	}

	// If this large page is not marked a large page, that means it's a pointer already.
	// That page is therefore already split.
	if (!TargetEntry->LargePage)
	{
		return TRUE;
	}
If not, we set PreAllocatedMemoryDetails’s PreAllocatedBuffer to null so that next time the pre-allocator allocates a new buffer for this purpose.
1
2
	// Free previous buffer
	GuestState[CoreIndex].PreAllocatedMemoryDetails.PreAllocatedBuffer = NULL;
Then, we should fill the PML1 with an RWX template and then split our 2 MB page into 4 KB chunks (compute 4 KB physical addresses and fill the PageFrameNumber).
1
2
3
4
5
6
7
8
9
10
11
12
13
14
15
16
17
18
19
	// Point back to the entry in the dynamic split for easy reference for which entry that dynamic split is for.
	NewSplit->Entry = TargetEntry;

	// Make a template for RWX
	EntryTemplate.Flags = 0;
	EntryTemplate.ReadAccess = 1;
	EntryTemplate.WriteAccess = 1;
	EntryTemplate.ExecuteAccess = 1;

	// Copy the template into all the PML1 entries
	__stosq((SIZE_T*)&NewSplit->PML1[0], EntryTemplate.Flags, VMM_EPT_PML1E_COUNT);


	// Set the page frame numbers for identity mapping.
	for (EntryIndex = 0; EntryIndex < VMM_EPT_PML1E_COUNT; EntryIndex++)
	{
		// Convert the 2MB page frame number to the 4096 page entry number plus the offset into the frame.
		NewSplit->PML1[EntryIndex].PageFrameNumber = ((TargetEntry->PageFrameNumber * SIZE_2_MB) / PAGE_SIZE) + EntryIndex;
	}
Finally, create a new PML2 entry (with LargePage = 0) and replace it with the previous PML2 entry.
Also keep the track of allocated memory to de-allocate it when we want to run vmxoff.
1
2
3
4
5
6
7
8
9
10
11
12
	// Allocate a new pointer which will replace the 2MB entry with a pointer to 512 4096 byte entries.
	NewPointer.Flags = 0;
	NewPointer.WriteAccess = 1;
	NewPointer.ReadAccess = 1;
	NewPointer.ExecuteAccess = 1;
	NewPointer.PageFrameNumber = (SIZE_T)VirtualAddressToPhysicalAddress(&NewSplit->PML1[0]) / PAGE_SIZE;

	// Add our allocation to the linked list of dynamic splits for later deallocation
	InsertHeadList(&EptPageTable->DynamicSplitList, &NewSplit->DynamicSplitList);

	// Now, replace the entry in the page table with our new split pointer.
	RtlCopyMemory(TargetEntry, &NewPointer, sizeof(NewPointer));
The following function represent the full code for splitting 2 MB pages to 4 KB pages.
1
2
3
4
5
6
7
8
9
10
11
12
13
14
15
16
17
18
19
20
21
22
23
24
25
26
27
28
29
30
31
32
33
34
35
36
37
38
39
40
41
42
43
44
45
46
47
48
49
50
51
52
53
54
55
56
57
58
59
60
61
62
63
64
65
66
67
68
69
70
71
72
73
/* Split 2MB (LargePage) into 4kb pages */
BOOLEAN EptSplitLargePage(PVMM_EPT_PAGE_TABLE EptPageTable, PVOID PreAllocatedBuffer, SIZE_T PhysicalAddress, ULONG CoreIndex)
{

	PVMM_EPT_DYNAMIC_SPLIT NewSplit;
	EPT_PML1_ENTRY EntryTemplate;
	SIZE_T EntryIndex;
	PEPT_PML2_ENTRY TargetEntry;
	EPT_PML2_POINTER NewPointer;

	// Find the PML2 entry that's currently used
	TargetEntry = EptGetPml2Entry(EptPageTable, PhysicalAddress);
	if (!TargetEntry)
	{
		LogError("An invalid physical address passed");
		return FALSE;
	}

	// If this large page is not marked a large page, that means it's a pointer already.
	// That page is therefore already split.
	if (!TargetEntry->LargePage)
	{
		return TRUE;
	}

	// Free previous buffer
	GuestState[CoreIndex].PreAllocatedMemoryDetails.PreAllocatedBuffer = NULL;

	// Allocate the PML1 entries
	NewSplit = (PVMM_EPT_DYNAMIC_SPLIT)PreAllocatedBuffer;
	if (!NewSplit)
	{
		LogError("Failed to allocate dynamic split memory");
		return FALSE;
	}
	RtlZeroMemory(NewSplit, sizeof(VMM_EPT_DYNAMIC_SPLIT));


	// Point back to the entry in the dynamic split for easy reference for which entry that dynamic split is for.
	NewSplit->Entry = TargetEntry;

	// Make a template for RWX
	EntryTemplate.Flags = 0;
	EntryTemplate.ReadAccess = 1;
	EntryTemplate.WriteAccess = 1;
	EntryTemplate.ExecuteAccess = 1;

	// Copy the template into all the PML1 entries
	__stosq((SIZE_T*)&NewSplit->PML1[0], EntryTemplate.Flags, VMM_EPT_PML1E_COUNT);


	// Set the page frame numbers for identity mapping.
	for (EntryIndex = 0; EntryIndex < VMM_EPT_PML1E_COUNT; EntryIndex++)
	{
		// Convert the 2MB page frame number to the 4096 page entry number plus the offset into the frame.
		NewSplit->PML1[EntryIndex].PageFrameNumber = ((TargetEntry->PageFrameNumber * SIZE_2_MB) / PAGE_SIZE) + EntryIndex;
	}

	// Allocate a new pointer which will replace the 2MB entry with a pointer to 512 4096 byte entries.
	NewPointer.Flags = 0;
	NewPointer.WriteAccess = 1;
	NewPointer.ReadAccess = 1;
	NewPointer.ExecuteAccess = 1;
	NewPointer.PageFrameNumber = (SIZE_T)VirtualAddressToPhysicalAddress(&NewSplit->PML1[0]) / PAGE_SIZE;

	// Add our allocation to the linked list of dynamic splits for later deallocation
	InsertHeadList(&EptPageTable->DynamicSplitList, &NewSplit->DynamicSplitList);

	// Now, replace the entry in the page table with our new split pointer.
	RtlCopyMemory(TargetEntry, &NewPointer, sizeof(NewPointer));

	return TRUE;
}
Applying the Hook
EptVmxRootModePageHook is one of the important parts of the EPT.
First, we check to prohibit calling this function from vmx root-mode when the pre-allocated buffer isn’t available.
1
2
3
4
5
6
7
	// Check whether we are in VMX Root Mode or Not
	LogicalCoreIndex = KeGetCurrentProcessorIndex();

	if (GuestState[LogicalCoreIndex].IsOnVmxRootMode && GuestState[LogicalCoreIndex].PreAllocatedMemoryDetails.PreAllocatedBuffer == NULL && HasLaunched)
	{
		return FALSE;
	}
Then we align the address as the addresses in page tables are aligned.
1
2
3
	VirtualTarget = PAGE_ALIGN(TargetFunc);

	PhysicalAddress = (SIZE_T)VirtualAddressToPhysicalAddress(VirtualTarget);
We’ll check about the granularity and split it if it’s a LargePage (more details at the next section - Splitting 2 MB Pages to 4 KB Pages ).
1
2
3
4
5
6
7
8
9
	// Set target buffer
	TargetBuffer = GuestState[LogicalCoreIndex].PreAllocatedMemoryDetails.PreAllocatedBuffer;


	if (!EptSplitLargePage(EptState->EptPageTable, TargetBuffer, PhysicalAddress, LogicalCoreIndex))
	{
		LogError("Could not split page for the address : 0x%llx", PhysicalAddress);
		return FALSE;
	}
Then find the PML1 entry of the requested page and as it’s already divided into 4 KB pages so PML1 is available.
1
2
3
4
5
6
7
8
9
10
11
12
	// Pointer to the page entry in the page table.
	TargetPage = EptGetPml1Entry(EptState->EptPageTable, PhysicalAddress);

	// Ensure the target is valid.
	if (!TargetPage)
	{
		LogError("Failed to get PML1 entry of the target address");
		return FALSE;
	}

	// Save the original permissions of the page
	OriginalEntry = *TargetPage;
Now, we change the attributes related to the PML1 entry, this the most interesting part of this function, for example, you can disable Write access to a 4 KB page, in our case, I disabled instruction execution (fetch) from the target page.
1
2
3
4
5
6
7
8
9
10
11
12
	/*
	 * Lastly, mark the entry in the table as no execute. This will cause the next time that an instruction is
	 * fetched from this page to cause an EPT violation exit. This will allow us to swap in the fake page with our
	 * hook.
	 */
	OriginalEntry.ReadAccess = 1;
	OriginalEntry.WriteAccess = 1;
	OriginalEntry.ExecuteAccess = 0;


	// Apply the hook to EPT
	TargetPage->Flags = OriginalEntry.Flags;
If we are in vmx root-mode then the TLB caches have to be invalidated.
1
2
3
4
5
6
7
8
9
	// Invalidate the entry in the TLB caches so it will not conflict with the actual paging structure.
	if (HasLaunched)
	{
		// Uncomment in order to invalidate all the contexts
		// LogInfo("INVEPT Results : 0x%x\n", InveptAllContexts());
		Descriptor.EptPointer = EptState->EptPointer.Flags;
		Descriptor.Reserved = 0;
		AsmInvept(1, &Descriptor);
	}
Done ! The hook is applied.
Handling hooked pages’ vm-exits
First, we’re trying to align the Guest Physical Address (remember from the Ept Violation that we read the GUEST_PHYSICAL_ADDRESS from Vmcs). This because we’re only able to find aligned physical addresses from our EPT Table (we don’t want to iterate over them !).
1
	PhysicalAddress = PAGE_ALIGN(GuestPhysicalAddr);
Now, as I described above, we find the PML1 entry relating to this physical address. We’re not looking for PML2 that’s because, if we reached here then we probably split 2 MB pages to 4 KB pages and we have PML1 instead of PML2.
1
2
3
4
5
6
7
8
	TargetPage = EptGetPml1Entry(EptState->EptPageTable, PhysicalAddress);

	// Ensure the target is valid.
	if (!TargetPage)
	{
		LogError("Failed to get PML1 entry for target address");
		return FALSE;
	}
Finally, we check if the violation is caused by an Execute Access (based on Exit Qualification) and the violated page has Execute Access to 0, if so, then just make the page’s entry in PML1 executable and invalidate the cache so that this modification takes effect.
Don’t forget to tell our vm-exit handler to avoid skipping the current instruction (avoid adding Instruction Length to Guest RIP) and execute it one more time as the instruction didn’t execute.
1
2
3
4
5
6
7
8
9
10
11
12
13
14
15
16
17
18
19
20
21
	// If the violation was due to trying to execute a non-executable page, that means that the currently
	// swapped in page is our original RW page. We need to swap in the hooked executable page (fake page)
	if (!ViolationQualification.EptExecutable && ViolationQualification.ExecuteAccess)
	{

		TargetPage->ExecuteAccess = 1;

		// InveptAllContexts();
		INVEPT_DESCRIPTOR Descriptor;

		Descriptor.EptPointer = EptState->EptPointer.Flags;
		Descriptor.Reserved = 0;
		AsmInvept(1, &Descriptor);

		// Redo the instruction
		GuestState[KeGetCurrentProcessorNumber()].IncrementRip = FALSE;

		LogInfo("Set the Execute Access of a page (PFN = 0x%llx) to 1", TargetPage->PageFrameNumber);

		return TRUE;
	}
All in all, we have the following handler.
1
2
3
4
5
6
7
8
9
10
11
12
13
14
15
16
17
18
19
20
21
22
23
24
25
26
27
28
29
30
31
32
33
34
35
36
37
38
39
40
41
42
43
44
45
46
47
48
49
50
51
52
53
54
55
56
57
58
59
60
61
62
63
64
/* Check if this exit is due to a violation caused by a currently hooked page. Returns FALSE
 * if the violation was not due to a page hook.
 *
 * If the memory access attempt was RW and the page was marked executable, the page is swapped with
 * the original page.
 *
 * If the memory access attempt was execute and the page was marked not executable, the page is swapped with
 * the hooked page.
 */
BOOLEAN EptHandlePageHookExit(VMX_EXIT_QUALIFICATION_EPT_VIOLATION ViolationQualification, UINT64 GuestPhysicalAddr)
{
	SIZE_T PhysicalAddress;
	PVOID VirtualTarget;

	PEPT_PML1_ENTRY TargetPage;


	/* Translate the page from a physical address to virtual so we can read its memory.
	   This function will return NULL if the physical address was not already mapped in
	   virtual memory.
	*/
	PhysicalAddress = PAGE_ALIGN(GuestPhysicalAddr);

	if (!PhysicalAddress)
	{
		LogError("Target address could not be mapped to physical memory");
		return FALSE;
	}

	TargetPage = EptGetPml1Entry(EptState->EptPageTable, PhysicalAddress);

	// Ensure the target is valid.
	if (!TargetPage)
	{
		LogError("Failed to get PML1 entry for target address");
		return FALSE;
	}

	// If the violation was due to trying to execute a non-executable page, that means that the currently
	// swapped in page is our original RW page. We need to swap in the hooked executable page (fake page)
	if (!ViolationQualification.EptExecutable && ViolationQualification.ExecuteAccess)
	{

		TargetPage->ExecuteAccess = 1;

		// InveptAllContexts();
		INVEPT_DESCRIPTOR Descriptor;

		Descriptor.EptPointer = EptState->EptPointer.Flags;
		Descriptor.Reserved = 0;
		AsmInvept(1, &Descriptor);

		// Redo the instruction
		GuestState[KeGetCurrentProcessorNumber()].IncrementRip = FALSE;

		LogInfo("Set the Execute Access of a page (PFN = 0x%llx) to 1", TargetPage->PageFrameNumber);

		return TRUE;
	}

	LogError("Invalid page swapping logic in hooked page");

	return FALSE;
}
Invalidating Translations Derived from EPT (INVEPT)
Now that we implemented EPT, there is another problem here. It’s the software’s responsibility to invalidate the caches. For example, we changed the Execute access attribute of a particular page, now we have to tell the CPU that we changed something and it has to invalidate its cache, or in another way, we get EPT Violation for Execute access of a special page and now we no longer need these EPT Violations for this page. Hence, we set the Execute Access of this page to 1; thus, we have to tell our processor that we changed something in our page table. Are you confused? Let me explain it one more time.
Imagine we access the physical 0x1000, and it’ll get translated to host physical address 0x1000 (based on 1:1 mapping). Next time, if we access 0x1000, the CPU won’t send the request to the memory bus but uses cached memory instead. It’s faster. Now let’s say we changed the EPT Physical Address of a page to point to different EPT PD or change the attributes (Read, Write, Execute) of one of the EPT tables, now we have to tell the processor that your cache is invalid and that’s what exactly INVEPT performs.
There is a problem here; we have to separately tell each logical core that it needs to invalidate its EPT cache. In other words, each core has to execute INVEPT on its vmx root-mode. We’ll solve these problems later in this part.
There are two types of TLB Invalidation for hypervisors.
VMX-specific TLB-management instructions:
INVEPT - Invalidate cached Extended Page Table (EPT) mappings in the processor to synchronize address translation in virtual machines with memory-resident EPT pages.
INVVPID - Invalidate cached mappings of address translation based on the Virtual Processor ID (VPID).
We’ll talk about INVVPID in detail in part 8.
So in case if you wouldn’t perform INVEPT after changing EPT’s structures, you would be risking that the CPU would reuse old translations.
Any change to EPT structure needs INVEPT, but switching EPT (or VMCS) doesn’t require INVEPT because that translation will be “tagged” with the changed EPTP in the cache.
Now we have two terms here, Single-Context and All-Context.
1
2
3
4
5
typedef enum _INVEPT_TYPE
{
	SINGLE_CONTEXT = 0x00000001,
	ALL_CONTEXTS = 0x00000002
};
And we have a assembly function which generally executes the INVEPT.
1
2
3
4
5
6
7
8
9
10
11
12
13
14
15
16
17
18
19
20
21
22
; Error codes :
    VMX_ERROR_CODE_SUCCESS              = 0
    VMX_ERROR_CODE_FAILED_WITH_STATUS   = 1
    VMX_ERROR_CODE_FAILED               = 2

AsmInvept PROC PUBLIC

    invept  rcx, oword ptr [rdx]
    jz @jz
    jc @jc
    xor     rax, rax
    ret

    @jz:
    mov     rax, VMX_ERROR_CODE_FAILED_WITH_STATUS
    ret

    @jc:
    mov     rax, VMX_ERROR_CODE_FAILED
    ret

AsmInvept ENDP
From the above code, RCX describes the Type (which can be one of the all-context and single-context), and RDX is the descriptor for INVEPT.
The following structure is the descriptor for INVEPT as described in Intel SDM.
1
2
3
4
5
typedef struct _INVEPT_DESC
{
	EPTP EptPointer;
	UINT64  Reserveds;
}INVEPT_DESC, * PINVEPT_DESC;
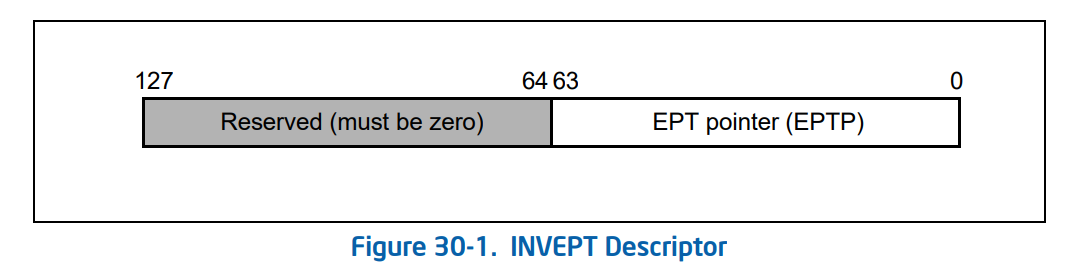
We’ll use our assembly function in another function called Invept.
1
2
3
4
5
6
7
8
9
10
11
/* Invoke the Invept instruction */
unsigned char Invept(UINT32 Type, INVEPT_DESC* Descriptor)
{
	if (!Descriptor)
	{
		INVEPT_DESC ZeroDescriptor = { 0 };
		Descriptor = &ZeroDescriptor;
	}

	return AsmInvept(Type, Descriptor);
}
It’s time to see what are so called “All-Context“and “Single-Context”.
Invalidating All Contexts
All-Context means that you invalidate all EPT-derived translations. (for every-VM).
1
2
3
4
5
/* Invalidates all contexts in ept cache table */
unsigned char InveptAllContexts()
{
	return Invept(ALL_CONTEXTS, NULL);
}
Note: For every-VM, I mean every VM for a particular logical core; each core can have multiple VMCSs and EPT tables and switches between them. It doesn’t relate to the EPT table on other cores.
Invalidating Single Context
Single-Context means that you invalidate all EPT-derived translations based on a single EPTP (in short: for a single VM in a logical core).
1
2
3
4
5
6
/* Invalidates a single context in ept cache table */
unsigned char InveptSingleContext(UINT64 EptPointer)
{
	INVEPT_DESC Descriptor = { EptPointer, 0 };
	return Invept(SINGLE_CONTEXT, &Descriptor);
}
Broadcasting Invept to all logical cores simultaneously
Let say you have two cores and 1 EPTP. At some point you change EPT on core one; thus you have to invalidate EPT on all cores at that point. If you remember from the previous section, we have to notify all cores to invalidate their EPT caches using something like KeIpiGenericCall, and the problem is you can’t call KeIpiGenericCall from VM-exit for apparent reasons - you shouldn’t call any NT APIs in Vm-exit. Calling this API from Vm-exit likely causes deadlock.
We can get around this by modifying APIC and creating our custom IPI call routine. We’ll come across APIC virtualization in the future parts. Still, for now, if we want to change EPT for all cores, then we can call KeIpiGenericCall from regular kernel-mode (not vmx root-mode) and in that callback we perform Vmcall to tell our processor to invalidate its cache in vmx root-mode.
It’s because if we don’t immediately invalidate EPT, then we might lose some EPT Violations. This is because each logical core will have a different memory view.
If you remember from the above sections (EptPageHook), we’d checked whether the core is already on vmx operation (vmlaunch is executed). If it launched, then we used Vmcall to tell the processor about modifying EPT Table from the vmx root-mode. Right after returning from Vmcall, we called HvNotifyAllToInvalidateEpt to tell all the cores about new invalidation in their EPT caches (remember, we’re not on vmx root-mode anymore, we’re in vmx non-root mode so we can use NT APIs as it’s a regular kernel function).
1
2
3
4
5
6
7
8
9
10
11
12
	if (HasLaunched)
	{
		if (AsmVmxVmcall(VMCALL_EXEC_HOOK_PAGE, TargetFunc, NULL, NULL, NULL) == STATUS_SUCCESS)
		{
			LogInfo("Hook applied from VMX Root Mode");

			// Now we have to notify all the core to invalidate their EPT
			HvNotifyAllToInvalidateEpt();

			return TRUE;
		}
	}
HvNotifyAllToInvalidateEpt, on the other hand, uses KeIpiGenericCall, and this function broadcasts HvInvalidateEptByVmcall on all the logical cores and also pass our current EPTP to this function.
1
2
3
4
5
6
/* Notify all core to invalidate their EPT */
VOID HvNotifyAllToInvalidateEpt()
{
	// Let's notify them all
	KeIpiGenericCall(HvInvalidateEptByVmcall, EptState->EptPointer.Flags);
}
HvInvalidateEptByVmcall decides whether the caller needs an all-contexts invalidation or a single-context invalidation, and based on that, it calls the Vmcall with adequate Vmcall number. Note that our hypervisor doesn’t have multiple EPTPs, so it’s always a single-context Vmcall.
1
2
3
4
5
6
7
8
9
10
11
12
13
14
/* Invalidate EPT using Vmcall (should be called from Vmx non root mode) */
VOID HvInvalidateEptByVmcall(UINT64 Context)
{
	if (Context == NULL)
	{
		// We have to invalidate all contexts
		AsmVmxVmcall(VMCALL_INVEPT_ALL_CONTEXT, NULL, NULL, NULL);
	}
	else
	{
		// We have to invalidate all contexts
		AsmVmxVmcall(VMCALL_INVEPT_SINGLE_CONTEXT, Context, NULL, NULL);
	}
}
Finally, Vmcall handler calls InveptAllContexts or HvInvalidateEptByVmcall based on Vmcall number in vmx root-mode.
1
2
3
4
5
6
7
8
9
10
11
12
	case VMCALL_INVEPT_SINGLE_CONTEXT:
	{
		c(OptionalParam1);
		VmcallStatus = STATUS_SUCCESS;
		break;
	}
	case VMCALL_INVEPT_ALL_CONTEXT:
	{
		InveptAllContexts();
		VmcallStatus = STATUS_SUCCESS;
		break;
	}
The last thing is you can’t execute INVEPT in vmx non-root mode as it causes a Vm-exit with EXIT_REASON_INVEPT (0x32) and it doesn’t have any effect.
That’s it all for INVEPT.

Fixing Previous Design Issues
The rest of the topic is nothing new. We want to improve our hypervisor and fix some issues from the previous parts and also support some new features and defeat some deadlocks and synchronization problems that exist in our previous parts.
Support to more than 64 logical cores
Previous versions of Hypervisor From Scratch has the problem of not supporting more than 32 cores (32*2 logical cores). This is because we used KeSetSystemAffinityThread, and it gives a KAFFINITY as its argument, and it’s a 64 Bit long variable mask.
We used KeSetSystemAffinityThread when we broadcast Vmptrld, Vmclear, VMCS Setup (Vmwrite), Vmlaunch, and Vmxoff to all cores.
The best approach to run on all logical cores is letting Windows (API) execute them on each core simultaneously. This involves raising IRQL on each core.
We have different options here; first, we can use KeGenericCallDpc. It’s an undocumented function which schedules CPU-specific DPCs on all CPUs.
The definition of KeGenericCallDpc is as bellow.
1
2
3
4
KeGenericCallDpc(
	_In_ PKDEFERRED_ROUTINE Routine,
	_In_opt_ PVOID Context
);
The first argument is the address of the target function, which we want to execute on each core, and context is an optional parameter to this function.
In the target function, we call KeSignalCallDpcSynchronize and KeSignalCallDpcDone to avoid synchronization problems so that all the cores finish at the same time.
KeSignalCallDpcSynchronize waits for all DPCs to synchronize at that point (where we call KeSignalCallDpcSynchronize).
1
2
3
4
LOGICAL
KeSignalCallDpcSynchronize(
	_In_ PVOID SystemArgument2
);
Finally, KeSignalCallDpcDone marks the DPC as being complete.
1
2
3
4
VOID
KeSignalCallDpcDone(
	_In_ PVOID SystemArgument1
);
The above two functions have to be executed as the last step (when everything completes) in the target function.
Another option is using KeIpiGenericCall, this routine causes the specified function to run on all processors simultaneously, and it’s documented. I used the first approach in Hypervisor From Scratch, and these updates are applied to both the initialization phase and the Vmxoff phase.
Synchronization problem in exiting VMX
As we now support more than 64 logical cores using DPCs, and as most of the functions are executed simultaneously, we have some problems with our previously designed routines. For example, in the previous parts, I used gGuestRSP and gGuestRIP to return to the former state. Using one global variable on all cores causes errors as one core might save its RIP and RSP (core 1), then other core (core 2) keeps the same data in these variables, When the first core (core 1) tries to restore the state, it’s the state of second core (core 2), and you’ll see a BSOD :D .
In order to solve this problem, we have to store a per-core structure which saves the Guest RIP and Guest RSP. The following structure is used for this purpose.
1
2
3
4
5
6
7
typedef struct _VMX_VMXOFF_STATE
{
	BOOLEAN IsVmxoffExecuted;					// Shows whether the VMXOFF executed or not
	UINT64  GuestRip;							// Rip address of guest to return
	UINT64  GuestRsp;							// Rsp address of guest to return

} VMX_VMXOFF_STATE, * PVMX_VMXOFF_STATE;
We add the above structure to VIRTUAL_MACHINE_STATE as it’s a per-core structure.
1
2
3
4
5
6
typedef struct _VIRTUAL_MACHINE_STATE
{
...
	VMX_VMXOFF_STATE VmxoffState;									// Shows the vmxoff state of the guest
...
} VIRTUAL_MACHINE_STATE, * PVIRTUAL_MACHINE_STATE;
We need to broadcast Vmxoff to all of the logical cores. This is done by using the HvTerminateVmx; this function is called once and broadcast HvDpcBroadcastTerminateGuest to all logical cores and de-allocates (free) all the EPT related tables and pre-allocated buffers.
1
2
3
4
5
6
7
8
9
10
11
12
13
14
15
16
17
18
19
20
21
22
23
/* Terminate Vmx on all logical cores. */
VOID HvTerminateVmx()
{
	// Broadcast to terminate Vmx
	KeGenericCallDpc(HvDpcBroadcastTerminateGuest, 0x0);

	/* De-allocatee global variables */

	// Free each split
	FOR_EACH_LIST_ENTRY(EptState->EptPageTable, DynamicSplitList, VMM_EPT_DYNAMIC_SPLIT, Split)
		ExFreePoolWithTag(Split, POOLTAG);
	FOR_EACH_LIST_ENTRY_END();

	// Free Identity Page Table
	MmFreeContiguousMemory(EptState->EptPageTable);

	// Free GuestState
	ExFreePoolWithTag(GuestState, POOLTAG);

	// Free EptState
	ExFreePoolWithTag(EptState, POOLTAG);

}
HvDpcBroadcastTerminateGuest is responsible for synchronizing DPCs and calling a VMX function call VmxTerminate.
1
2
3
4
5
6
7
8
9
10
11
12
13
14
15
/* The broadcast function which terminate the guest. */
VOID HvDpcBroadcastTerminateGuest(struct _KDPC* Dpc, PVOID DeferredContext, PVOID SystemArgument1, PVOID SystemArgument2)
{
	// Terminate Vmx using Vmcall
	if (!VmxTerminate())
	{
		LogError("There were an error terminating Vmx");
	}

	// Wait for all DPCs to synchronize at this point
	KeSignalCallDpcSynchronize(SystemArgument2);

	// Mark the DPC as being complete
	KeSignalCallDpcDone(SystemArgument1);
}
VmxTerminate de-allocates per-core allocated regions like the Vmxon region, Vmcs region, Vmm Stack, and Msr Bitmap. As we implemented our Vmcall mechanism, we can use Vmcall to request a vmxoff from the vmx root mode (instead of what we’ve done in the previous version with CPUID Handler). So it executes AsmVmxVmcall with VMCALL_VMXOFF on each core, and each core will run vmxoff separately.
1
2
3
4
5
6
7
8
9
10
11
12
13
14
15
16
17
18
19
20
21
22
23
24
25
26
27
/* Broadcast to terminate VMX on all logical cores */
BOOLEAN VmxTerminate()
{
	int CurrentCoreIndex;
	NTSTATUS Status;

	// Get the current core index
	CurrentCoreIndex = KeGetCurrentProcessorNumber();

	LogInfo("\tTerminating VMX on logical core %d", CurrentCoreIndex);

	// Execute Vmcall to to turn off vmx from Vmx root mode
	Status = AsmVmxVmcall(VMCALL_VMXOFF, NULL, NULL, NULL);

	// Free the destination memory
	MmFreeContiguousMemory(GuestState[CurrentCoreIndex].VmxonRegionVirtualAddress);
	MmFreeContiguousMemory(GuestState[CurrentCoreIndex].VmcsRegionVirtualAddress);
	ExFreePoolWithTag(GuestState[CurrentCoreIndex].VmmStack, POOLTAG);
	ExFreePoolWithTag(GuestState[CurrentCoreIndex].MsrBitmapVirtualAddress, POOLTAG);

	if (Status == STATUS_SUCCESS)
	{
		return TRUE;
	}

	return FALSE;
}
Our Vmcall handler calls VmxVmxoff, and as this function is executed under vmx root-mode, so it’s allowed to run VMXOFF. This function also saves the GuestRip and GuestRsp into the per-core VMX_VMXOFF_STATE structure. This is where we solved the problem as we’re not using a shared global variable anymore. It also sets IsVmxoffExecuted, which indicates whether the logical core is on VMX operation or it left the VMX operation by executing VMXOFF.
The VmxVmxoff is implemented like this :
1
2
3
4
5
6
7
8
9
10
11
12
13
14
15
16
17
18
19
20
21
22
23
24
25
26
27
28
29
30
31
32
33
34
35
36
37
38
39
40
41
42
43
44
45
46
47
48
49
50
/* Prepare and execute Vmxoff instruction */
VOID VmxVmxoff()
{
	int CurrentProcessorIndex;
	UINT64 GuestRSP; 	// Save a pointer to guest rsp for times that we want to return to previous guest stateS
	UINT64 GuestRIP; 	// Save a pointer to guest rip for times that we want to return to previous guest state
	UINT64 GuestCr3;
	UINT64 ExitInstructionLength;


	// Initialize the variables
	ExitInstructionLength = 0;
	GuestRIP = 0;
	GuestRSP = 0;

	CurrentProcessorIndex = KeGetCurrentProcessorNumber();

	/*
	According to SimpleVisor :
		Our callback routine may have interrupted an arbitrary user process,
		and therefore not a thread running with a system-wide page directory.
		Therefore if we return back to the original caller after turning off
		VMX, it will keep our current "host" CR3 value which we set on entry
		to the PML4 of the SYSTEM process. We want to return back with the
		correct value of the "guest" CR3, so that the currently executing
		process continues to run with its expected address space mappings.
	*/

	__vmx_vmread(GUEST_CR3, &GuestCr3);
	__writecr3(GuestCr3);

	// Read guest rsp and rip
	__vmx_vmread(GUEST_RIP, &GuestRIP);
	__vmx_vmread(GUEST_RSP, &GuestRSP);

	// Read instruction length
	__vmx_vmread(VM_EXIT_INSTRUCTION_LEN, &ExitInstructionLength);
	GuestRIP += ExitInstructionLength;

	// Set the previous registe states
	GuestState[CurrentProcessorIndex].VmxoffState.GuestRip = GuestRIP;
	GuestState[CurrentProcessorIndex].VmxoffState.GuestRsp = GuestRSP;

	// Notify the Vmexit handler that VMX already turned off
	GuestState[CurrentProcessorIndex].VmxoffState.IsVmxoffExecuted = TRUE;

	// Execute Vmxoff
	__vmx_off();

}
As we return to vm-exit handler, we check whether we left the VMX opeation or not.
1
2
3
4
	if (GuestState[CurrentProcessorIndex].VmxoffState.IsVmxoffExecuted)
	{
		return TRUE;
	}
We also define two other functions called “HvReturnStackPointerForVmxoff” and “HvReturnInstructionPointerForVmxoff”, which find the logical core index and returns the corresponding stack pointer and RIP to return.
HvReturnStackPointerForVmxoff is :
1
2
3
4
5
/* Returns the stack pointer, to change in the case of Vmxoff */
UINT64 HvReturnStackPointerForVmxoff()
{
	return GuestState[KeGetCurrentProcessorNumber()].VmxoffState.GuestRsp;
}
And HvReturnInstructionPointerForVmxoff is:
1
2
3
4
5
/* Returns the instruction pointer, to change in the case of Vmxoff */
UINT64 HvReturnInstructionPointerForVmxoff()
{
	return GuestState[KeGetCurrentProcessorNumber()].VmxoffState.GuestRip;
}
Eventually, when we detect that we left the vmx operation, instead of executing VMRESUME we’ll run AsmVmxoffHandler, this function calls the HvReturnStackPointerForVmxoff and HvReturnInstructionPointerForVmxoff and puts the value of RSP and RIP after the general-purpose registers thus when we restore the general-purpose registers, we can pop the RSP from the stack and return to the previous address (ret) and continue normal execution.
1
2
3
4
5
6
7
8
9
10
11
12
13
14
15
16
17
18
19
20
21
22
23
24
25
26
27
28
29
30
31
32
33
34
35
36
37
38
39
40
41
42
43
44
45
46
47
48
49
50
51
52
53

AsmVmxoffHandler PROC

    sub rsp, 020h       ; shadow space
    call HvReturnStackPointerForVmxoff
    add rsp, 020h       ; remove for shadow space

    mov [rsp+088h], rax  ; now, rax contains rsp

    sub rsp, 020h       ; shadow space
    call HvReturnInstructionPointerForVmxoff
    add rsp, 020h       ; remove for shadow space

    mov rdx, rsp        ; save current rsp

    mov rbx, [rsp+088h] ; read rsp again

    mov rsp, rbx

    push rax            ; push the return address as we changed the stack, we push
                        ; it to the new stack

    mov rsp, rdx        ; restore previous rsp

    sub rbx,08h         ; we push sth, so we have to add (sub) +8 from previous stack
                        ; also rbx already contains the rsp
    mov [rsp+088h], rbx ; move the new pointer to the current stack

	RestoreState:

	pop rax
    pop rcx
    pop rdx
    pop rbx
    pop rbp		         ; rsp
    pop rbp
    pop rsi
    pop rdi
    pop r8
    pop r9
    pop r10
    pop r11
    pop r12
    pop r13
    pop r14
    pop r15

    popfq

	pop		rsp     ; restore rsp
	ret             ; jump back to where we called Vmcall

AsmVmxoffHandler ENDP
As you can see, we no longer have the problem of using a global variable among all the cores.
The issues relating to the Meltdown mitigation
As you know, EXIT_REASON_CR_ACCESS is one of the reasons that might cause VM-Exit (Especially if you’re subject to 1-setting of CRs in your VMCS). Hypervisors used to save all the general-purpose registers every time a VM-Exit occurs and then restore it at the next VMRESUME.
In the previous versions of our driver, we ignored RSP and save some trash instead of it, that’s because RSP of guest is already saved in GUEST_RSP in VMCS. After VMRESUME, it’s loaded automatically, and you know, our current RSP is invalid (it’s host RSP).
After meltdown mitigation, Windows uses MOV CR3, RSP, and as we saved trash instead of RSP, then you change CR3 to an invalid value, and it silently crashes with TRIPLE FAULT VM-Exit. It won’t give you the exact error.

For fixing this issue, we add the following code to HvHandleControlRegisterAccess, so each time when a vm-exit occurs, we change the RSP to the correct value.
1
2
3
4
5
6
	/* Because its RSP and as we didn't save RSP correctly (because of pushes) so we have make it points to the GUEST_RSP */
	if (CrExitQualification->Fields.Register == 4)
	{
		__vmx_vmread(GUEST_RSP, &GuestRsp);
		*RegPtr = GuestRsp;
	}
Previously, this was mentioned by Alex, for more information, you can read this article.
Some tips for debugging hypervisors
Always try to test your hypervisor in a uni-core system. If it works then, you can check it on a multi-core, so when something doesn’t work on multi-core and works on uni-core, then know that it’s a synchronization problem.
Don’t try to call Nt functions in Vmx root mode. Most of NT functions are not suitable to run in a high IRQL, so if you use it, it leads to weird behavior and crashes the whole or system is halted.
For more information, I really recommend reading Hyperplatform’s User Document (4.4. Coding Tips).
Let’s Test it!
Let’s see how we can test our hypervisor,
How to test?
In order to test our new hypervisor, we have two scenarios, and the following codes show how we test our hypervisor, the codes for tests are available at (Ept.c and HypervisorRoutines.c).
In the first scenario, we want to test page hook (EptPageHook) before executing vmlaunch, which means that Ept is initialized, and then we want to put the hook before entering VMX. (the test code is on Ept.c)
1
2
3
	///////////////////////// Example Test /////////////////////////
	 EptPageHook(ExAllocatePoolWithTag, FALSE);
	///////////////////////////////////////////////////////////////
The above function puts hook on the execution of a page containing a function (in this case ExAllocatePoolWithTag).
The second scenario is we want to test both VMCALL and EptPageHook after our hypervisor is loaded, and we’re in Vmx non-root mode (the test code is on HypervisorRoutines.c).
1
2
3
4
5
6
7
8
9
10
11
12
	//  Check if everything is ok then return true otherwise false
	if (AsmVmxVmcall(VMCALL_TEST, 0x22, 0x333, 0x4444) == STATUS_SUCCESS)
	{
		///////////////// Test Hook after Vmx is launched /////////////////
		EptPageHook(ExAllocatePoolWithTag, TRUE);
		///////////////////////////////////////////////////////////////////
		return TRUE;
	}
	else
	{
		return FALSE;
	}
As you can see, it first tests the Vmcall using VMCALL_TEST and then puts the hook to a function (in this case ExAllocatePoolWithTag).
Demo
First, we load our hypervisor driver,
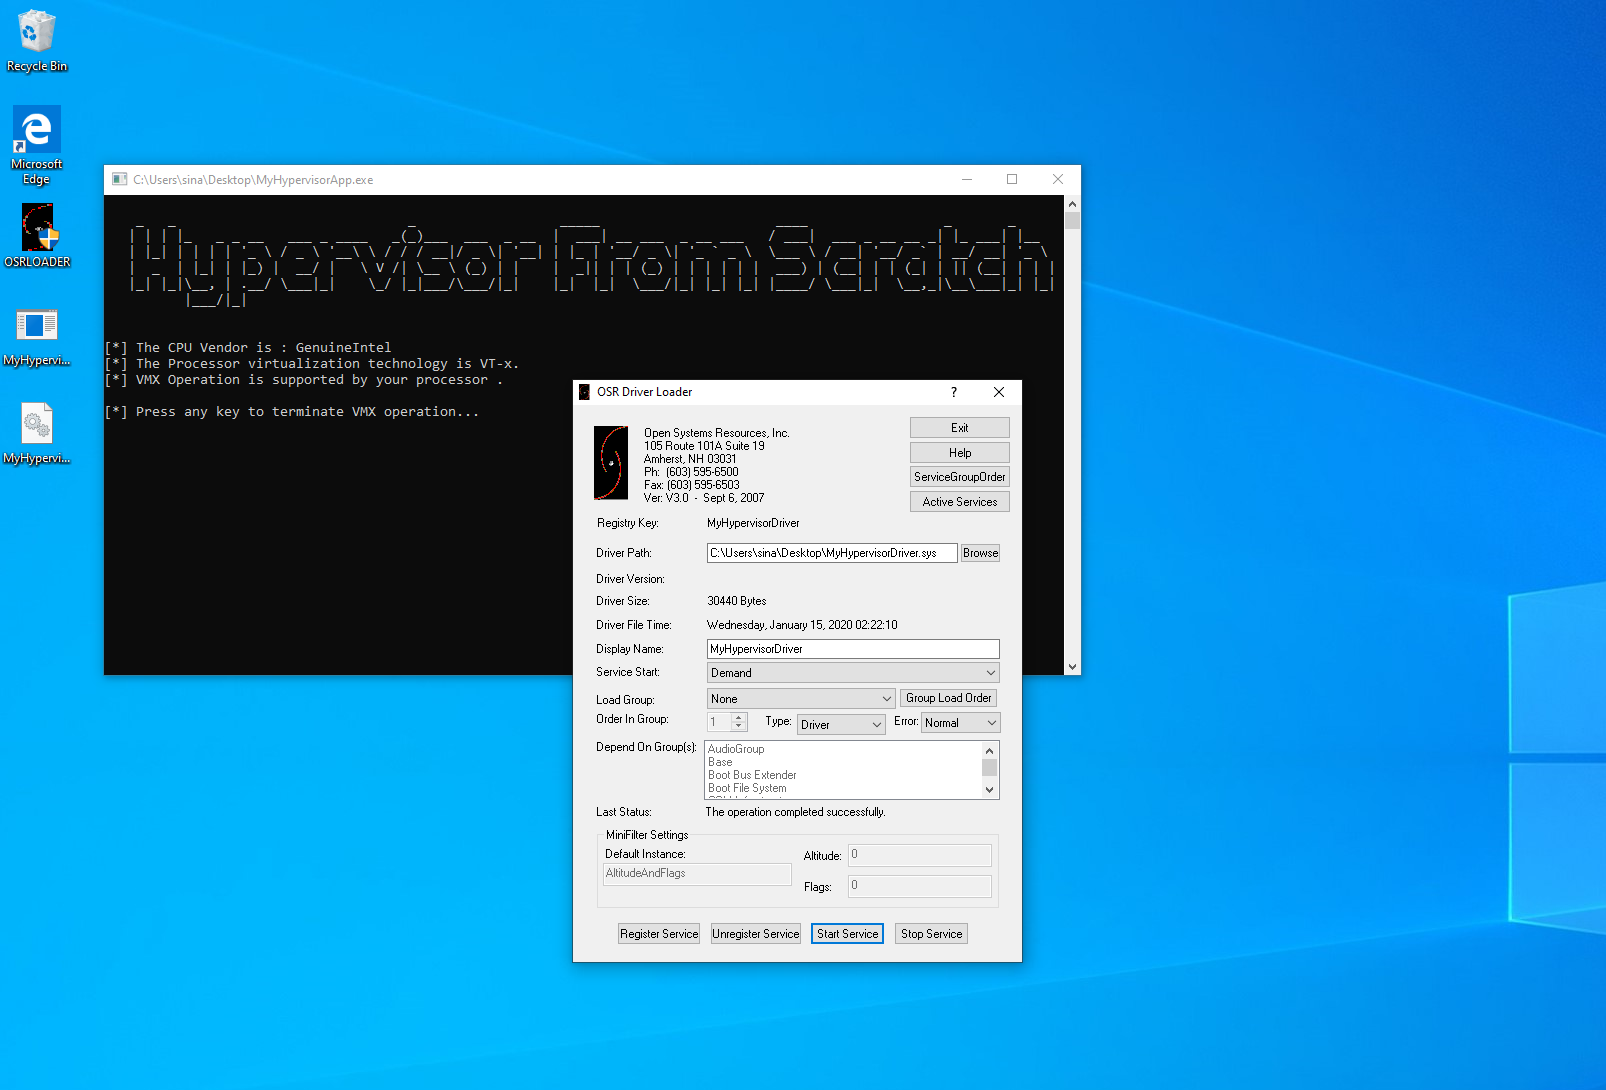
For the first scenario, you can see that we successfully notified about the execution of ExAllocatePoolWith tag after vmlaunch executed, and Guest Rip is equal to the address of ExAllocatePoolWithTag and EptHandleEptViolation is responsible for handling Ept violations.

In the second testing scenario, you can see that our VMCALL is successfully executed (green line), and we notified about the execution of a page, but wait, we put our Execute Access hook on ExAllocatePoolWithTag, but the Guest Rip is equal to ExFreePool, Why?
It turns out that ExAllocatePoolWithTag and ExFreePool are both on the same page, and ExFreePool is executed earlier than ExAllocatePoolWithTag, so we get the execution of this function.
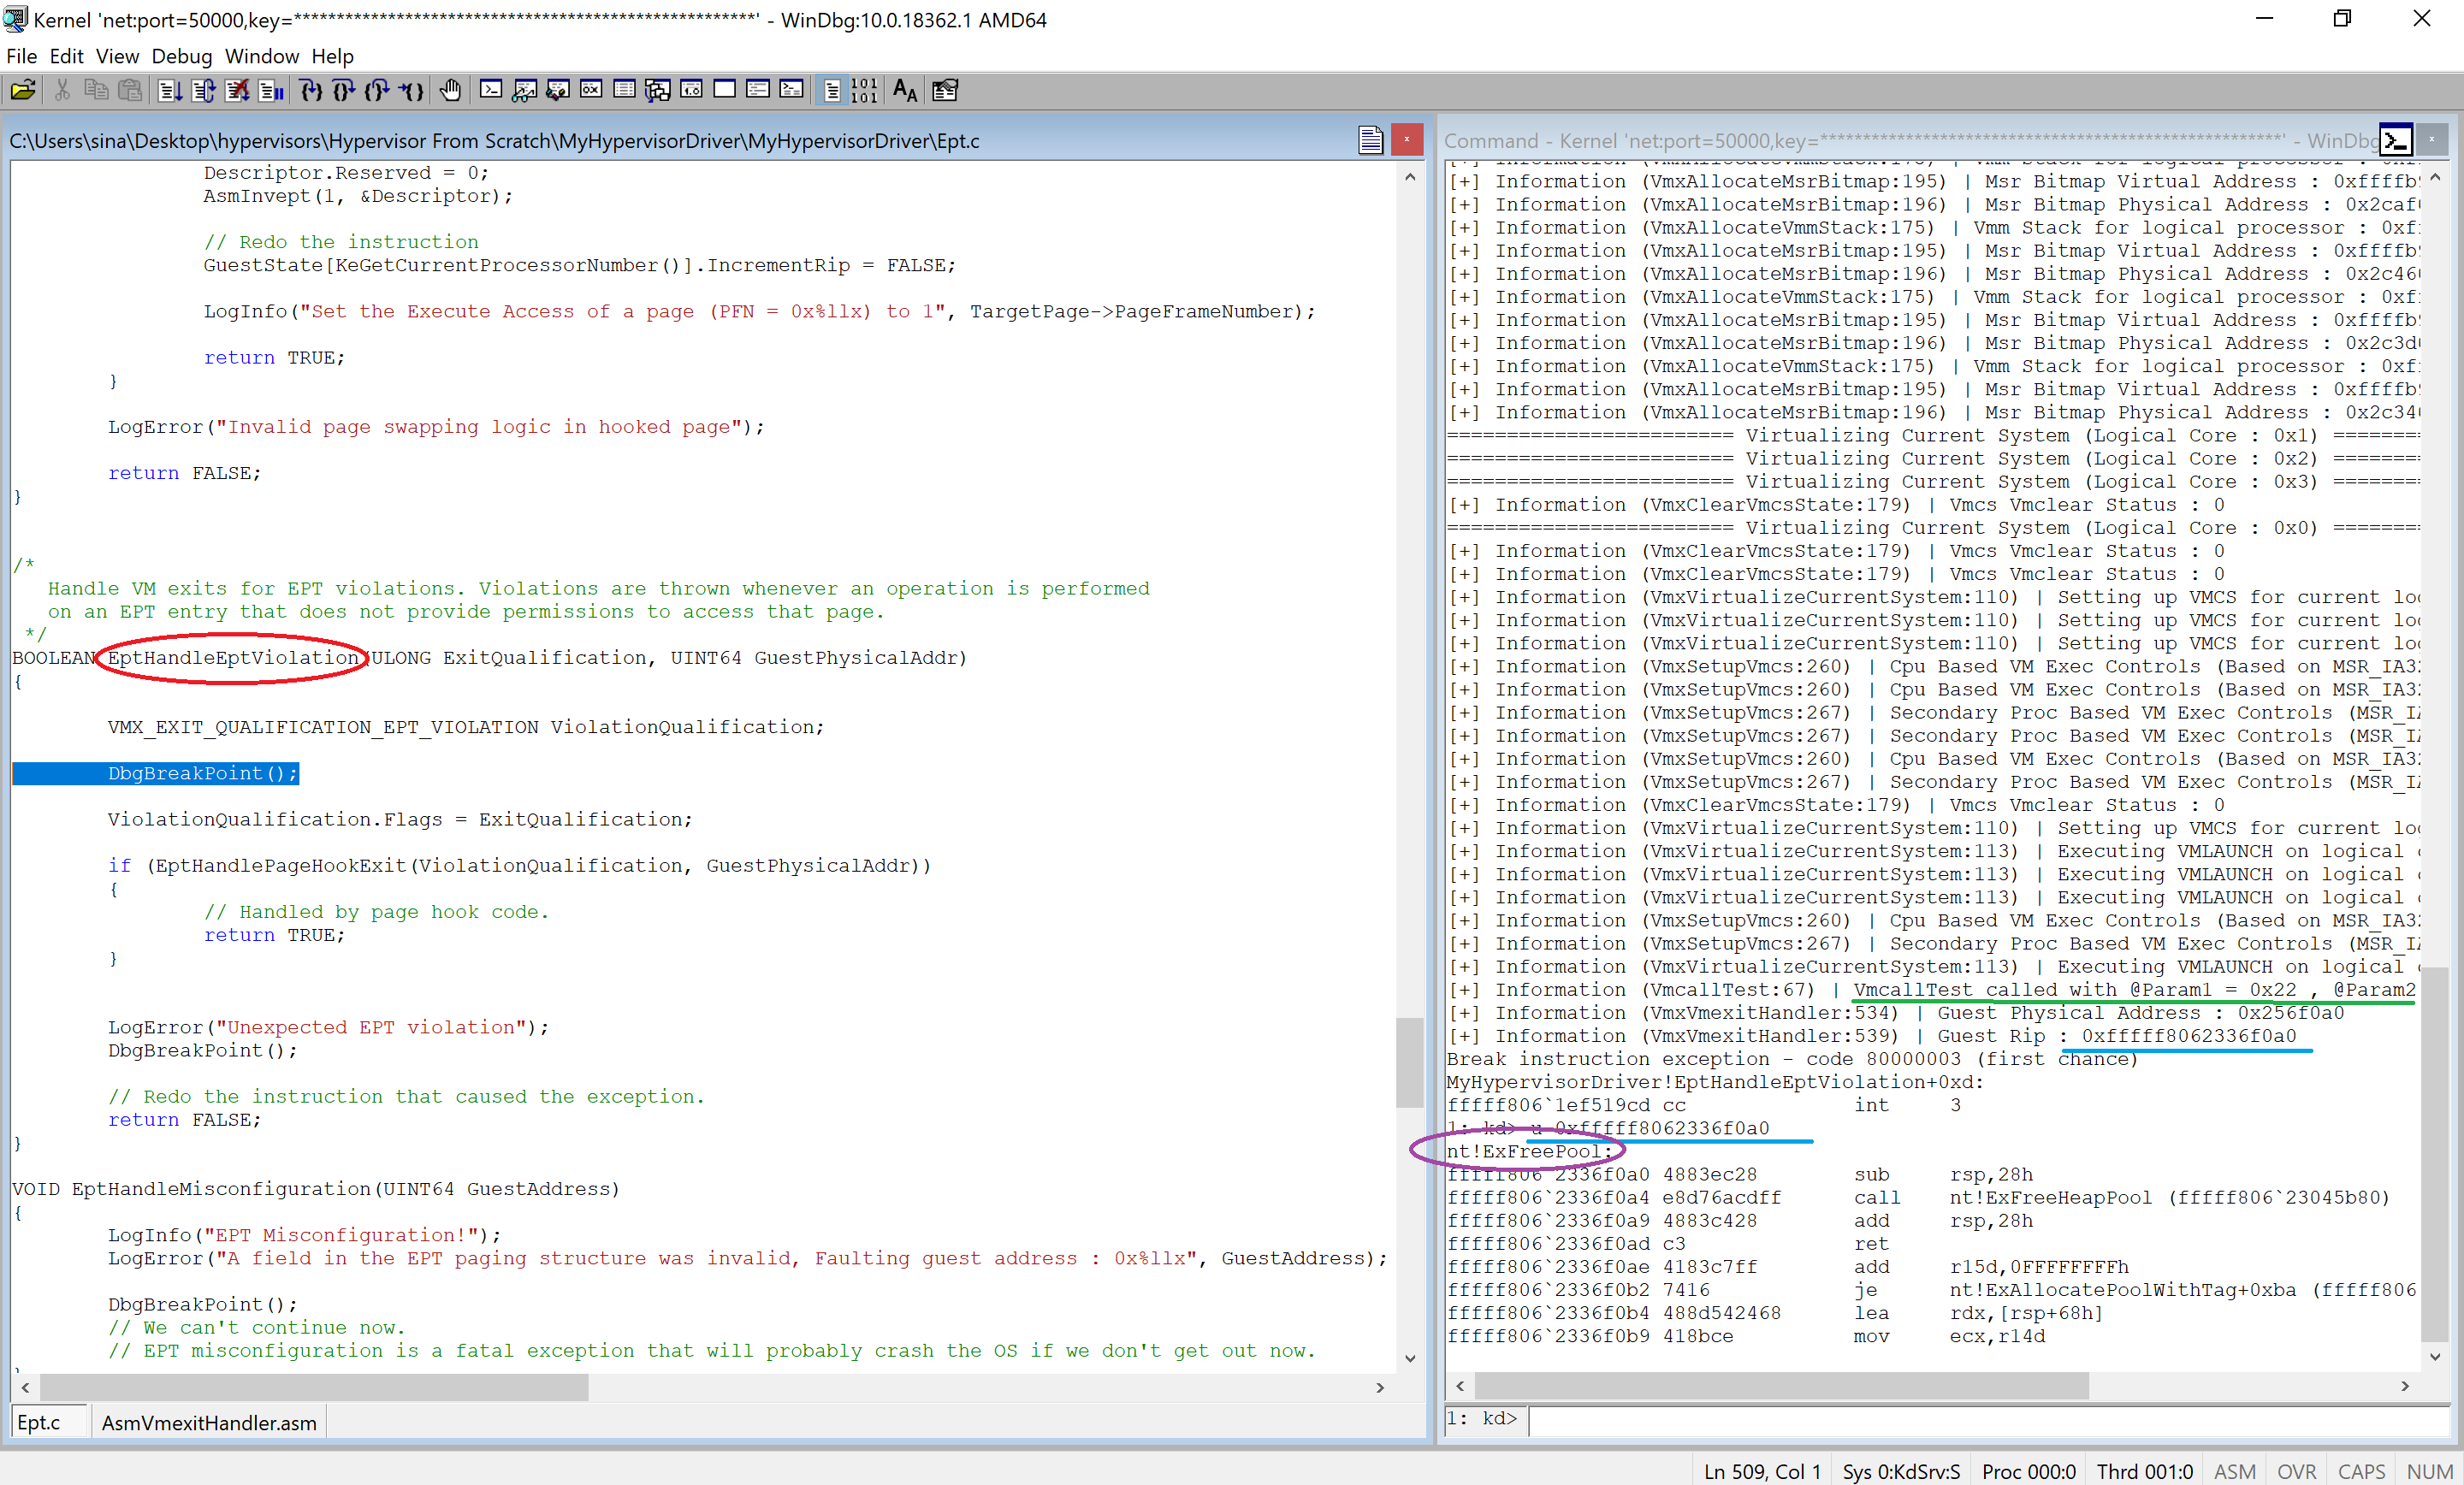
The above test results show the importance of checking Guest Rip in the EPT violation handler. We’ll talk about it in the next part.
Finally, you can see the following picture which shows whether our hook successfully applied or not.
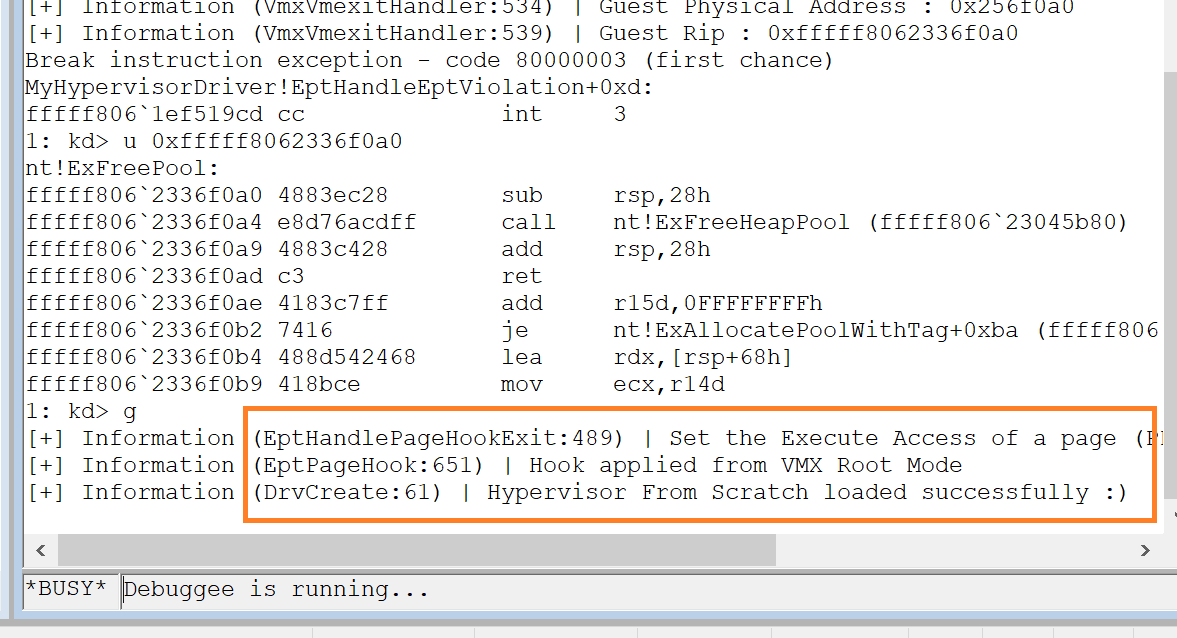
Discussion
This part is added to answer to questions about EPT, we’ll discuss different approaches and pros and cons of them. Thanks to Petr for answering these questions.
1. Why there are limitations on calling NT functions in VMX Root Mode?
It is because of paging and high IRQL. The reason is what explained here for the high IRQL and as we’re in a high IRQL in Vmx root mode then some pages(paged pools) might be paged-out.
The hypervisor can use a completely different address space than the NT kernel, I believe this is what regular hypervisors like Hyper-V/XEN do. They don’t use “identity EPT mapping”, therefore VA 0x10000 in VMX-root mode does not point to the same physical memory as 0x10000 in VMX non-root mode.
For example, let’s pick an NT function that can be called at HIGH_IRQL (MmGetPhysicalAddress). Let’s imagine this function is on virtual address 0x1234, but this virtual address points to that function in VMX non-root, in ntoskrnl address space.
The real question should be: “Why can I call some NT functions in VMX-root mode” the answer is that you set HOST_CR3 in VMCS to be the same as CR3 of the NT main System process, therefore hypervisor in vmx root-mode share the same memory view as VMX non-root mode.
It is important to know this, in practice for self-virtualizing hypervisors (like hyperplatform/hvpp), you don’t care, because as I said your HOST_CR3 is the same as NT’s CR3, therefore you can touch whatever memory you want.
If you happened to work on HyperV or XEN, you don’t have the same luxury. the hypervisor memory address space is not mapped at all in the virtualized OS (that’s quite the point of virtualization).
2. Why we shouldn’t modify EPT in VMX Non-Root?
In the ideal world, no memory of the hypervisor should be visible from the virtualized OS (you cant see XEN internals from the virtualized OS for example).
in hyperplatform/hvpp, you can see the memory of the hypervisor. Why? This time it’s not because of HOST_CR3 but because of identity EPT mapping - you set EPT tables in such a way, that the virtualized OS can see even the memory of the hypervisor itself.
My point is - in the ideal world you shouldn’t even see the EPT structures from within the VMX non-root mode, imagine it this way, can you modify regular page-tables from user-mode?
The answer is it depends. In reality? No. Why? because the page-tables are in kernel memory that is inaccessible from the user-mode. That’s the whole point of memory protection. Could you set page tables in such a way that it would be possible to modify them from user-mode? Yes, but it doesn’t mean you should though. This is sort of a security thing.
There’s one even more important reason: caches
Now you might have tried it and it worked most of the time in your case but that doesn’t mean it’s the correct approach.
3. What are the advantages of having EPT table for each processor separately?
When you change EPT structures and you want that change to be synced across CPUs, you have to perform IPI (KeIpiGenericCall) from within VMX root mode to flush caches on all CPUs.
In an ideal world, you would call KeIpiGenericCall from VMX-root mode. but you can’t - you’ll fastly end up in a deadlock. You’d need to implement your own IPI mechanism and set correctly APIC for VMX-root mode.
Now this can be done - but it would be non-trivial to implement.
When you have multiple EPTs for each CPU, you don’t have to do IPIs, each core manages its own EPT.
Now they won’t be 100% synced all the time, but if the EPT handler logic is the same for each core and doesn’t change over time, it doesn’t matter.
Conclusion
We come to the end of this part. I believe EPT is the most important feature that can be used by researchers, security programs and game hackers as it gives a unique ability to monitor the operating system and user-mode applications. In the next part, we’ll be using EPT and implement hidden hook mechanisms, which commonly used among hypervisors. Also, we’ll improve our hypervisor by using WPP Tracing instead of using DbgPrint, event injection, and a mechanism to talk from Vmx root-mode to Vmx non-root mode and finally we’ll see how to use Virtual Processor Identifier (VPID). Feel free to use the comments below to ask questions or ask for clarification.
See you guys in the next part.
The 8th part is available here.

References
[1] Memory type range register - (https://en.wikipedia.org/wiki/Memory_type_range_register)
[2] KVA Shadow: Mitigating Meltdown on Windows - (https://msrc-blog.microsoft.com/2018/03/23/kva-shadow-mitigating-meltdown-on-windows/)
[3] How to Implement a software-based SMEP(Supervisor Mode Execution Protection) with Virtualization/Hypervisor Technology - (http://hypervsir.blogspot.com/2014/11/how-to-implement-software-based.html)
[4] Vol 3A – Chapter 11 – (11.11.3 Example Base and Mask Calculations) - (https://software.intel.com/en-us/articles/intel-sdm)
[5] x86 Paging Tutorial - (https://cirosantilli.com/x86-paging)
[6] OSDev notes 2: Memory management - (http://ethv.net/workshops/osdev/notes/notes-2)
[7] Vol 3A – Chapter 11 – (11.11 MEMORY TYPE RANGE REGISTERS (MTRRS)) - (https://software.intel.com/en-us/articles/intel-sdm)
[8] Vol 3A – Chapter 11 – (11.12 PAGE ATTRIBUTE TABLE (PAT)) - (https://software.intel.com/en-us/articles/intel-sdm)
[9] HyperPlatform User Document - (https://tandasat.github.io/HyperPlatform/userdocument/)
[10] Vol 3C – Chapter 34– (34.15.2 SMM VM Exits) - (https://software.intel.com/en-us/articles/intel-sdm)
[11] Vol 3C – Chapter 34– (34.15.6 Activating the Dual-Monitor Treatment) - (https://software.intel.com/en-us/articles/intel-sdm)
[12] Windows Hotpatching: A Walkthrough - (https://jpassing.com/2011/05/03/windows-hotpatching-a-walkthrough/)
[13] Vol 3C – Chapter 28– (28.2.3.1 EPT Misconfigurations) - (https://software.intel.com/en-us/articles/intel-sdm)
[14] Vol 3C – Chapter 28– (28.2.3.2 EPT Violations) - (https://software.intel.com/en-us/articles/intel-sdm)
[15] R.I.P ROP: CET Internals in Windows 20H1 - (http://windows-internals.com/cet-on-windows)
[16] Inside Windows Page Frame Number (PFN) Part 1 - (https://rayanfam.com/topics/inside-windows-page-frame-number-part1)
[17] Inside Windows Page Frame Number (PFN) Part 2 - (https://rayanfam.com/topics/inside-windows-page-frame-number-part2)
[18] why we can access memory from non paged pool at or above DISPATCH LEVEL - (https://stackoverflow.com/questions/18764211/why-we-can-access-memory-from-non-paged-pool-at-or-above-dispatch-level)
Comments powered by Disqus.